#49 – Kings of the Beach
No crowns required to be kings in this four-player volleyball game.

Very chill setting!
To Beat: Win a tournament
To Complete: Beat the game on the Difficult setting
What I Did: Completed the game
Played: 4/7/17 – 4/13/17
Difficulty: 5/10
My Difficulty: 5/10
Video: Kings of the Beach – Tournament Mode Final Matches
I am not good at sports. I still like to play them when I get the chance even though I wasn’t blessed with any ability. If there’s one game I am at least decent at, it would be sand volleyball. I organized a weekly sand volleyball night with a bunch of friends for several years, and that afforded me the opportunity to practice often. Now don’t let me fool you, I’m still not all that good at volleyball. However, I am pretty good at playing video games. Therefore, it shouldn’t be that much of a stretch for me to complete one of the few NES volleyball games.
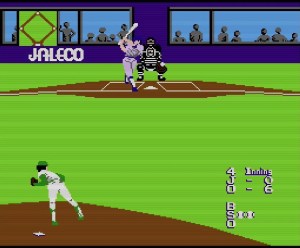
Kings of the Beach is a volleyball game developed and published by Electronic Arts in 1988 on DOS. It was ported to the Commodore 64 in 1989 and the NES in January 1990. Ultra Games published the NES port. However, it is unclear if either Konami or Electronic Arts developed this version of Kings of the Beach. The game was only released in the US.
Kings of the Beach is a two-on-two beach volleyball game. You play as professional beach volleyball players Sinjin Smith and Randy Stoklos. In single-player mode, you only control one character and your partner is computer controlled. The main draw for single player is the Tournament mode. Here you will play against other pairs of players in five different locations all around the world. To win the tournament mode and beat the game, you must win three consecutive matches at each of the five beaches for fifteen total matches.

Interesting cursor choice!
At the start of the game, you move a green cursor around in an overhead map of the beach. This is your menu. The first place you will want to go is the registration tent, which is the game’s options menu. To start, you can assign either a controller or computer control to Smith, Stoklos, and two other competitors. Kings of the Beach supports up to four players simultaneously using the NES Four Score accessory. Next, you can choose between cooperative play or competitive play. This is only needed for a two-player game to decide if you want to play on the same team or not. You can set the difficulty of computer opponents to either Easy, Medium, or Difficult. You can choose if you want to play either a single set or a three-set match, and you can toggle the sound on and off. Choose Exit to Beach to go back to the main menu.
The other menu options are for practice or setting up a game. At the top of the screen there are three beaches labeled Bump, Set, or Spike. If you choose one, you are put in a practice beach where you get easy setups to practice the basic moves. Press Select at any time to exit the training and go back to the menu. At the lower left of the menu is the Match option where you jump directly into an exhibition match with the defined settings. This is the mode you want for a three or four player game. The bottom right part of the menu starts up the Tournament mode. You can select either a new game, or continue a previous game with a password. After that you jump right into the action.
Kings of the Beach plays by standard volleyball rules. Each side has two players and each point starts with a serve from the back of the court. Each side can hit the ball up to three times before hitting it over to the opponent’s court, and teammates must alternate hits. If the ball lands in your opponent’s court, the opponent hits the ball more than three times, or the opponent hits the ball out of bounds, then you win the point. The serving team is the only team that can score, otherwise the non-serving team gains control of the serve if they win the point. In a single set match, the first team to fifteen points wins. In a three-set match, teams play to twelve points per set. In either case, teams must also win by two points. This means play will continue beyond the required winning score until a team leads by two.

Bump, set, spike!
The basic strategy of beach volleyball is to use your three hits to bump the ball, then set the ball, and finally spike the ball. You will use the D-pad to move your player around the court. Quite often you will move on your own to the spot where the ball will land as it’s heading toward you, but sometimes you need to position yourself properly. The ball casts a shadow on the sand that will guide you toward where you want to stand. Press A to bump the ball in the air toward your teammate. To set the ball, press B. To spike the ball, press both A and B. The spike is a powerful jumping hit toward the opponent. You will need to focus on timing for all hits, but spiking the ball requires the best timing. The idea is to run up to the net and jump, meeting the ball with your hands at the top of your jump. For all hits, you can guide it in a direction using the D-pad in conjunction with the hit.
The above moves are mostly offensive moves, but you do have a couple of defensive moves at your disposal. If you know the opponent will spike the ball, you can move up against the net and press A and B together to jump up and attempt a block. Sometimes you can repel the ball right back into the opponent’s court for a quick point. Stoklos has his own signature block called the Kong block, which is very powerful. The other defensive move is called the dig. This happens automatically whenever the ball is just far enough out of reach normally. You will make a dive toward the ball to bump it back up into the air. I didn’t seem to put myself in good positions to do this very often, so in my experience it was left to chance.
Serving the ball effectively is a vital skill. When it’s your turn to serve, you can move up and down the line to put yourself in the position of your choice. There are three different ways to serve the ball. The easiest method is the underhand serve. Simple press A and B together to lob a slow serve at the opposite court. You want to pay attention to the flags that indicate wind direction because an underhand serve may come up short if the wind is blowing in hard. The overhand serve is more powerful. Press A to toss the ball straight up, wait for the ball to come down, and then press B to do a standing, overhand hit. You can use the D-pad to aim the ball while serving. The most powerful serve is the jump serve. Like the spike, it’s the most difficult serve to perform. Press A to toss the ball just before, but this time press A to jump and hit the ball. The more powerful the hit, the more likely the opponent will be unable to return the ball.

With the right timing, the jump serve is the best one.
One neat thing you can do is argue a call with the referee. Every now and then the line judge will make a mistake on a ball that lands near the lines. If you think a bad call went against you, then you can run up next to the judge’s stand and press Start to dispute the call. You will see your player make a scene as persuasively as possible. If you are successful, the referee reverses his call and you get the ball! If the judge disagrees, then he will shake his hand no and hold out a penalty card. This can be either a yellow card or a red card. The yellow card is just a warning, but if you lose a second disputed call in a set the referee will give you a red card instead and you lose a point off your score. Your opponents and even your partner can dispute a call on their own. One key thing is that if you want to dispute a call, you need to decide quickly and get over to the referee right away to plead your case. You lose your opportunity to argue a call if play advances to the next serve.
As stated earlier, to complete Tournament mode you must win fifteen total matches broken up into groups of three. After you win three consecutive matches on the same beach, you get a password for the next beach. The passwords are up to eight characters long and are normal words that are easy to write down or remember. I noticed that the passwords are the same for each beach no matter what difficulty or length of match. For instance, you can win the first round of matches on the Difficult setting with three-set matches, and the next time you play with the password you can select Easy difficulty and single set matches. You can play however you want!
This was my first time playing Kings of the Beach. The game was a later addition to my collection, but it is pretty common and inexpensive so I have had a few copies pass through my hands. I am not a huge fan of sports games even though I enjoy playing a little volleyball. Chances are I would not have given Kings of the Beach much of a chance if not for this project. Chances are I will also say this same thing about many other future games!

Digs are done automatically. This one was successful!
For my playthrough, I decided on playing single set matches on Medium difficulty. I played as the default Smith and let the computer play Stoklos for me. My intent was to learn the game on Medium difficulty and then go back and play the game again on the Difficult setting. At first, Medium difficulty was enough of a challenge. I understood the fundamentals early on, and other than some mistakes with spiking I was already playing well enough to make some progress. My struggles came in the third match of any beach. I could play well enough to win the first two matches, and then I would lose the third and have to start over at the top. That is awfully frustrating. Kings of the Beach became a fight of attrition and required some good old fashioned grinding to seal the win.
It seems like many sports games have some kind of exploit or tactic that makes life much easier. I found one such tactic that helped me win points much more often. The first thing is I needed is the setup to spike the ball myself. Usually this required getting the first hit on the return so that I could get the third hit and spike, but sometimes I would take the spike myself on the second hit instead. It’s a little riskier but it can catch the opponent off guard. My spike position was up against the net either slightly above or below the center. I would spike toward the corner of the net and the closer side line. For example, if I set up below center, I would aim for the lower line near the net, and do the opposite when closer to the top. The opponent tended to favor guarding the larger area so I could sneak it in on the other side close to the line without either player getting to it. That trick does not always work, but it works often enough to be useful.

My partner is disputing a call unsuccessfully.
I beat the entire game on Medium over the course of a few days. Once I accomplished that, I bumped up to the Difficult setting and repeated the final three matches with the last password. If I can beat the last beach on Difficult, then I should be able to beat any other configuration, so I didn’t bother repeating anything else on Difficult. I did not notice any significant changes between Medium and Difficult settings. Perhaps the opponents make fewer mistakes or make powerful serves more often on the higher settings, but I could not tell the difference. With my spiking tactic, I could score more often than not regardless of difficulty. I recorded my video of the final set of matches on Medium difficulty, and then played the final matches again on Difficult unrecorded. The ending is the same on either difficulty.
I would have considered the game more difficult overall if not for the fact that the computer controlled Stoklos handled nearly all the defense for me. Actually, my computer partner played very well in general and handled many situations better than I could have. Most of the time he plays close to the net so he can utilize his powerful Kong block. My job was to back him up and try to get to anything hit past him if I could. We worked together well on the offensive side too. He is a good spiker and serves very well. He’s not a perfect partner and makes mistakes that are unavoidable, but in my opinion he is a more consistent player than I am. It’s a pleasant surprise to have a competent computer player for once!
There are not many volleyball games on the NES to compare, but I think they did well with Kings of the Beach. The game sets itself apart somewhat for having a simultaneous four-player mode. It also performs well as a single player game. The computer controlled players are competent both as opponents and partners. The graphics and music are well done, just as you would expect in a Konami game. The game is a tad lengthy and repetitive, but it’s just the nature of the game so it hard to fault Kings of the Beach for that. If you are looking for an NES volleyball game, you won’t do wrong with Kings of the Beach.

#49 – Kings of the Beach