#46 – Bases Loaded
Better hope you are loaded with free time!

The music is upbeat, at least!
To Beat: Win 80 Games
Played: 1/2/17 – 3/1/17
Difficulty: 2/10
My Difficulty: 2/10
Video: Bases Loaded Final Game and Ending
Bases Loaded is a game that has a reputation for being a very long game, which I can now confirm to be true. I am not the biggest fan of sports video games, so this is exactly the type of game that I wanted to avoid playing if I could. I originally came up with the idea in my Methodology to shuffle undesirable games like this to the end of the list and most likely skip them altogether. I have since had a change of heart and decided that if I really want to beat all the NES games, I shouldn’t make excuses against any game at all. So occasionally I will be pulling a game off the top of my “snub list” and playing that one instead. Bases Loaded is the first game off of that list, and actually it came at a good time because I had been building a large backlog of game posts and needed a long game to help me catch up with writing.
Bases Loaded is known in Japan as Moero!! Pro Yakyuu and was originally an arcade title in Japan only in 1987. It was published and developed by Jaleco. That same year the game was ported to Famicom by the developer Tose, and it was brought to the NES in 1988. A Game Boy port was released in 1990. Bases Loaded had several other installments. In all there are four NES games, three SNES games called Super Bases Loaded, and Bases Loaded ’96: Double Header for the Sega Saturn and Playstation. The original Bases Loaded was also released for Virtual Console on the Wii, 3DS, and Wii U, all in both Japan and North America.
When you start the game you choose from either Pennant mode or Vs. Mode. Pennant mode is the single player game and Vs. Mode is for a two-player game. If you select Pennant mode you are brought immediately to the password screen where you may continue your game. If you leave the password as the default or enter the wrong password, the game assumes you are playing a new season. You get to pick your team from the 12 teams in the league. In two player mode both players will choose their team. From there you go right into a baseball game!

I spent a lot of hours looking at this screen.
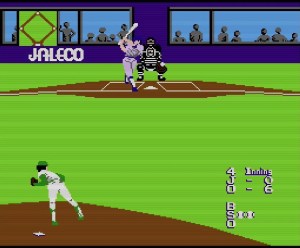
The pitching perspective is similar to how baseball games are shown on TV. You see the pitcher from behind looking toward the batter and catcher at home plate. Before throwing a pitch, you can tap Left or Right on the D-Pad to position the pitcher where you want him on the mound. To throw a pitch you press A while pressing directions on the D-Pad to choose your pitch. You can throw a fastball by holding Up or a breaking ball by holding Down before you throw. You can also hold Left or Right to target one side of the plate if you choose, and you can hold diagonal directions for both pitch type and direction. As the pitcher winds up to throw, you can then hold down any direction on the D-Pad to curve the pitch toward that direction. The breaking pitches are slower in speed than the fastball but have more curve as they approach home plate. The two step process of pitching allows you to throw many different types of pitches. Also, if there is a runner on base, you can press B and the direction of the base before throwing to do a pickoff move to try and get the runner out. Here, Right represents first base, Up represents second base, and Left represents third base. I never used this because I couldn’t figure out the timing for the pickoff.
When a batter puts a ball into play, the perspective shifts to an overhead view. You take control of the fielder that is closest to the ball. Use the D-Pad to move your fielder in any direction. You pick up the ball whenever you come in contact with it, and from there you the throw the ball by holding the D-Pad at the base you want and pressing A. Throws automatically go to first base if no direction is held. Any subsequent defender with the ball can run and throw to bases in the same way. If you don’t press anything at all when the ball is put into play, the fielders will automatically run toward the ball which is a nice touch. They will usually end up catching weak fly balls for you in the outfield. If the ball gets past an outfielder then it is best to take matters into your own hands.
The batting uses the same perspective as the pitching. You press A to swing at the pitch. As you swing you can hold down a direction on the D-Pad to swing toward a specific area. For instance, hold Up to swing high or Down to swing low. You can also swing toward the left or right and also in the middle by not pressing anything. Essentially you have to aim your swing toward the pitch right before the catcher grabs it if you want to make contact. If you want to bunt, press B before the pitcher starts his delivery to go into the bunting stance. When bunting you use the D-Pad to move the bat around to try and bunt it. You can also attempt to steal bases if you have a runner on by pressing B and the direction for the base during the pitcher’s windup.

It’s fun juggling several baserunners when you get a base hit like this.
Baserunning takes place from the overhead view. You press B and a direction to advance that runner ahead a base or press A and a direction to go back toward a base. You can move all the runners by pressing Down and either A to move them back or B to move them ahead. I found this a little confusing so here’s an example to explain how it works. If you have a runner either at first base or between first and second, you use Right on the D-Pad to control that runner. Hold Right and press B to move the runner toward second, or press Right and A to move the runner toward first. I am very used to the R.B.I. Baseball style of A plus direction to retreat to a base and B plus direction to advance to that base, and I never really did get used to the different method here.
You can choose to bring in a new pitcher or a pinch hitter. While pitching or batting, press Start to call timeout and press A to bring up the scoreboard. You can choose a new pitcher or batter by selecting his number on the board and pressing A, or you can change your mind with B. If you bring in a pinch hitter, sometimes you have to make an additional substitution before going back to defense if the new hitter does not play the same position as the player you replaced. Each pinch hitter is assigned either as an infielder, outfielder, or catcher, but you can’t tell which one they are. Also, the game will not allow you to pinch hit for a batter if there are no available players at that position. You have to keep track on your own as you play to figure out which positions your best pinch hitters play.
Each player in the game has a name as well as some basic statistics. Batters have a batting average and home run total displayed on the scoreboard before batting. You can see the ERA of the pitcher chosen as well when brought into the game. The home run numbers tend to mirror well with batter power and the pitchers with lower ERA can have more curve to their pitches, but this isn’t always true. It takes some playing to figure out who is more useful to the team.
When you finish a game you get a password. These are 7 characters long with only uppercase letters, so they are easy to manage. The passwords contain the number of games you have played along with your number of wins and the team you will play next.

Not looking too good for the outfielder.
Bases Loaded is one of the sports games on the system that requires you to play a full season of games to get the ending. The season consists of 132 games but you can end it early if you win 80 games. I believe this is the only way to get the ending, but I am not about to play 132 games just to see what happens.
This was my first and likely only time playing through Bases Loaded. It is a very common cart that shows up all the time and it’s cheap. As of this writing I have somewhere between 8-10 copies of the game because it is that common and that hard to get rid of short of giving them away. I bet that most NES collectors got this game early on.
When I started the game I picked Omaha as my team. There were quite a few teams in this game where there is not a real-life MLB team in the same city, and Omaha stood out to me. That team is not one of the good teams in the game, and so the beginning of my season got off to a rough start. As usual it takes some time to get accustomed to the gameplay. I have played a few baseball games on the NES but none from the behind-the-pitcher perspective. It made pitching and hitting different which meant it took me longer to get the hang of the game. My first few games ended up closer than I thought they would, but I fell short. The fourth game I played was my first win and then I lost the next, starting off the season with a 1-4 record. That’s when I figured out The Exploit.
One thing the game has going for it is that the pitching is consistent. I am used to games where you have control over the ball in-flight, but here the path of the pitch is already determined when it leaves the pitchers hand. I took advantage of this mechanic. There is a certain spot the pitcher can throw the ball where it is always called a strike if the batter doesn’t swing, and the batter will always miss if he does. Once you figure this out, you can consistently throw strikeouts and the batters will never make contact with the ball.
This is the magic spot for infinite strikeouts!
Not every pitcher has the capability of throwing this super pitch, so you have to find one who does. For Omaha, the pitcher I relied on the most was Foot. Strange name for a pitcher, I know. Here is my exact technique. Hold Down and Left and press A to start the pitch, then hold Down and Right before letting go of the ball. This starts the pitch on the left side and fades it over to the bottom right for a strike every single time. Now this doesn’t last for long. Pitchers get tired the longer they are in the game and at that point the pitch is no longer effective. It takes Foot 40 pitches to get tired, meaning he can get me to the 5th inning with one out and one strike if I execute perfectly. The good news is I can take advantage of his tired state to throw another super pitch. This time just hold Down, press A, then hold Right. A left-handed batter will sometimes have this pitch called a ball, so to compensate I have to slide the pitcher over to the left one tiny step before executing the pitch. This works for another 30 pitches which gets me to the 8th inning. Then I change pitchers over to Waters who can throw the same pitch as Foot does when he gets tired. Between the two of them I can cover more than 9 innings without the other team scoring anything. Armed with this knowledge I won the next 79 games in a row to end my season at 80-4.
With the defensive side completely solved by pitching, there’s not much to worry about on offense. My strategy consisted of scoring one run and then making outs as quickly as I can. For the most part, I decided to swing away at every pitch just to put the ball into play. Sometimes I would make an out the normal way, other times I would get a hit and purposefully get thrown out at first or second, and occasionally I would hit a home run. The homers may be counterproductive, but they are fun!
My lineup was not particularly good but they got the job done. Far and away my best hitter was the number four hitter Lyonse. His stats showed 25 home run power but he probably hit 50-60 for me. He would hit the ball hard almost every time he batted. The rest of the lineup power wise was remarkably consistent. Each other player with the exception of the pitcher had 5-10 homers each regardless of their noted totals. I even had the pitcher hit a home run one time, which I couldn’t believe when I saw it!
On that note I had a few other rare moments documented over the course of the season. In one two-game stretch Lyonse hit five straight home runs. In another game, I purposefully stopped myself from scoring to try and hit a walk-off homer in either the 9th inning or extra innings. I went scoreless through 12 innings and then the game suddenly ended in a 0-0 tie but credited me with the win anyway. I couldn’t find that outcome documented anywhere else, so that was a neat tidbit to discover.

I enjoyed running up the score in my final game!
The problem with Bases Loaded is not so much that it demands you play a large number of games, but it’s that the pace of play for each individual game is terribly slow. The pitching in particular is very intentional. The entire pitch from windup to catcher’s mitt is slow. The catcher then slowly throws the ball back to the pitcher to start the next pitch all over again. It takes a long time for the fielding to end when an out is recorded. The scoreboard showing which batter is coming up to the plate is displayed for a long time. There’s no mercy rule like in R.B.I. Baseball so all nine innings need to be played each game. I get that the idea here is to look and feel like a real baseball game, but trying to play through 80 wins with this pace is agonizing especially when the game boils down to simply executing the same plan over and over. When trying to speed through the game like I did it still took 25-30 minutes per game, and that adds up to about 40 hours over the entire season. That’s a lot of time to spend on an old baseball game, but hey, this is what I signed up for when I started this project!
Bases Loaded has a lot of minor glitches too. Sometimes the outfielders will drop routine flyouts. Sometimes an infielder steps out of the way when the ball is thrown at him. Sometimes the defense forgets who is holding the ball and you can circle the bases for a cheap run while the defense does nothing. When a ball is hit to the first baseman, he will run to the bag in a rapid zigzag pattern instead of running straight to the base. One time I saw an umpire standing on top of the crowd past the left field wall. Once I saw two infielders standing on top of each other throwing the ball back and forth instead of toward the intended base. With the long season, it ended up being a breath of fresh air to see some weird things happen like that.
I guess what I’m trying to say here is that there’s really no reason to play Bases Loaded in the single player mode anymore unless you are trying to beat all the games or you are involved in some kind of other larger project. It might be fun for a few games but the whole season is obviously such a drag. The two player mode could still be fun, but I think there are better baseball games on the NES and time is better spent playing them instead.

#46 – Bases Loaded