Take on the NES Library

An 8-bit Extravaganza!

ball

JUN
04
2018
0

#77 – Roundball: 2-on-2 Challenge

The name pretty well sums it up, save the “challenge.”

Another very highly detailed title screen!

To Beat: Win the Tournament (3 rounds)
Played: 3/6/18
Difficulty: 2/10
My Difficulty: 2/10
My Video: Roundball: 2-on-2 Challenge Tournament Longplay

It has been some time since I played a sports game! Roundball 2-on-2 Challenge is the first basketball game covered on this site. I don’t care for most sports video games and the NES is just littered with them. Maybe you like basketball more than I do, and if so you might know the answer to this question. How many NES basketball games are there? I spent five minutes thinking about it and I came up with six games. There are ten basketball games on the console, and I’m surprised I didn’t think of so many of them. I guess we are going to find out which ones are good and which ones are truly forgettable. For now, Roundball may have been a decent introduction to the genre on NES, but let’s reach in and see how it stacks up.

Roundball: 2-on-2 Challenge was developed by Park Place Productions and published by Mindscape. It was released in North America in May 1992 and was also brought to Europe in 1992. It’s an NES exclusive. Park Place Productions was a short-lived company that primarily developed sports games. This was their only NES release. Mindscape, on the other hand, is one of the bigger publishers on the NES with 24 titles. This is their second release that I have beaten for this project.

Roundball is a basketball game played on a half-court. As the title suggests, games are meant to be played two-on-two. You can choose to play one-on-one instead if you want and there are a bunch of customization options for structuring a match the way you want. There is also a roster of 24 fictitious players to choose from, each with his own stats and named after one of the developers. The two main modes are Exhibition and Tournament. To beat the game, you must win the tournament. Rounds of the tournament are the Semi-Finals, Finals, and Championship. You only have to win three total matches to win the tournament.

Look at all the options!

The main menu contains several different options for customization. You will see a box on the left containing the options, and then the box on the right will display the choices for that option. Press Up or Down to scroll through the options. Pick an option and press Right to point to the choices panel. Press Up or Down to select your choice and then press A to lock in it. This moves the cursor back over to the options window and also writes down your selection at the bottom of the screen. When you are done, press Start to advance to player selection.

Here are the options you can pick from. Team Size lets you pick between either a one-on-one or two-on-two game. Players lets you pick from one to four human players. This game supports the NES Four Score for a full four-player game. The Teammates option is for a two-player game only to decide if you want the two players on the same team or on different teams. Mode is for selecting either Exhibition or Tournament modes. Steals lets you decide both your effectiveness at stealing the ball and the opponent’s effectiveness at stealing from you. You can pick from Easy, Normal, or Hard. Time lets you choose how long each quarter of the game is. You can pick from 4, 8, 12, or 16 minute quarters. Outs means who gets the ball after a basket, either the team the made it or the other team. The Control option is for single player only with a two-on-two team size. Primary means on offense you always control the teammate holding the ball. Same Guy means you always control the same player the entire game.

The player selection menu differs if you are playing either Exhibition or Tournament mode. For Exhibition mode, you can pick from any of the 24 players. Highlight the player you want and he will appear on the left side of the screen. You see the player’s portrait and his associated statistics. The first three stats are percentages. 3PT is for three-points shots, FG means field goals, and FT is for free throws. The remaining five stats are all per-game average numbers. RBD are rebounds, STL are steals, BLK are blocks, AST are assists, and PF are personal fouls. The bottom part of the screen shows already chosen players as well as which person is making their selection currently. You may pick a player with A or assume the default player with Start.

Hanson is a great player in this game.

If you chose Tournament mode, first you have to pick if you want to start a new tournament with A or resume a previous tournament with B. If you press B, you go to the password screen. Passwords are only three characters, nice and short. It also seems a little unnecessary since there are only three tournament matches anyway. You can also cancel out of the screen if you don’t have a valid password. Then you proceed to the team selection screen. There are eight preset teams to choose from. You may also highlight an individual player in the menu and view his stats. The same rules for selecting players also apply here.

Before starting a game, you have to shoot for outs. Each team has one player stand behind the three-point line and take a shot. To shoot the ball, hold down A to jump and let go to release the ball. You want to shoot the ball at the top of the jump to get the best chance of scoring. Then the opposing player makes his shot. The player who makes a shot while the other misses gets the ball first. If there are too many ties eventually the computer decides who gets the ball. I didn’t win outs in any of the games I played.

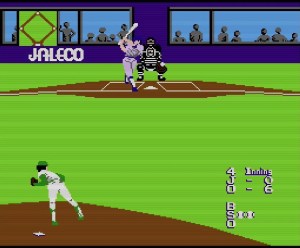
Now the game starts for real. On the gameplay screen, the score for each side is displayed at the top. Standard NBA scoring applies here, so two points are scored on a shot from the field, three points if made beyond the three-point line, and one point for a successful free throw. The bottom of the screen shows the rest of the details. First is the shot clock, which is how many seconds you can maintain possession. Next to that is the time remaining in the period. The period indicator shows which quarter of the game you are playing, and the ball handler is the name of the player currently holding the ball.

I don’t understand why I missed this shot.

There are several things you can do while on offense. Use the D-pad to run around the court. Press A to shoot the ball, just like when shooting for outs. If you are moving near the basket and press A, you’ll do a layup. You will actually perform one of several kinds of dunks or layups automatically just for show. Press the B button to pass the ball to your teammate in a two-on-two game. You can pass the ball while taking a shot if you press B while you are still holding the ball. The Start button pauses the game. When paused you can press Select to toggle the music on and off. There are also pre-set plays you can use during the action by holding Select and pressing a direction on the D-pad. Up clears the forward away from the defender, Right sets up a pick play, Down puts both players under the basket, and Left puts both players in three-point range.

There are fewer actions for playing defense. The most common action is attempting to steal. Rapidly tap the A button when you are near the ball and you might steal it away. If you press the A button and hold it a bit, you will jump and try to block the ball. You can block a shot from the field or underneath the basket. Press the B button to switch control to the other defender. You can also try and rebound the ball if the opponent misses a shot. When you get the ball back, you aren’t allowed to score until you first take the ball past the top of the key. If you fail to do this and try and shoot anyway, the game yells at you to “take it back!” It’s considered time out until you take the ball out.

The referee may call fouls in this game and a player will go to the line to shoot free throws. This takes place from the perspective of behind the backboard. There will be a white cursor that jiggles around near the basket and you want to press A to shoot when the cursor is over the basket. After free throws are completed, play resumes as normal.

The free throw perspective is quite nice.

At the end of each quarter, a detailed stats screen is displayed. It shows stats for every player both for the last quarter and the full game thus far. You’ll see number of field goals made, number of steals, number of rebounds, and so on. It’s a nice touch, but it’s a little bit of information overload and the stats don’t persist after the game is over.

This was my first time playing Roundball. I don’t even remember trying it. Maybe I didn’t make it through the menu. It’s not a rare game, but it’s not one I see around often. I’m pretty sure I bought my copy from a nearby game store. It sells for around $8 to $10 now, which sounds about right for this kind of game.

Just like I did with my last game, The Rocketeer, I tried this one out very early in the morning and went ahead and beat it later that night. I started by playing an exhibition match with the default settings, and I ended up winning by something like 90 points. I imagined I wouldn’t have too much trouble with the tournament, and I was right. I did notice that the competition got better in the later rounds of the tournament, but I was never close to losing any of the three rounds. I won 180-82, 195-116, and 177-134 and got the simple ending screen I wanted.

Rinse and repeat.

I don’t think that Roundball is necessarily an easy game, but it sure is exploitable. The first thing I decided was that I wanted to find the player with the best three-point shooting. I also wanted a player good at stealing. This is because it’s one of the few defensive moves you can do and there’s even a setting controlling stealing success, which leads me to believe it’s one of the more important features in the game. The best players between those two stats are Hanson and Lyndon. In the tournament, you can’t have them on the same team, so I went with the team Hanson and Belanger, a solid player in his own right. On offense, I only shot threes. On defense, I tried stealing every chance I got and tried to rebound any missed shots. That strategy alone gave me comfortable wins in each match. It makes me wonder if the other basketball games have similar strategies, at least offensively.

The rest of the game isn’t all that thrilling. It’s a slow-paced game, especially the timer. When it says four-minute quarters, that’s a reasonably accurate time in the real world. When playing it feels even longer. I can’t imagine sitting through sixteen-minute quarters, so I didn’t. I’m confident I would have been successful no matter how long the games took. The other things slow are layups. Each opponent almost exclusively did layups and I had to wait for him to take his time making each shot. Fouls slowed the game down too, but that’s part of the game and they didn’t happen too often anyway. Aside from the timer, my other major issue was defense. When stealing didn’t work, my opponent could drive to the basket and there was nothing I could do about it besides sit back and watch. Roundball has its problems, but I can look past them because I had little trouble beating it.

For my first basketball game, I think I did okay with Roundball. A four-player basketball game makes sense with managing NES sprite limitations, and four player games are few and far between on the NES anyway. The graphics aren’t too bad, and the voice samples are very clear to hear. I got tired of hearing “take it back!” all the time though. The music is decent but unmemorable. The game controls fine, except for maybe having to hold down A to block. Most importantly, the game was easy to beat with a sensible approach that was simple to pull off. That’s the kind of game I can get behind for this project. I wouldn’t recommend playing it otherwise. I’m willing to bet I will play some better NES basketball games before this is all said and done.

#77 – Roundball: 2-on-2 Challenge

 
APR
24
2018
0

#73 – Q*bert

Our hero teaches you to swear early and often!

Boring screen, but the next one tells you the rules at least.

To Beat: Finish Level 9 Round 4
Played: 2/1/18 – 2/18/18
Difficulty:10/10
My Difficulty:10/10
My Video: Q*bert Longplay

If you’re like me, your eyes got wide seeing another 10/10 difficulty rating appear. Indeed, Q*bert on NES is one of those games that doesn’t come up often. We have already seen a previous arcade port, the infamous Ikari Warriors, receive the only prior 10/10 rating. Ikari Warriors was a different case because it is a much more expansive game on NES than in the arcade. NES Q*bert on the other hand is close to the arcade experience. I think it’s neat to see how two arcade ports on NES go in different directions but still retain a very high level of difficulty compared with other NES games. Beating Q*bert is something you can feel proud of if you are one of the few that can conquer it.

Q*bert started as an arcade game that was both developed and published by Gottlieb in 1982. Jeff Lee is credited with both designing the character Q*bert as well as the initial ideas of gameplay. Warren Davis stepped in later as a programmer and further contributed to the game. David Theil was the audio engineer, and his trouble in finding enough time to properly add clear voices to the game led to the idea of having the sound synthesizer read random data, producing gibberish that composes Q*bert’s somewhat iconic swearing noises. The development team also included a pinball device inside the arcade cabinet that slams into the side of it whenever Q*bert falls off the board. Another risky idea was turning the game joystick 45 degrees for diagonal-only movement. All of the above pieces combined to make Q*bert a success for Gottlieb, so the game was widely ported to many home consoles and computers throughout 1983 and 1984.

Q*bert on NES was released in February 1989. It was developed and published by Ultra Games, the alternate publishing label of Konami. It wasn’t released on the Famicom nor outside of the US. This version is closely aligned to the original arcade game, but some later titles expanded on the idea. A unique sequel, Q*bert’s Qubes, was released in arcades in 1984. It is a more complex game and wasn’t as widely distributed. Q*bert on MSX was released in 1986. This version doesn’t feature Q*bert at all, but does include 50 different stage layouts. The Game Boy port of Q*bert in 1992 goes back to starring the original character while also introducing new stage layouts. Q*bert 3 on SNES in 1992 also has different levels. Q*bert also had different versions on Windows, mobile, and other platforms more recently.

Most of what you need to know is evident from the start.

Q*bert is a single screen action game with puzzle elements. You play as Q*bert on a triangular pyramid of cubes. It holds seven rows of cubes containing 28 total cubes. You hop along the top faces of these cubes changing the color of any one you step on. To complete each level, you must switch all the tiles to a specified target color while avoiding other enemies that try to get in your way or disrupt your progress. There are nine levels of four rounds each, so you have to complete 36 pyramids to beat the game.

The controls are simple and can even be customized, which is great because by nature of the game Q*bert’s hops are always diagonal. On the title screen, first select one or two players. Multiplayer is alternating play so this might as well be a single player game. The first thing you get to see is the control customization screen. It includes a demonstration of Q*bert hopping so you can see clearly which direction you are setting, and there is also an image of the NES controller. First you choose what direction on the D-pad you want to press to make Q*bert jump up and right, then down and right, down and left, and finally up and left. The initial setting is Up on the D-pad to move Q*bert up and right. You can press A to lock that in or press B to turn 45 degrees clockwise. You can keep pressing B to pivot this selection around to any direction you want. If you want inverted controls or something really bizarre, you can do it. After you make selections for all four directions, you must press A one more time to confirm. If you press B instead, then you have to re-enter all four directions again from the start. My recommendation is setting the default controls by mashing the A button right away. This locks controls to the main cardinal directions of the D-pad, so visually if you were to turn the controller 45 degrees clockwise the D-pad perfectly aligns with Q*bert’s movement on screen. The other common control scheme is locking in all diagonal D-pad inputs, but I didn’t bother with this because pressing diagonals isn’t always precise enough.

When you are playing the game, just use the D-pad. Press the direction you set to hop in the desired direction. Q*bert’s jumps are always deliberate and take time to finish. You may tap the direction you want to move when you are standing still. If you hold a direction while Q*bert is in mid jump, he will go ahead and jump in that direction after he lands. This acts as an input buffer so you can hold the direction you next intend to go early and Q*bert will transition as quickly as possible. Finally, the Start button pauses the game if you need a break in the action.

Q*bert’s biggest fan helps out with control customization.

There are several enemies that stand in your color changing ways. The rule of thumb is you can safely come in contact with green enemies, but any other color enemy kills you when touched. The one enemy that appears in every stage is Coily. He first appears as a purple ball falling from the sky and landing in the second row. He hops randomly downward until he reaches the bottom row and comes alive as a snake. Now he will follow you around in hot pursuit. The only safe way to deal with Coily is to use disks that can appear on either the left or right side of the pyramid. Q*bert is allowed to jump completely off the pyramid to his death if you aren’t careful, in which case you lose a life and he respawns on the topmost tile, just as he starts every level. Hop off the pyramid onto one of those disks, and it will carry Q*bert to the top of the pyramid. During this transport, if Coily was close enough to you he will also jump off the pyramid, and as a bonus this also removes all enemies from play, plus you get 500 points. You may only use a disk once and there are only a handful per level.

Ugg and Wrong Way are two similar enemies that have a strange movement pattern. Unlike other enemies, they appear from the bottom of the screen and hop on the sides of the cubes instead of on the top. Wrong Way begins on the bottom left and will either jump up or right. Ugg begins on the bottom right and only jumps up or left. Maybe it’s the opposite, I don’t know. Either way, when they reach the side of the pyramid, they jump completely off and go away. Because they don’t land on the top tiles, it takes a while to completely understand how to safely move around them.

The remaining enemies all move like Coily’s purple ball and they all jump off the bottom of the board. However, each one has other characteristics. Red balls are called Whammy Balls. They are simple, common enemies that hurt when you collide with them. The remaining enemies are green and can be touched safely. The green ball is a powerup. Grab the green ball to both freeze all enemies on screen and make Q*bert invincible. This lasts for several seconds which is perfect for flipping a bunch of tiles the way you want them. You also get 100 points from the green ball. The final two enemies are Sam and Slick. I can’t tell the two of them apart mid-game, but Slick wears sunglasses and Sam doesn’t. Like Q*bert, they change tile colors every step they take, and so they have a bad habit of undoing all your hard work. You can take them out of play if you grab them and you get 300 points for your efforts. I believe Sam advances each square one color ahead and Slick always turns tiles one of the non-target colors. Maybe their characteristics are level dependent and not character dependent. Either way, these are very annoying non-lethal enemies.

Early levels already have a lot going on.

Other than the enemies, there are some other ways to earn points. Flipping a tile earns you 30 points. You also get a bonus after each round. Any remaining disks give you 50 points, and then you earn the main round bonus. This begins at 1000 points for completing Level 1-1, and it steps up an additional 250 points for subsequent rounds. Around Level 5-1 it stops at 5000 points per round but then goes up to 6000 points for Level 8 and 8000 points for each round in the final level. Points let you earn extra lives. You get your first extra life at 6000 points, and then you get another one for every 12,000 points after that.

The main objective is coloring tiles, and this gradually gets more complex. Each level begins with a demonstration of how colors change when Q*bert hops on tiles. Levels can feature up to three colors which I’ll call Colors A, B, and C. The colors themselves vary just for aesthetic reasons. All levels begin with all Color A tiles, and the target color is B for two-color levels and C for three-color levels. Level 1 just has two colors with only A flipping to B. Color B is locked in for the round unless Sam or Slick get involved. Essentially, step on every tile once. Level 2 goes to three colors, with A flipping to B, B flipping to C, and C stays locked. Just step on every tile twice. Level 3 is only two colors, however, A goes to B and B goes back to A. Uh-oh. The puzzle element shows up here, but it’s gets better with experience. Level 4 goes A to B, B to C, and C to B. It’s more hopping, but eventually boils down to the same as Level 3. Level 5 and onward is just nasty, and I bet you can already guess where this is going. Here, A flips to B, B flips to C, and C flips back to A. This is the last pattern, but you have to suffer through 20 rounds of this if you are set on beating NES Q*bert. Each subsequent level gets faster too.

Now it all starts to come together why Q*bert is one of the hardest games to beat on the NES. The game does provide a bit of extra assistance. Each game of Q*bert begins with four additional lives. You can continue when you run out of lives, but only three times. The extra credits help tremendously, but this is still a steep mountain to climb.

I always like these stages with the black cube sides.

I had a little previous experience with Q*bert. I believe I mentioned this in my Snow Brothers review, but I originally played that game at a babysitter’s house long ago as a rental. The other rented game that day was Q*bert, and I remember getting as far as Level 3. I sought it out specifically when I got back into game collecting. I ended up buying a nice, clean copy with manual on eBay for $6 shipped. This is a silly reason, but I wanted to get it early on because one of my collection milestones was collecting all NES games that start with each letter of the alphabet. Q is the easiest to finish since it’s only Q*bert and Qix, at least for licensed NES. I do like the game though, so I was happy to own it. Nowadays a cart copy costs around $8-$10, same as it did around 2014 when I bought my own.

I’ve done a lot of research into the NES library and I already know several games that project to be among the most difficult. Q*bert was absolutely on my radar as a Top 10 candidate. Because of this, I kept track of my attempts including milestones anytime I reached a new stage for the first time. I was looser with this than my Ikari Warriors tracking, so I neglected to note exactly which attempts reached which stages. I also didn’t keep track of how many hours I spent playing. The stats I did collect are interesting enough. I beat Q*bert on my 67th attempt over 18 days of playing. I’d say I reset early on maybe a dozen or more attempts, especially toward the end of my grind when I knew I needed to play well early to have a better shot at the end. Later attempts took as long as 45 minutes, and earlier attempts were at least 20-30 minutes long. I’m pretty comfortable guessing that I played 30 hours of Q*bert before I won.

The road getting there was pretty long, despite what I consider a condensed timeframe. I started out very strong, reaching Level 5 on my first day playing. This is no small feat. The first two levels are challenging to start, but straightforward. Level 3 is the first big step up where you have to contend with pathfinding and Sam and Slick really hindering progress. It gets a little worse in Level 4, but Level 5 is where the gloves truly come off. I think it was huge for me to do well enough reaching Level 5 so early in the process. Who knows how long I would have spent playing Q*bert if I struggled earlier, like I’m sure many players do. But that’s where things stalled out for quite some time. I reached Level 6 on my third day and then got stuck for a few days. I was getting angry about losing in those later levels, and solving them more felt like I was lucky than I was skilled. After the first week of attempts, I had something of a breakthrough, reaching 8-4 in one of those magical runs. Following that were three days of heavy playing over the weekend where I didn’t come all that close. My Level 5+ technique was gradually coming together, and by the next weekend I was routinely reaching Levels 7 and 8, and even Level 9. Finally it all came together and I beat Q*bert!

Getting the jump on the green ball is huge.

My winning run was an attempt that I nearly threw away. I was gauging attempts based on how many lives I had entering 5-1. I had gotten there a couple of times with ten lives, but usually I had six to eight lives. This time I broke even and only had the starting four. I decided to try anyway and things were really clicking for me, at least until Level 8. From 5-3 on, both the disk layout and Sam’s tile flipping behavior are always the same. Later levels do speed up, but aside from that there’s no reason why Level 8 would be unique in its difficulty. Anyway, that’s where things looked bleak. I used all three continues here: One in 8-1, another in 8-2, and my last in 8-4. I wanted to at least get to Level 9, but I ended up playing very well and beat 9-4 with several lives to spare. I didn’t have any notes for 9-4 but I didn’t need them. It was a huge relief to mark Q*bert off the list!

The best advice I can give for beating Q*bert is this: The enemy movements are random, but the order in which enemies appear is fixed for each level. Armed with this knowledge, it is possible to map out exactly when certain enemies appear, especially the green ball. I had a few notes for the first three levels that I didn’t really use, but from Level 4 on I wrote down about when I expected the ball to show up. My strategy for those levels was to start clearing out the lower left corner, particularly the three corner tiles. Wait there for Coily to approach you and then take the disk in that corner. Repeat that step for the other corner. After that, try and work the board from the bottom on up. If you can stop Sam, by all means do it, but it’s not absolutely critical. Occasionally, Sam will hug one side of the board and mess up the corner, so when that happens I fix that as soon as possible. My notes indicated about how many times I could bait Coily off the edge with a disk before the green ball appears. I had to improvise somewhat since Coily can end up too far away from where I’m waiting, but for the most part I made it work. The green ball often follows a Whammy Ball in the sequencing, so I tried using that sometimes as a visual cue.

One super annoying thing from Level 5 on is that sometimes the board gets caught in an unwinnable state temporarily. This happens when all squares are the target color except the one you are standing on, which is one hop away. There are a few things that you can do to fix it. What I like to do is massage that final square up to the very top of the pyramid. This is generally a safe tile aside from Coily and, in rare cases, Ugg and Wrong Way. If Coily isn’t an eminent threat, wait here for Sam or Slick to show up. When he does, immediately land on his square before he gets away. His landing shuffles the corner enough so that you can finish it. You can also use a disk to flip the top tile and fix it, but this has to be one of the disks in an odd-numbered row for it to work. Finally, if you can work the final square to one of the tiles adjacent to the topmost tile, simply jump off the board. This method costs you a life, so keep that in mind. Q*bert respawns on the top tile but doesn’t shuffle it, so then you can hop directly to the last square and clear the board.

Even in the final levels, the same tricks apply.

There’s one last tidbit I have on NES Q*bert. After you beat the game and view the ending sequence, you start all over at Level 1. Q*bert gets even harder during the second loop, if you can believe that. The speed overall is increased, and if I’m not mistaken, the speed can fluctuate mid-level. If that’s not true, it sure seemed that way while I was playing. That adds a little extra unpredictability to a game that does not need to be any more complicated. Considering this is a Konami game, many of their games that repeat have three distinct difficulty loops. It would not surprise me if Q*bert also does this, although good luck finding out. I captured video of my winning run, and when it looped I decided to play it through to the end, reaching 5-1 on the second loop before biting the dust. I’m really happy I have video proof of this achievement to share.

I’m going to address the difficulty here, because I know I’m going to be asked about it. Q*bert is the second game I’ve given a 10/10 rating. Out of the entire NES licensed set, I expect to hand this out to around 20 games. Q*bert is deserving of the 10/10, no doubt in my mind. This should be reserved for the cream of the crop, the ones that take an extraordinary amount of effort to beat. The question I’m sure I’ll be asked is “How does Q*bert compare to Ikari Warriors?” That answer is crystal clear. Ikari Warriors is much, much harder than Q*bert. Within the timeframe it took me to beat Q*bert, I had not yet beat the first level in Ikari Warriors. I think it’s okay to have two games far apart in difficulty within this space, and I don’t want to get into half-ratings or anything like that. What I will do is rank the 10/10’s relative to each other as I beat new ones. This will be a glacially slow list to compile, but I think this is something people want to know. Maybe it will be worth the wait.

Q*bert is a game that, despite its rage-inducing difficulty, I had a good time with. Action games with puzzle elements are right up my alley. Now this is not a flashy game. The visuals are basic, but colorful aside from the plain black background. The soundtrack is almost non-existent. The developers opted for having sound effects as the main audio driver instead, but it is pretty helpful to have audio cues for enemies when your eyes are busy keeping Q*bert alive elsewhere. Considering this is based on an early arcade title, this is all to be expected. The controls are great, both responsive and accurate, within the limitation of Q*bert’s deliberately designed movement, at least. Q*bert is a well-designed game and the NES version hits all the right notes. It’s a fun game to pick up and play, and if that’s all you want out of it, you will have some fun. Beating it, however, is grueling and unforgiving. That will have you swearing more than Q*bert does.

#73 – Q*bert

 
MAR
09
2018
0

#68 – Super Team Games

Great, another exhausting Power Pad game!

Some balloons burst to get you started.

To Beat: Win all four events in single player
To Complete: Win all events on the highest difficulty
What I Did: Beat all events on the lowest difficulty
Played: 12/21/17 – 12/28/17
Difficulty: 7/10
My Difficulty: 7/10
Video: Super Team Games – All Events

Another Power Pad game already? I just finished World Class Track Meet not even a week before this. There are only a handful of Power Pad games that reached the NES, and it is just dumb luck that we get two such games almost back to back. This may have been a good thing here since my Power Pad muscle memory from the previous game carried over to this one. I needed that because Super Team Games is significantly more challenging than World Class Track Meet.

Super Team Games was developed by Sonata (who would later become Human Entertainment) for release in Japan in November 1987. It was originally published by Bandai, and it was the seventh game in their Family Trainer series. Nintendo published the NES release in November 1988, branded as a Power Pad game. It did not include any Family Trainer or Family Fun Fitness branding, just like World Class Track Meet. This was the final game of the Famicom’s Family Trainer series to reach North America.

Super Team Games is a running race game where you compete in different types of events and try to beat your opponent. There are several smaller events that are arranged into larger obstacle courses. There are several different modes for single player, two players, and two teams of players. Since multiplayer modes are competitions against each other, only the single player modes count for beating Super Team Games. There are four different obstacle courses in single player mode, and when you win all of them you have won the game.

You gotta start jumping pretty early.

This Power Pad game uses Side B, which contains blue buttons on the left and red buttons on the right, all individually numbered from 1 to 12. In single player, we are only concerned with the blue buttons. The top row buttons are 1 and 2, the middle row buttons are 5 and 6, and the bottom row buttons are 9 and 10. Multiplayer games use the red buttons, so just add two to each button number to get the same mappings for the second player.

The menu controls are the same as World Class Track Meet. On the title screen, press Select to move the cursor and press Start to go to name entry. In the tournament mode, you first select how many teams you want between three and six. Use the D-Pad to move the cursor at the bottom and press Select to lock in your choice. You then move to name entry which is identical for all modes. The blinking cursor at the top part of the screen determines which character in the name you want to choose, and you move that cursor by pressing B to move it left and A to move it right. Use the D-Pad to move the letter selection cursor at the bottom part of the screen. Press Select to write the selected character in the name field. When all names have been entered, press Start to begin.

Now you move to the event screen. There are flags displayed with the names of all the events. Press Select to choose the event and press Start. In 1 Player and 2 Player modes, the events are Super Obstacle Course, Obstacle Course A, Obstacle Course B, and Skateboard Race. The 2 Team Play and Tournament mode events are 6 Legged Race, Tug of War, and Relay Race. More on these modes later. The next screen is the versus screen showing who is competing in the race. If you are playing Tournament mode, you will see a screen in between showing the bracket setup. In single player, the versus screen lets you decide which computer character you want to race against. Press Select to choose from either Ollie, Jimmy, or Jack, and press Start to go to the race. Ollie is easy mode, Jimmy is medium difficulty, and Jack is the fastest.

What lovely flags!

The gameplay screen has the same structure in all events. The left runner, designed as the White team, is displayed on the top part of the screen and the right runner, or Red team, is below. At the bottom of the screen is a minimap that shows how far each player or team has reached in the current race. You also see times for each runner. This timer freezes briefly during checkpoints so you get a better glimpse of how you are doing as you compete. To begin the race, all active participants must be standing on the Power Pad in their designated spots. For single player, stand on 5 and 6. A whistle is blown and soon the referee fires the starting gun.

Let’s look at each of the events first. Then I will explain how they combine into the different courses.

The Log Hop is exactly how it sounds; you run and jump over stationary logs. This introduces the standard controls that apply to many events in the game. Run on 5 and 6 in the middle row to move forward. Take a step back and run on 9 and 10 to back up a little bit if you need to. You can run right up to the log and then jump in the air so that your character jumps as well. The logs are medium height so they aren’t too tough to jump over. You can even land on top of the log and run right off.

No, you can’t run around the ball.

The Belly Bump Ball has the same controls as the Log Hop. Here a giant beach ball is in the middle of the track and you have to bump it forward by running into it. The faster you run into it, the farther down the track it goes. Ideally you want to get into a good rhythm of bouncing it far ahead and then running fast to knock the ball ahead again. If you come at it slow, the ball won’t go very far and then you don’t have the distance necessary to build up speed unless you take a few steps back and give yourself some running room.

Water Cross is similar to the Log Hop. There are pools of water on the track that you want to jump completely over if you can. Run up to the edge and jump to hopefully get across. More than likely you will fall into the water. You can swim by running on 5 and 6, but you will cross very slowly and use up a lot of time.

In the Crab Walk, I guess you wear a crab outfit? It’s weird. You want to put your left foot on the 1 and your right foot on the 9 and then run in place to inch ahead. It’s different than the other events since your feet are much further apart. I could move forward but really couldn’t get the hang of this one like I should have.

The Wall Jump is exactly like the Log Hop. The walls are thin and much taller than the logs. You really need to jump high to get to the top of the wall. Not only that, but there are two different heights of walls just to make things more exhausting.

This is a very sturdy bubble.

In Bubble Run, you first approach an air pump and must blow up your bubble. Hit 1 and 2 in the first row to inflate your balloon. The manual says to hit the buttons with your hands, which makes sense since you are working an air pump. You can run on it if you want, but my legs needed a break! Once the bubble is filled, then run on 5 and 6 and take the bubble to the end.

These are all the basic events that combine to form the larger events that you choose from the menu before play. In the Super Obstacle Course, you run all six of the above events in that exact order. In Obstacle Course A, you do the Log Hop, Water Cross, and Wall Jump, and in Obstacle Course B you do the Belly Bump Ball, Crab Walk, and Bubble Run. The Relay Race in the team play modes is the same as the Super Obstacle Course. Instead of running the whole thing alone, you pass the baton and substitute team members after each pair of events.

That’s not all! There are also three other unique special events:

The Skateboard Race is for one or two players. In this mode you don’t have to run, which is quite the relief! Your front foot position will either be on the 5 or 6, and your back foot position is either 9 or 10. First, stand on 5 and 6 to start with the whistle blow, then put your front foot on 5 and your back foot on 9. I like to face right while on the mat. This will position you in the top row in your course. Move your front foot to the 6 and then move your back foot to the 10 to move your character to the bottom row in the course. You can switch positions one step at a time to slide your skateboarder. You may rhythmically step between positions to slalom and that lets you move faster down the course. You also need to sidestep to dodge obstacles on the course. Some obstacles block both lanes and you must jump to get past them. If it sounds complicated, I’m sure you will get it once you finish the course once or twice.

Try to weave around the obstacles.

The 6 Legged Race is a team event only. You need six players for this event! Each team of three stands back to back on the respective spaces on the Power Pad so that there is a foot on every button. Each team must take left and right steps together as if their feet are tied together. If someone is out of step the racers will fall over and make it harder for the team to continue to walk. There’s no feasible way for me to play this event, but I bet it would be hilarious!

The Tug of War is another team event that can be done with either two, four, or six players against each other. Within a team, the first player stands on 5 and 6, the second player stands on 1 and 2, and the third player stands on 9 and 10. The other team takes the respective positions on the right side of the Power Pad. When the firing gun starts, everyone runs as fast as they can. Whichever side has pulled more of the rope after 30 seconds wins the Tug of War.

I’ve never been a Power Pad player, so this was my first time playing through Super Team Games. All of the Power Pad games tend to teeter between common and uncommon, but they are neither difficult nor expensive to track down if you really want them. Well, aside from Stadium Events that is. I got my original copy in a lot on eBay early on when I had made my big push to collect the other half of the NES licensed set. I remember seeing it and getting pretty excited since I had never seen the game before and thought it might have been worth something. I quickly found out that it was cheap because no one wants it. I’ve had a few different copies come through my possession.

This was a really bad jump attempt.

Super Team Games is a significant step up in difficulty from World Class Track Meet. Naturally, I learned this the hard way. My first time playing I picked the Super Obstacle Course against the fastest computer runner Jack. He completely blew me away. He completed the entire course in under three minutes while I hadn’t even reached the halfway point yet. I had to stop and step away in the middle of the race for a little while to catch my breath. I kept at it just to get through it, but I never did finish the race. After 10 minutes have elapsed, the race just ends. I was at the very end of the course with the finish line in sight when this happened. So annoying. I’m calling it impossible for me to beat this on the hardest difficulty and immediately accepted the idea of beating it on Easy and stopping there.

I moved on to the Skateboard Race next which is the easiest mode and much less strenuous. It still took me two attempts to beat easy difficulty Ollie. The first attempt was learning the course and the controls, and then the second try was enough to win the race. I then switched over to trying Obstacle Course A and managed to win that race too. The only problem is I forgot to hit the record button on my PC. That really upset me and I knew I wouldn’t be happy unless I completed it again. I was completely spent from playing this game to the point where I had to rest for a couple of days before trying again.

I finished all of the modes over the next three play sessions. The Super Obstacle Course took me two tries to win against Ollie. He finishes the race in around six minutes. I was about twenty seconds behind the first try and then I won by more than that the next try. It also took me two tries to beat the Obstacle Course A again. The first try I quit part way because I was too far behind and exhausted from winning the Super Obstacle Course just before. The next try I won the race by just barely passing Ollie on the final stretch. That was way too close for comfort. Obstacle Course B is quite a bit easier than the other two obstacle courses, but I think that took a couple of tries as well. I used the Skateboard Race as a warm up exercise and finished it a couple more times for good measure. I learned from my mistakes and recorded everything the way I wanted.

That’s how close I was to losing Obstacle Course A.

I think Super Team Games requires more consistency and better form than World Class Track Meet. You can be successful by stepping on the Power Pad as quickly as possible, since that’s more or less what I did. However, it does seem that you are rewarded for having proper form in your steps and jumps. I will caution that I cannot be entirely sure about this. The manual tells you what to do, but not how to do it well. It’s not really feasible for me to test any hypotheses either because I can only play a little bit at a time before wearing out. My theories will have to do. I was able to do a really long jump a few times and I never understood how it happened. I’m sure it has to do with the timing of my jump while running with some speed, maybe even by jumping off of one foot and landing on the other. I also noticed that I accelerated sometimes while jogging for some distance. There does seem to be some momentum inherent in the game physics as long as you keep going without slowing down too much or missing any steps on the buttons. Again, these are just theories. I assume there has to be some kind of technique that I didn’t understand that could help me perform at a higher level.

I do have a few observations about racing Ollie that might be helpful if you want to play this game single player. I found that I was about on par with Ollie in all events but two. Ollie does the Crab Walk well, but does the Belly Bump Ball terribly. I have no idea what the secret is to crab walking and I always lost ground during that event. The Belly Bump Ball is best way to take a big lead. Ollie gets no momentum at all and only pushes the ball a short distance while never backing up to get a better shot at it. If you run fast, pause briefly just after you bump the ball, and repeat, you should clear the event quickly. This was the key for me completing the Super Obstacle Course and Obstacle Course B, leaving only Obstacle Course A without an easy exploit. The sad thing is that the game manual tries to make you feel bad for even coming close in a match with Ollie. From the manual: “Ollie: A push over. Shame on you if you lose!” Let me tell you, there is no shame in losing to Ollie. This really is a tough game.

Super Team Games is not fun to play in my opinion, but it is a competent title. The graphics are simple and clean. The music, while not notable, is decent. The controls work well once you learn how to navigate the menu. There is a wide variety of events, especially when you include many players. The real fun of Super Team Games lies in playing this game with someone else. Racing against another player or coordinating large groups for team events are the kind of activities that form memories and build bonds, even in the heart of strenuous competition. Super Team Games is also a good exercise tool for Power Pad owners, so long as you take it easy and don’t worry about trying to outrun the computer players. Trying to beat the game in single player mode is too tedious and exhausting to be fun, and I missed out on everything in the other modes that would have made it enjoyable. I think the best part of Super Team Games was the feeling of relief to check it off the list and move on to the next game.

#68 – Super Team Games (Super Obstacle Course)

#68 – Super Team Games (Obstacle Course A)

#68 – Super Team Games (Obstacle Course B)

#68 – Super Team Games (Skateboard Race)

 
DEC
27
2017
0

#61 – Section Z

Even if I never found the real Section Z, this early NES title is an intriguing blend of genres.

Plain screen with good music!

To Beat: Reach the Ending
Played: 10/10/17 – 10/16/17
Difficulty: 5/10
My Difficulty: 5/10
Video: Section Z Longplay

I never realized just how many NES games are arcade conversions until I started this deep dive into the library. Here we have another one with Section Z. This conversion differentiates itself from many other ports by significantly altering the style of the game from the arcade to the NES. The changes in the NES game make Section Z more suitable for home play as opposed to a quarter-munching arcade experience. Reading impressions from other players around the web gives me the consensus that the NES version is the better game. Let’s take a closer look to see if these changes make Section Z on NES fun to play.

Section Z began as an arcade title released in December 1985. It was both developed and published by Capcom. The game was first ported to the Famicom Disk System in Japan in May 1987. This version of Section Z is also developed and published by Capcom. The NES port was released shortly thereafter in July 1987 in North America. Europe had to wait until September 1989 before Section Z on NES was released there. Many years later, the arcade version was re-released in a few different Capcom arcade game compilations, so you can play it on PS2, PS3, PSP, Xbox, or Xbox 360.

Section Z is a side scrolling shoot-em-up. You play the role of Captain Commando and you are tasked with entering the enemy base of Balangool. The mission is to destroy L-Brain, who is located in Section Z of the enemy base. Defeat L-Brain and escape Balangool to beat the game. It’s a shell of a story and premise, but it’s all you really need.

Fly in there and fight!

In the arcade game, you automatically enter the base and begin at Section A. Your character looks like an astronaut with a gun. He can move in all directions but can only fire directly left or right. You use the joystick to move around and you have two action buttons, one to fire your gun and the other to turn around and face the other way. Therefore, you can face one way while moving in another direction. You also drop bombs anytime you fire your gun. Play progresses linearly from Section A alphabetically to Section Z. You find upgrades to increase both your speed and the strength of your gun up to three times each. Every five sections or so you fight a boss, and after that the game scrolls in a different direction for the next set of sections.

The NES version changes things up by having a completely different level structure. For starters, the sections are numbered, meaning there is no Section Z at all in the game! The sections themselves are arranged in a giant maze that you explore via branching paths. The game begins with the approach to the base in what the game calls Section 00. Play scrolls to the right in this and every other section in the game. After this short action sequence, you descend directly into Section 01 for more shoot-em-up action. At the end of this section, you are presented with a pair of teleporters and you decide which way to go. Most sections in the game have these branches at the end, and you don’t know where you’ll end up until you pick one for yourself. Each section is numbered to help you map your way through the maze. Furthermore, the whole base is logically broken down into three areas, each its own self-contained maze.

The controls are almost like the arcade game. You can move your character in all eight directions with the D-pad. Instead of having dedicated fire and turn buttons, pressing B fires to the left and pressing A fires to the right. This is much more intuitive control. You do not drop bombs when you shoot like you do in the arcade version. If you press both A and B together, you will generate special weapons. Start pauses the game, and Select uses a powerup.

It only looks like a standard shooter at first.

The top of the screen displays your score, the current section number, your current energy, maximum energy, and the powerup selection. Section Z utilizes energy in a few different ways, but mostly it acts as your health. You begin the game with 20 energy. Each time you get hit by an enemy bullet, you lose one point of energy. The game is very forgiving when it comes to bullet damage. Also, you may freely touch walls with no issue, and even your character stands on the ground if you land. You die if you get crushed by the screen scrolling, run out of energy, or make direct contact with an enemy. You lose a life and five energy points, but you get to resume at the start of the current section. You get three lives in Section Z, but they are immaterial. At Game Over, you are given the option to continue your game or restart from the very beginning. The only loss from continuing is your score goes back to zero, and Section Z has infinite continues anyway. Dying with no energy remaining is the steepest punishment, sending you all the way back to the start of the current area with 20 energy.

Enemies will occasionally drop powerups when defeated. Regular enemies can drop one of two powerups. One restores three energy points, and the other labeled with the letter S increases your speed. There’s no indication to confirm, but I believe you can increase your speed twice. The weapon powerups come from a specific enemy called a Metal Eater. This looks a metal blob attached to the wall. When defeated, it drops one of three powerups: The Flash Buster, the Megasmasher, and the Barrier Shield.

On the top-right of the screen, you may see up to four letters that indicate which powerups are available. L is for the default laser, and F, M, and B represent the three weapon powerups. Collecting the weapon displays the letter on the status bar and you can arm yourself with whichever one you want at any time. You move the special weapon selector arrow during play by pressing Right on the D-pad, and then press Select to use it. The controls are really bad for equipping weapons on the fly, and you can’t pause the game and select a weapon which seems like an oversight to me. As it is, your best bet is to equip weapons at the end of a section prior to hopping in the teleporter.

Thank you Metal Eater for the gift you will soon give me!

Here’s what the powerup weapons do. The Flash Buster gives you a three-way spread shot, but the bullets themselves are short range. Also, firing another round of shots removes any bullets still on screen. The Megasmasher replaces your normal shot with a large V-shaped bullet. The barrier shield sits in front of you and can absorb 32 bullets before being depleted. You can also get a combination of both the Flash Buster and the Megasmasher, but it’s a bit complicated to acquire. It just seems to happen when you keep grabbing powerups as you play. This is how I believe it works. You must have one of the two base weapons in use, as well as have both weapons in reserve, and then grab a powerup of the other weapon. The combo weapon has the spread and range of the Flash Buster with the bullet type of the Megasmasher. It doesn’t have an official name, but I’ve seen it called the Megabuster in two separate FAQs, so that name seems appropriate to me!

Sometimes the sections have hidden rooms. You have to fire at specific locations to reveal a white warp portal, then fly into it to be taken to the hidden room. There are several kinds of special rooms. You may find a warp room which presents you with two more exits to different sections. An energy refill room looks like the warp room except the teleporters restore some energy. The metal eater room is for finding weapon drops. Finally, you may find permanent upgrades for two additional special weapons in the game. Each of these special weapons is called a Special Transmissions Shell, or STS.

The STS is the special weapon you activate by pressing A and B simultaneously. Pressing the buttons together will display the STS temporarily in the middle of the screen and you must collect it if you want to use it. Collect it first, then press one of the fire buttons to deploy it. Grabbing the STS costs four energy points, so keep that in mind. There are three types of STS. The default one you start with is a Megamissile, which fires a heavy, straight shot. Next is the Flash Bomb which damages all enemies on screen. The last is the Crash Ball that orbits your character for a few seconds and damages everything it touches. You can cycle through available STS by revealing and ignoring the ones you don’t want. I found myself not bothering with STS because of the energy cost and the cumbersome method of equipping them.

Make sure the path you want is unlocked first.

Sometimes at the end of a section, one of the teleporters is a red beam of light instead of the normal white beam. Touching the red beam instantly kills you, so obviously avoid them! There is a generator somewhere in the maze that you destroy to replace the red beam with a normal one so that you can pass. You have to seek out the section that contains the generator and then blow it up. Generators act like a mini-boss battle and halt the screen scrolling when you approach one. They are stationary but fire both aimed shots and tracker bullets that follow you around the screen. With enough firepower, you will destroy the generator, leaving behind an energy capsule that increases your maximum energy when acquired. Backtrack to the previous section with the red teleporter, and if you destroyed the correct generator you will see it transition from red to white and you may now take this new path forward.

The end of each of the three main areas ends in a boss battle. You are awarded with another energy upgrade when you defeat a boss. Exiting this section brings you to a major checkpoint. Here you get a small cutscene which awards you bonus points as well as displays your maximum energy and all STS you have acquired. Unless you turn the game off or reset, you won’t have to go back and replay major areas completed.

Section Z was a game that I rented once as a kid. We had two rental places in my town right across the street from each other, Gentry’s TV and Video and Main Street Video. Gentry’s had moved to the next town over and not long after that Circus Video opened a few blocks further away. I mostly remembered Circus Video for their SNES and N64 games later, but early on they had NES games and I only remember renting just a few of them, including Section Z. I have vague memories of the game, but I know I didn’t understand the game at all and was left unimpressed. It wasn’t until just a few years ago that I discovered Section Z was both a shooter and a maze exploration game. This is really suited to my tastes in gaming, and now I can give the game its proper understanding and appreciation. I was very excited about giving Section Z a try with this fresh perspective.

The boss fights are pretty neat, but they do have issues.

My approach before even starting the game was to map out all the paths. Rather than draw an actual map, I drew up a table that connects each exit in a section to its corresponding section. I made sure to revisit each section and take each exit to make sure I didn’t miss any connections. The idea was that I would completely map out the game and take my time exploring, and then go back and figure out the most straightforward way through the game to complete it efficiently on my final attempt. The sections themselves are short and most are not too challenging. The main problem I had was that I ended up going the right way accidentally and couldn’t go back to trace alternate paths. My only options were either to continue on or to run out of energy intentionally to get sent back. I beat the game twice before I felt I had the game sufficiently mapped out, having all primary branches accounted for and only missing a few optional secret areas.

With my completed chart in hand, I traced my complete route and set up to record my final run. I’m really pleased with how my longplay video turned out. I don’t think it’s obvious from watching the video that I was moving through the maze based on just my notes. I beat Section Z without taking any wrong turns and I even beat it without dying. It’s one of the cleanest runs I’ve captured thus far.

My biggest complaint about the game is that the hitboxes for the bosses are incredibly small. You have to be lined up just right to do damage. This is made more difficult in several ways. It is much more difficult to get the necessary pixel precision with both speed upgrades. Missed shots bounce off bosses to neat effect, but it’s detrimental because you must wait for those repelled shots to vanish before you can fire more. The three-way shot makes this even harder. Also, the hitbox is off-center from what you would expect, so you often miss when it appears you are making direct hits. Switching up weapons while dodging enemies or bosses is very cumbersome, and I often chose the wrong weapon by mistake in those situations.

Sometimes the action can get a little hectic.

Section Z has a reputation for being a difficult game, but I would give it an average difficulty rating. Infinite continues, the energy system, and mild setbacks from death ease the difficulty considerably. Keep a map or a table like I did to streamline exploration. Most of the sections are brief and progress from section to section is consistent. Don’t worry too much about avoiding bullets and focus on avoiding enemy collisions. The boss battles are the most difficult part of the game, and much of the difficulty can be mitigated by stockpiling energy and winning through attrition.

Section Z is a neat mixture of shooter and maze exploration that kept my enjoyment throughout my playthrough. I was right that this would be a fun game for me. However, as an early NES game, it suffers from several issues. The boss fights are problematic as I already mentioned. There are graphical glitches that appear visibly in between screens. Sprite flicker is not handled properly, and in some spots the enemies at the end of a long row are completely invisible. These are not exactly minor issues, but Section Z is better in other aspects. The graphics are good for its time, and the music is catchy in almost all instances. There is just a tiny bit of slowdown, but the game performs well even with many enemies and bullets on screen. The boss battles have clever concepts and would be a highlight of the game with a little tweaking.

It’s hard to say if I would recommend playing Section Z today. The NES got a better shoot-em-up and exploration hybrid in The Guardian Legend just under a year later. I can’t decide which aspect I like more: The gameplay or the act of mapping out everything. I do like that Capcom tried something different with the game instead of a more direct arcade port, and the glimpses of quality here paved the way for Capcom’s later NES efforts. What you will get out of the game depends on both your personal taste and acceptance of common quality issues found within early NES games. If any of this sounds appealing to you, I think you should at least try Section Z.

#61 – Section Z

 
OCT
02
2017
0

#53 – American Gladiators

You can sort of get the experience with this lovely home version!

A contestant runs around the copyright page before the title.

To Beat: Reach the Ending
Played: 6/26/17 – 7/2/17
Difficulty: 6/10
My Difficulty: 6/10
Video: American Gladiators Playthrough

It wasn’t too long ago that I wrote about Rollergames, and today we have another game based on a 90’s TV show that is right out of the same mold. They were both live-action shows that ran on TV at the same time. Both shows received an NES game to piggyback off the hype. Also, although American Gladiators on NES does a little better in this regard, both NES games deviate somewhat from the source material.

American Gladiators is a US TV show that aired in syndication from 1989 to 1996. It pits two men and also two women against each other in several events culminating in a final obstacle course called the Eliminator. All the events involved the Gladiators, who are recurring athletes that have their own roles in the events to prevent the contestants from scoring. The show eventually featured many different events that came and went through the run of the show, and each episode consisted of different combinations of events. Later, there was a remake of American Gladiators that ran for two seasons, both in 2008.

I’m genuinely disturbed by the concept of lives here.

American Gladiators on NES was released in October 1991 only in the US. It was published by Gametek and developed by Incredible Technologies. This game resembles the show but does not follow its format. There is a different American Gladiators game that is much more faithful to the show. That version was developed by Imagitec Design Inc and also published by Gametek on the Sega Genesis, DOS, and Amiga in 1992. The SNES port was released in 1993.

Similar to the TV show, in the NES game you have to compete in five different events which are modified versions of specific games that appeared on the show. You have to clear all five events within so many “lives.” The events are Joust, The Wall, Human Cannonball, Powerball, and Assault. Once you clear all five events, the game advances to the next level where you get a more challenging set of these same five events. In all, you must clear four different difficulty levels of five events each before moving on to the final event, the Eliminator. If you can clear the Eliminator, then you win the game.

Let’s look at each event. First I will explain how the event is played on the show, and then I will describe how it was converted to the NES game.

Stick and move.

In Joust, a contestant and a gladiator attempt to knock each other off a raised platform with pugel sticks. In the NES version of Joust, you square off against four gladiators one at a time instead of just the single battle featured in the show. During a face-off, you can move around a bit on the platform by tapping Left or Right on the D-Pad. Press A to thrust your pugel stick at the gladiator. You can press B to thrust too but this will also inch you a step toward the gladiator. Just pressing A or B does a middle thrust, and you can also do a high thrust by holding Up or a low thrust by holding Down when you strike. You can also block by holding Left and pressing either A or B. You exchange blows with the gladiator until you knock him off the platform. Then the event briefly switches to a platformer as you must move forward jumping from platform to platform to engage the next gladiator. After you win the third fight, a super pugel stick will fly into play. If you grab it your stick will light up, then if you can land a first strike on the gladiator you will knock him off instantly. If you get hit first then you lose the super pugel stick, so make it count! If you get knocked off or fall off at any time, you lose a life.

Tap it out while making quick decisions.

In The Wall, two contestants race up a climbing wall. After a few seconds, the Gladiators will pursue the contestants attempting to pull them off the wall, preventing them from reaching the top and scoring points. In the NES event, your goal is also to climb to the top of the wall, but this time there are several gladiators that appear at various locations along the wall that you must avoid. The controls for this event are tricky and unlike anything else I’ve ever played. The idea is that the B button moves your left hand and the A button moves your right hand. You combine this button press with a direction to move that hand in all eight directions. There are handholds covering most of the wall and as long as you have at least one hand on one you will stay on the wall. The consequence of this control scheme is that you need to tap buttons quickly to move fast. For instance, to move straight up, you must rapidly alternate between pressing A and B while holding Up. It takes practice to get the hang of it. You can find a glove on the wall that lets you move very fast with just the D-Pad instead of having to tap out A and B, but it only lasts for a few seconds. Each of the four levels is a completely different layout on the wall, and you need to have mastered the control scheme to clear the last wall. If you lose the grip on both hands, or you come in contact with one of the gladiators, then you fall down and lose a life. Plus, you have to start at the very bottom of The Wall.

He doesn’t stand a chance.

The Human Cannonball event begins with a gladiator standing on a small elevated platform holding a foam pad for protection. The contestants swing on a rope from their own platform and try to knock the gladiator down to score points. The NES event requires you to jump from your platform, grab the swinging rope, and then let go at the right time to knock the gladiator down. Like Joust, there is a series of four gladiators that you knock down to finish the event. Both the starting platform and the gladiator’s platform move up and down, making the timing more difficult. At the start, you can walk left or right a bit on the platform, and then press A to jump toward the rope. If you grab onto it, then you automatically swing back and forth and you must press A again to let go and launch yourself. In some levels, during the third gladiator a glove will fly into play, and if you grab it you can move up and down the rope. Normally where you first grab the rope is where you stay until you jump off. The glove comes in handy on the fourth gladiator because there can be a trophy at the top of the rope that gives you an extra life. In this event, it is very easy to lose lives. You can fall off the platform, miss the jump to the rope, miss the gladiator on the launch, or hit the gladiator when he is blocking.

Always score in the center when it is clear.

In Powerball, there are bins filled with balls on both ends of the playfield, and there are five empty pods guarded by three gladiators. Both contestants play simultaneously by taking a ball and putting it into the pods, if they can get by the gladiators to do so. The players must cross to the opposite end before grabbing a new ball, and the object is to score as many points as possible within a time limit. The NES version of Powerball is mostly faithful to the original event. You grab a ball at either end of the playfield with either A or B. Then you have to run around the gladiators and place the ball into the pod by standing next to it and pressing the button. Just like on the show you must cross to the opposite side to grab a new ball. The difference in the NES game is that you are only allowed to put one ball in each pod. If you score on all five pods, you are awarded an extra life as well as free up all the pods so you can continue scoring anew. If a gladiator touches you, he always knocks the ball out of your hand and you have to go get a new one. This is the only event where you don’t lose a life. Just score as much as you can before the timer runs out!

Weird gladiator scrolling, but a fun game mode at least.

The Assault features a gladiator manning a tennis ball cannon, and there is a target on the wall behind him. The contestants run through the playfield dodging the fired tennis balls and reaching the safe spots. Each safe spot has a weapon used to hit the target. The contestant wins if they hit the target or reach the end of the course before time runs out, and they lose if the gladiator hits them with a tennis ball. The NES version of the game plays a bit differently. The gladiator moves back and forth at the top of the screen with the cannon no matter where you are in the course. You scroll the playfield upward and seek out weapons near a safe spot. Neither you nor the gladiator can shoot through barriers on the field. Grab a weapon by standing on the weapon icon and pressing B, then press A to launch a shot upward. Each icon gives you three shots. The gladiator will fall if you shoot him enough times, and you lose a life if he hits you three times. Alternatively, you clear the event if you reach the top of the course before time runs out. This is the only event that you can lose if the timer expires.

Platforming with random projectiles!

Once you clear all 20 events, then you begin the Eliminator. This is a long, slowly scrolling platforming level essentially. You start out by hopping between balance beams with the A button and advancing to the right. During the event, medicine balls will spray out from the bottom of the screen randomly. If they hit you then you fall, but you can save yourself by pressing Down to duck in time and shield yourself from the hit. Be careful when jumping as you can’t block hits. Eventually you come to the hand bike. Press Left or Right to move along the rail and dodge the balls. Past the hand bike are conveyor belts, and then after that is another hand bike section. Finally, the balls go away and you take a series of zip lines to the end of the course. You must time your jump off each zip line to grab the next one. If you get all the way to the end, congratulations!

Finally, here is some miscellany about American Gladiators. Across all events, there is a scoring system in place. You typically earn points by either getting past a gladiator or redeeming each second left on the timer at the end of the event. Once you clear a level of five events, you get 100 points as well as an extra life for the next level. You can also earn a continue by clearing either Level 1 or 2. When you lose all your lives, you get a password, provided you have already cleared Level 1. The password is eight characters long and the only characters are A and B. You enter the password by pressing the corresponding button, which is super convenient. There are only three passwords, one for each level from two to four. Lastly, the game features a two-player mode, but it is alternating play so it isn’t that useful.

This was my first time playing American Gladiators. I have owned the game since childhood and probably got it from a yard sale. It only took one try playing it to discover I wasn’t all that interested in the gameplay. I’m not sure why that was because I enjoyed watching the TV show on cable whenever I saw it was on, and I played NES often as a kid. I’m glad I’m doing this completion project because it gives me the motivation to play through games such as American Gladiators that I’ve owned for over half my life.

This guy is super tough for some reason.

It took me three or four days over a week to solve American Gladiators. Initially I found Powerball to be the easiest event because I always filled up the pods, only to find out later that it truly is the easiest one since you cannot lose regardless. Assault was the next easiest game for me because I am good at dodging, although that was tested during the final level. The Wall tends to be difficult for people due to the weird, exhausting controls, but I took to it quite well. Joust was the event that gave me so much trouble until I figured out how it worked. Human Cannonball to my surprise ended up being the most difficult event as the later levels had me almost pulling my hair out.

Once I got all those games figured out, it was time for the Eliminator. This event was challenging, but it was even harder to learn because I could only use what lives I had remaining after clearing all the Level 4 events. The best shot I had at the Eliminator came from playing the game from the start and accumulating as many lives as possible along the way. I had a few runs that I almost completed before recording anything, and once I sat down to record I ended up completing the game for the first time. I even beat it without continues. I had close to ten lives starting the Eliminator but I used nearly all of them up to beat it.

You really need to master the controls to solve this one.

Here are some pointers for a few of the events that tripped me up in the game. Spoilers apply here, so if you want to try the game yourself and keep your experience pure, now is the time to look away! As I mentioned earlier, Joust was my first major hang up. That was because I was playing it wrong. The opponents also strike with low, medium, and high thrusts, and you can counter each one. You counter a low strike with a medium one, a medium strike with a high one, and a high strike with a low one. The gladiators also strike in a pattern that loops, so once you see it you can predict and counter every hit. If you are fast and don’t know the pattern, you can also counter by observing his strike and attacking quickly. Moving on to the Human Cannonball event, there are a few gladiators that seem impossible to knock down because they always block you. The only way I figured out how to get past them is to swing on the rope back and forth a few times before launching yourself. In other words, if they block on your first swing, try knocking them down on your second swing. You can stay on the rope for as long as you like once you grab on. I won’t tell you which gladiators or how many swings you need to wait. If you need to know, you can see my strategy in the longplay video. Finally, a couple of basic tips for The Wall. Make sure to spend some time in a clear space learning how to move in all directions. Take it slow. This becomes very important in later levels where each incremental movement is critical. Also, it is best to set the controller in your lap and use your pointer and middle fingers to tap out the A and B buttons. The game manual recommends this since you can move around on The Wall much quicker and with less fatigue in your hand.

I’ll say that American Gladiators is an interesting NES game, but I don’t know that I would recommend playing it. It’s a novelty to see how they adapted the show into an NES game, but it’s not quite reminiscent of the show enough to invoke the nostalgia factor. The music is fine, but nothing special, and notably the iconic theme song is not in this game at all. If it is, then it wasn’t recognizable enough for me to notice it. The graphics are decent and every important element is clearly defined. It’s a mish-mash of a game. I had fun with it, but of course I always say that.

#53 – American Gladiators

 
AUG
10
2017
0

#49 – Kings of the Beach

No crowns required to be kings in this four-player volleyball game.

Very chill setting!

To Beat: Win a tournament
To Complete: Beat the game on the Difficult setting
What I Did: Completed the game
Played: 4/7/17 – 4/13/17
Difficulty: 5/10
My Difficulty: 5/10
Video: Kings of the Beach – Tournament Mode Final Matches

I am not good at sports. I still like to play them when I get the chance even though I wasn’t blessed with any ability. If there’s one game I am at least decent at, it would be sand volleyball. I organized a weekly sand volleyball night with a bunch of friends for several years, and that afforded me the opportunity to practice often. Now don’t let me fool you, I’m still not all that good at volleyball. However, I am pretty good at playing video games. Therefore, it shouldn’t be that much of a stretch for me to complete one of the few NES volleyball games.

Kings of the Beach is a volleyball game developed and published by Electronic Arts in 1988 on DOS. It was ported to the Commodore 64 in 1989 and the NES in January 1990. Ultra Games published the NES port. However, it is unclear if either Konami or Electronic Arts developed this version of Kings of the Beach. The game was only released in the US.

Kings of the Beach is a two-on-two beach volleyball game. You play as professional beach volleyball players Sinjin Smith and Randy Stoklos. In single-player mode, you only control one character and your partner is computer controlled. The main draw for single player is the Tournament mode. Here you will play against other pairs of players in five different locations all around the world. To win the tournament mode and beat the game, you must win three consecutive matches at each of the five beaches for fifteen total matches.

Interesting cursor choice!

At the start of the game, you move a green cursor around in an overhead map of the beach. This is your menu. The first place you will want to go is the registration tent, which is the game’s options menu. To start, you can assign either a controller or computer control to Smith, Stoklos, and two other competitors. Kings of the Beach supports up to four players simultaneously using the NES Four Score accessory. Next, you can choose between cooperative play or competitive play. This is only needed for a two-player game to decide if you want to play on the same team or not. You can set the difficulty of computer opponents to either Easy, Medium, or Difficult. You can choose if you want to play either a single set or a three-set match, and you can toggle the sound on and off. Choose Exit to Beach to go back to the main menu.

The other menu options are for practice or setting up a game. At the top of the screen there are three beaches labeled Bump, Set, or Spike. If you choose one, you are put in a practice beach where you get easy setups to practice the basic moves. Press Select at any time to exit the training and go back to the menu. At the lower left of the menu is the Match option where you jump directly into an exhibition match with the defined settings. This is the mode you want for a three or four player game. The bottom right part of the menu starts up the Tournament mode. You can select either a new game, or continue a previous game with a password. After that you jump right into the action.

Kings of the Beach plays by standard volleyball rules. Each side has two players and each point starts with a serve from the back of the court. Each side can hit the ball up to three times before hitting it over to the opponent’s court, and teammates must alternate hits. If the ball lands in your opponent’s court, the opponent hits the ball more than three times, or the opponent hits the ball out of bounds, then you win the point. The serving team is the only team that can score, otherwise the non-serving team gains control of the serve if they win the point. In a single set match, the first team to fifteen points wins. In a three-set match, teams play to twelve points per set. In either case, teams must also win by two points. This means play will continue beyond the required winning score until a team leads by two.

Bump, set, spike!

The basic strategy of beach volleyball is to use your three hits to bump the ball, then set the ball, and finally spike the ball. You will use the D-pad to move your player around the court. Quite often you will move on your own to the spot where the ball will land as it’s heading toward you, but sometimes you need to position yourself properly. The ball casts a shadow on the sand that will guide you toward where you want to stand. Press A to bump the ball in the air toward your teammate. To set the ball, press B. To spike the ball, press both A and B. The spike is a powerful jumping hit toward the opponent. You will need to focus on timing for all hits, but spiking the ball requires the best timing. The idea is to run up to the net and jump, meeting the ball with your hands at the top of your jump. For all hits, you can guide it in a direction using the D-pad in conjunction with the hit.

The above moves are mostly offensive moves, but you do have a couple of defensive moves at your disposal. If you know the opponent will spike the ball, you can move up against the net and press A and B together to jump up and attempt a block. Sometimes you can repel the ball right back into the opponent’s court for a quick point. Stoklos has his own signature block called the Kong block, which is very powerful. The other defensive move is called the dig. This happens automatically whenever the ball is just far enough out of reach normally. You will make a dive toward the ball to bump it back up into the air. I didn’t seem to put myself in good positions to do this very often, so in my experience it was left to chance.

Serving the ball effectively is a vital skill. When it’s your turn to serve, you can move up and down the line to put yourself in the position of your choice. There are three different ways to serve the ball. The easiest method is the underhand serve. Simple press A and B together to lob a slow serve at the opposite court. You want to pay attention to the flags that indicate wind direction because an underhand serve may come up short if the wind is blowing in hard. The overhand serve is more powerful. Press A to toss the ball straight up, wait for the ball to come down, and then press B to do a standing, overhand hit. You can use the D-pad to aim the ball while serving. The most powerful serve is the jump serve. Like the spike, it’s the most difficult serve to perform. Press A to toss the ball just before, but this time press A to jump and hit the ball. The more powerful the hit, the more likely the opponent will be unable to return the ball.

With the right timing, the jump serve is the best one.

One neat thing you can do is argue a call with the referee. Every now and then the line judge will make a mistake on a ball that lands near the lines. If you think a bad call went against you, then you can run up next to the judge’s stand and press Start to dispute the call. You will see your player make a scene as persuasively as possible. If you are successful, the referee reverses his call and you get the ball! If the judge disagrees, then he will shake his hand no and hold out a penalty card. This can be either a yellow card or a red card. The yellow card is just a warning, but if you lose a second disputed call in a set the referee will give you a red card instead and you lose a point off your score. Your opponents and even your partner can dispute a call on their own. One key thing is that if you want to dispute a call, you need to decide quickly and get over to the referee right away to plead your case. You lose your opportunity to argue a call if play advances to the next serve.

As stated earlier, to complete Tournament mode you must win fifteen total matches broken up into groups of three. After you win three consecutive matches on the same beach, you get a password for the next beach. The passwords are up to eight characters long and are normal words that are easy to write down or remember. I noticed that the passwords are the same for each beach no matter what difficulty or length of match. For instance, you can win the first round of matches on the Difficult setting with three-set matches, and the next time you play with the password you can select Easy difficulty and single set matches. You can play however you want!

This was my first time playing Kings of the Beach. The game was a later addition to my collection, but it is pretty common and inexpensive so I have had a few copies pass through my hands. I am not a huge fan of sports games even though I enjoy playing a little volleyball. Chances are I would not have given Kings of the Beach much of a chance if not for this project. Chances are I will also say this same thing about many other future games!

Digs are done automatically. This one was successful!

For my playthrough, I decided on playing single set matches on Medium difficulty. I played as the default Smith and let the computer play Stoklos for me. My intent was to learn the game on Medium difficulty and then go back and play the game again on the Difficult setting. At first, Medium difficulty was enough of a challenge. I understood the fundamentals early on, and other than some mistakes with spiking I was already playing well enough to make some progress. My struggles came in the third match of any beach. I could play well enough to win the first two matches, and then I would lose the third and have to start over at the top. That is awfully frustrating. Kings of the Beach became a fight of attrition and required some good old fashioned grinding to seal the win.

It seems like many sports games have some kind of exploit or tactic that makes life much easier. I found one such tactic that helped me win points much more often. The first thing is I needed is the setup to spike the ball myself. Usually this required getting the first hit on the return so that I could get the third hit and spike, but sometimes I would take the spike myself on the second hit instead. It’s a little riskier but it can catch the opponent off guard. My spike position was up against the net either slightly above or below the center. I would spike toward the corner of the net and the closer side line. For example, if I set up below center, I would aim for the lower line near the net, and do the opposite when closer to the top. The opponent tended to favor guarding the larger area so I could sneak it in on the other side close to the line without either player getting to it. That trick does not always work, but it works often enough to be useful.

My partner is disputing a call unsuccessfully.

I beat the entire game on Medium over the course of a few days. Once I accomplished that, I bumped up to the Difficult setting and repeated the final three matches with the last password. If I can beat the last beach on Difficult, then I should be able to beat any other configuration, so I didn’t bother repeating anything else on Difficult. I did not notice any significant changes between Medium and Difficult settings. Perhaps the opponents make fewer mistakes or make powerful serves more often on the higher settings, but I could not tell the difference. With my spiking tactic, I could score more often than not regardless of difficulty. I recorded my video of the final set of matches on Medium difficulty, and then played the final matches again on Difficult unrecorded. The ending is the same on either difficulty.

I would have considered the game more difficult overall if not for the fact that the computer controlled Stoklos handled nearly all the defense for me. Actually, my computer partner played very well in general and handled many situations better than I could have. Most of the time he plays close to the net so he can utilize his powerful Kong block. My job was to back him up and try to get to anything hit past him if I could. We worked together well on the offensive side too. He is a good spiker and serves very well. He’s not a perfect partner and makes mistakes that are unavoidable, but in my opinion he is a more consistent player than I am. It’s a pleasant surprise to have a competent computer player for once!

There are not many volleyball games on the NES to compare, but I think they did well with Kings of the Beach. The game sets itself apart somewhat for having a simultaneous four-player mode. It also performs well as a single player game. The computer controlled players are competent both as opponents and partners. The graphics and music are well done, just as you would expect in a Konami game. The game is a tad lengthy and repetitive, but it’s just the nature of the game so it hard to fault Kings of the Beach for that. If you are looking for an NES volleyball game, you won’t do wrong with Kings of the Beach.

#49 – Kings of the Beach

 
JUL
11
2017
0

#46 – Bases Loaded

Better hope you are loaded with free time!

The music is upbeat, at least!

To Beat: Win 80 Games
Played: 1/2/17 – 3/1/17
Difficulty: 2/10
My Difficulty: 2/10
Video: Bases Loaded Final Game and Ending

Bases Loaded is a game that has a reputation for being a very long game, which I can now confirm to be true. I am not the biggest fan of sports video games, so this is exactly the type of game that I wanted to avoid playing if I could. I originally came up with the idea in my Methodology to shuffle undesirable games like this to the end of the list and most likely skip them altogether. I have since had a change of heart and decided that if I really want to beat all the NES games, I shouldn’t make excuses against any game at all. So occasionally I will be pulling a game off the top of my “snub list” and playing that one instead. Bases Loaded is the first game off of that list, and actually it came at a good time because I had been building a large backlog of game posts and needed a long game to help me catch up with writing.

Bases Loaded is known in Japan as Moero!! Pro Yakyuu and was originally an arcade title in Japan only in 1987. It was published and developed by Jaleco. That same year the game was ported to Famicom by the developer Tose, and it was brought to the NES in 1988. A Game Boy port was released in 1990. Bases Loaded had several other installments. In all there are four NES games, three SNES games called Super Bases Loaded, and Bases Loaded ’96: Double Header for the Sega Saturn and Playstation. The original Bases Loaded was also released for Virtual Console on the Wii, 3DS, and Wii U, all in both Japan and North America.

When you start the game you choose from either Pennant mode or Vs. Mode. Pennant mode is the single player game and Vs. Mode is for a two-player game. If you select Pennant mode you are brought immediately to the password screen where you may continue your game. If you leave the password as the default or enter the wrong password, the game assumes you are playing a new season. You get to pick your team from the 12 teams in the league. In two player mode both players will choose their team. From there you go right into a baseball game!

I spent a lot of hours looking at this screen.

The pitching perspective is similar to how baseball games are shown on TV. You see the pitcher from behind looking toward the batter and catcher at home plate. Before throwing a pitch, you can tap Left or Right on the D-Pad to position the pitcher where you want him on the mound. To throw a pitch you press A while pressing directions on the D-Pad to choose your pitch. You can throw a fastball by holding Up or a breaking ball by holding Down before you throw. You can also hold Left or Right to target one side of the plate if you choose, and you can hold diagonal directions for both pitch type and direction. As the pitcher winds up to throw, you can then hold down any direction on the D-Pad to curve the pitch toward that direction. The breaking pitches are slower in speed than the fastball but have more curve as they approach home plate. The two step process of pitching allows you to throw many different types of pitches. Also, if there is a runner on base, you can press B and the direction of the base before throwing to do a pickoff move to try and get the runner out. Here, Right represents first base, Up represents second base, and Left represents third base. I never used this because I couldn’t figure out the timing for the pickoff.

When a batter puts a ball into play, the perspective shifts to an overhead view. You take control of the fielder that is closest to the ball. Use the D-Pad to move your fielder in any direction. You pick up the ball whenever you come in contact with it, and from there you the throw the ball by holding the D-Pad at the base you want and pressing A. Throws automatically go to first base if no direction is held. Any subsequent defender with the ball can run and throw to bases in the same way. If you don’t press anything at all when the ball is put into play, the fielders will automatically run toward the ball which is a nice touch. They will usually end up catching weak fly balls for you in the outfield. If the ball gets past an outfielder then it is best to take matters into your own hands.

The batting uses the same perspective as the pitching. You press A to swing at the pitch. As you swing you can hold down a direction on the D-Pad to swing toward a specific area. For instance, hold Up to swing high or Down to swing low. You can also swing toward the left or right and also in the middle by not pressing anything. Essentially you have to aim your swing toward the pitch right before the catcher grabs it if you want to make contact. If you want to bunt, press B before the pitcher starts his delivery to go into the bunting stance. When bunting you use the D-Pad to move the bat around to try and bunt it. You can also attempt to steal bases if you have a runner on by pressing B and the direction for the base during the pitcher’s windup.

It’s fun juggling several baserunners when you get a base hit like this.

Baserunning takes place from the overhead view. You press B and a direction to advance that runner ahead a base or press A and a direction to go back toward a base. You can move all the runners by pressing Down and either A to move them back or B to move them ahead. I found this a little confusing so here’s an example to explain how it works. If you have a runner either at first base or between first and second, you use Right on the D-Pad to control that runner. Hold Right and press B to move the runner toward second, or press Right and A to move the runner toward first. I am very used to the R.B.I. Baseball style of A plus direction to retreat to a base and B plus direction to advance to that base, and I never really did get used to the different method here.

You can choose to bring in a new pitcher or a pinch hitter. While pitching or batting, press Start to call timeout and press A to bring up the scoreboard. You can choose a new pitcher or batter by selecting his number on the board and pressing A, or you can change your mind with B. If you bring in a pinch hitter, sometimes you have to make an additional substitution before going back to defense if the new hitter does not play the same position as the player you replaced. Each pinch hitter is assigned either as an infielder, outfielder, or catcher, but you can’t tell which one they are. Also, the game will not allow you to pinch hit for a batter if there are no available players at that position. You have to keep track on your own as you play to figure out which positions your best pinch hitters play.

Each player in the game has a name as well as some basic statistics. Batters have a batting average and home run total displayed on the scoreboard before batting. You can see the ERA of the pitcher chosen as well when brought into the game. The home run numbers tend to mirror well with batter power and the pitchers with lower ERA can have more curve to their pitches, but this isn’t always true. It takes some playing to figure out who is more useful to the team.

When you finish a game you get a password. These are 7 characters long with only uppercase letters, so they are easy to manage. The passwords contain the number of games you have played along with your number of wins and the team you will play next.

Not looking too good for the outfielder.

Bases Loaded is one of the sports games on the system that requires you to play a full season of games to get the ending. The season consists of 132 games but you can end it early if you win 80 games. I believe this is the only way to get the ending, but I am not about to play 132 games just to see what happens.

This was my first and likely only time playing through Bases Loaded. It is a very common cart that shows up all the time and it’s cheap. As of this writing I have somewhere between 8-10 copies of the game because it is that common and that hard to get rid of short of giving them away. I bet that most NES collectors got this game early on.

When I started the game I picked Omaha as my team. There were quite a few teams in this game where there is not a real-life MLB team in the same city, and Omaha stood out to me. That team is not one of the good teams in the game, and so the beginning of my season got off to a rough start. As usual it takes some time to get accustomed to the gameplay. I have played a few baseball games on the NES but none from the behind-the-pitcher perspective. It made pitching and hitting different which meant it took me longer to get the hang of the game. My first few games ended up closer than I thought they would, but I fell short. The fourth game I played was my first win and then I lost the next, starting off the season with a 1-4 record. That’s when I figured out The Exploit.

One thing the game has going for it is that the pitching is consistent. I am used to games where you have control over the ball in-flight, but here the path of the pitch is already determined when it leaves the pitchers hand. I took advantage of this mechanic. There is a certain spot the pitcher can throw the ball where it is always called a strike if the batter doesn’t swing, and the batter will always miss if he does. Once you figure this out, you can consistently throw strikeouts and the batters will never make contact with the ball.

This is the magic spot for infinite strikeouts!

Not every pitcher has the capability of throwing this super pitch, so you have to find one who does. For Omaha, the pitcher I relied on the most was Foot. Strange name for a pitcher, I know. Here is my exact technique. Hold Down and Left and press A to start the pitch, then hold Down and Right before letting go of the ball. This starts the pitch on the left side and fades it over to the bottom right for a strike every single time. Now this doesn’t last for long. Pitchers get tired the longer they are in the game and at that point the pitch is no longer effective. It takes Foot 40 pitches to get tired, meaning he can get me to the 5th inning with one out and one strike if I execute perfectly. The good news is I can take advantage of his tired state to throw another super pitch. This time just hold Down, press A, then hold Right. A left-handed batter will sometimes have this pitch called a ball, so to compensate I have to slide the pitcher over to the left one tiny step before executing the pitch. This works for another 30 pitches which gets me to the 8th inning. Then I change pitchers over to Waters who can throw the same pitch as Foot does when he gets tired. Between the two of them I can cover more than 9 innings without the other team scoring anything. Armed with this knowledge I won the next 79 games in a row to end my season at 80-4.

With the defensive side completely solved by pitching, there’s not much to worry about on offense. My strategy consisted of scoring one run and then making outs as quickly as I can. For the most part, I decided to swing away at every pitch just to put the ball into play. Sometimes I would make an out the normal way, other times I would get a hit and purposefully get thrown out at first or second, and occasionally I would hit a home run. The homers may be counterproductive, but they are fun!

My lineup was not particularly good but they got the job done. Far and away my best hitter was the number four hitter Lyonse. His stats showed 25 home run power but he probably hit 50-60 for me. He would hit the ball hard almost every time he batted. The rest of the lineup power wise was remarkably consistent. Each other player with the exception of the pitcher had 5-10 homers each regardless of their noted totals. I even had the pitcher hit a home run one time, which I couldn’t believe when I saw it!

On that note I had a few other rare moments documented over the course of the season. In one two-game stretch Lyonse hit five straight home runs. In another game, I purposefully stopped myself from scoring to try and hit a walk-off homer in either the 9th inning or extra innings. I went scoreless through 12 innings and then the game suddenly ended in a 0-0 tie but credited me with the win anyway. I couldn’t find that outcome documented anywhere else, so that was a neat tidbit to discover.

I enjoyed running up the score in my final game!

The problem with Bases Loaded is not so much that it demands you play a large number of games, but it’s that the pace of play for each individual game is terribly slow. The pitching in particular is very intentional. The entire pitch from windup to catcher’s mitt is slow. The catcher then slowly throws the ball back to the pitcher to start the next pitch all over again. It takes a long time for the fielding to end when an out is recorded. The scoreboard showing which batter is coming up to the plate is displayed for a long time. There’s no mercy rule like in R.B.I. Baseball so all nine innings need to be played each game. I get that the idea here is to look and feel like a real baseball game, but trying to play through 80 wins with this pace is agonizing especially when the game boils down to simply executing the same plan over and over. When trying to speed through the game like I did it still took 25-30 minutes per game, and that adds up to about 40 hours over the entire season. That’s a lot of time to spend on an old baseball game, but hey, this is what I signed up for when I started this project!

Bases Loaded has a lot of minor glitches too. Sometimes the outfielders will drop routine flyouts. Sometimes an infielder steps out of the way when the ball is thrown at him. Sometimes the defense forgets who is holding the ball and you can circle the bases for a cheap run while the defense does nothing. When a ball is hit to the first baseman, he will run to the bag in a rapid zigzag pattern instead of running straight to the base. One time I saw an umpire standing on top of the crowd past the left field wall. Once I saw two infielders standing on top of each other throwing the ball back and forth instead of toward the intended base. With the long season, it ended up being a breath of fresh air to see some weird things happen like that.

I guess what I’m trying to say here is that there’s really no reason to play Bases Loaded in the single player mode anymore unless you are trying to beat all the games or you are involved in some kind of other larger project. It might be fun for a few games but the whole season is obviously such a drag. The two player mode could still be fun, but I think there are better baseball games on the NES and time is better spent playing them instead.

#46 – Bases Loaded