#182 – Bases Loaded 4
We regret to inform you that the bases are now overloaded.

It’s a perfect day to play two!
To Beat: Win the World Series
Played: 8/4/21 – 12/12/21
Difficulty: 4/10
My Difficulty: 4/10
My Video: Bases Loaded 4 Part 1 | Part 2 | Part 3
When I first started this project, I was already well aware of the Bases Loaded series. I knew the games had long seasons to complete, and I knew that the 3rd installment had the unique Perfect Game requirement. I have no problem playing and enjoying baseball games, but I was not thrilled about the prospect of full season play for three of these games. I had once buried these games at the end of my list and then reversed those plans to put them into the mix sooner. At the start of this project, I would have never guessed I would finish all four Bases Loaded games before finishing 200 total games, but here we are! In this review we will go over Bases Loaded 4 as well as do the definitive ranking of the entire series. Let’s get started!
This review will focus primarily on the differences Bases Loaded 4 has to offer in the series. You can read my previous reviews on Bases Loaded, Bases Loaded II: Second Season, and Bases Loaded 3 for more information about the series. Bases Loaded 4, like the others in the series, was developed by Tose and published by Jaleco. The Japanese name is Moe Pro! Saikyo Hen which roughly translates to Burn! Stronger Version. The game launched in Japan in November 1991 and arrived in North America on the NES 18 months later in April 1993.
From a gameplay perspective, Bases Loaded 4 is very close structurally to Bases Loaded 3, but there are a few differences beginning with game setup. First and foremost, Bases Loaded 4 eschews the perfect game objective of Bases Loaded 3 and goes back to the full season mode as the primary way to play. From the title screen, either start up a new season or continue a previous season with a password. You can also choose to play an exhibition game in single player, two player, or watch mode. The top level of the title screen menu also has a small options menu. Here you can turn the music on or keep it off with sound effects playing only, and you can toggle if you want to play with a designated hitter or not. Past the title screen, Bases Loaded 4 goes straight to team selection. There is no choice of stadium like in Bases Loaded 3. There is also no Edit team in this game. Choose one of the 12 built-in teams only. There is an Eastern division and Western division of six teams each like the previous game, and the teams are a bit different than before. The rosters are also completely different this go-around, just like we’ve seen throughout this series. Finally, before every game you can manually set the lineup using the exact same screen found in Bases Loaded 3. With all the setup complete, it’s time to play ball!

Check out these logos!
The method of pitching was updated again in Bases Loaded 4, but it controls similarly to the previous game. Choose a D-pad direction, or none at all, to choose a pitch type, then press A to start the windup. There’s a chart in the manual for which pitch type is thrown when a direction is targeted. For example, a slider is always thrown up and away from the batter, a change up is always a middle-inside pitch, the fastball is always aimed high, and so on. You can tap A again multiple times during the windup to gradually increase the direction of the pitch. During the windup, instead of using the D-pad to adjust speed, you use the D-pad to adjust the break of the pitch. Between the pitch types and the on-the-fly adjustments to the curvature, it seems like you can throw just about anything you want anywhere you want, though honestly I can’t say if that really took effect that way because I didn’t experiment too much with the pitching. More on that later!
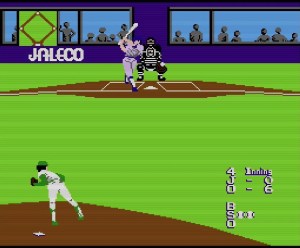
The defense in Bases Loaded 4 is identical to Bases Loaded 3 with the perspective from center field looking in. The only difference here is that there is a more detailed mini-map that aids with making defensive plays in the outfield. Instead of occupying a corner of the screen, it takes up almost the full right side of the screen overlaid on top of the action. You can see all bases, base runners, fielders, and the ball, all in one view. I feel it does not distract any from the gameplay itself or that it prevented me from making a play in any way. It for sure helped in positioning my outfielders better when they were offscreen. The remaining controls for throwing, running, and targeting a base are the same as the previous game and many other NES baseball games.
Batting is almost the same as before as well, with only a few small tweaks. The simplified batting is the same here, either swing level with A, swing high with Up and A, and low with Down and A. This time you have a little bit more control of positioning your batter in the box prior to the pitch. Bunting is done with the B button this time instead of Select. The A button will cancel a bunt attempt and let you swing away.
Baserunning is identical in Bases Loaded 3 and 4. To recap, press the direction of the base you want, then press B to move the runner ahead to the next base or A to move the leading runner back to the previous base. You can also press and hold both A and B together to halt all runners on the basepaths, in case you want to wait for a fielder to catch a fly ball or something like that.

I’ve seen this view a lot.
The most notable change to this installment is the star system. Every player may have stars displayed next to their name that are earned for different events during play. White stars are awarded for good plays while black stars are given out for various miscues. Think of the white stars as positive points and black stars as negative points. Getting a black star will remove an existing white star before giving any black stars, and vice versa. A player can have up to 8 stars at one time, and they only count for the current game. The stars themselves influence how well a player is doing and will affect their abilities during a game, good or bad. On batting, you can earn a white star by making an excellent play, such as hitting a homerun, or you get a black star for striking out. On the pitching side, white stars are for strikeouts and black stars are for allowing a run. During fielding, white stars are for great plays and black stars are given when you miss a ball or make a bad throw. Catchers get a white star for throwing out base stealers and a black star for making an error. Pitchers also lose a white star every inning due to fatigue, and two stars every inning after five. Pitchers aren’t given black stars for fatigue, they just lose white ones.
The perfect game winning condition from Bases Loaded 3 is gone and is replaced by winning a complete season like the first two games. This time you need to win 70 games out of 130 to advance to the Super Series, which is a best-of-7 series against the best team from the alternate division. Win 4 games against them to win the Super Series and beat the game. So you need to win 74 baseball games here, down from 80 and 79 games in Bases Loaded and Bases Loaded II respectively.
This was my first time playing Bases Loaded 4, on par with the rest of the series. This is far and away the hardest game of the four to acquire from a collecting standpoint. This is one of the few sports games that holds a relatively high value, as it was released in limited amounts in 1993, a couple of years after the Super Nintendo captured the collective gamers’ attention instead. This was one of the last 40 or so games I got for my collection. The list of games I had left were almost all expensive but this one was affordable back in 2015. I recall paying about $20 for my loose cart. Bases Loaded 4 currently sells for around $60-70.

I hit so many lazy fly balls like this one.
I am never thrilled about buckling down for a long season mode in an NES sports game, but considering how well Bases Loaded 3 went not long before this one, it felt manageable to do so this time. Pace of play is the most important factor for my enjoyment in this game. I clocked individual games at around 20 minutes each on average, roughly on par with the prior two games. That seems to be the sweet spot for game time. Completing the full season took me 32 hours which was longer than I would have expected. The total playtime was impacted by two rules. First is that the mercy rule from Bases Loaded II makes its return. Any time a team leads by 9 or more runs after the bottom of an inning, the game ends early. The other rule is new to the series, kind of. In previous games, being tied up after 12 innings counted as a win anyway. In Bases Loaded 4, not only do games last up to 18 innings, but if you are still tied after that, the game is counted as a tie. This is effectively the same as a loss, only worse since it took two full games worth of innings for a non-winning effort.
Choosing my team for the season was straightforward enough. I will always pick a Chicago based team if available, so that was my team for the season. There is nothing that really stands out with this team. They have a few good offensive players. By the numbers, the 4, 5, and 8 hitters were the best ones. This seemed like a good enough hitting team to work with. On pitching, the rotation of Fox, Lawson, Morris, and Gantos were relatively good and carried me throughout the season. There were no eye-popping numbers with any of these players, but nothing outlandishly bad either.
In the first Bases Loaded, I was able to find a pitching exploit the trivialized the entire game. I got through Bases Loaded II in part by finding inefficiencies in the game’s fielding and baserunning. I finished Bases Loaded 3 so quickly that I didn’t have time to find any of that stuff. My approach in Bases Loaded 4 harkened back to the original game through pitching, not perfect pitching, but effective pitching. The general strategy I came up with was pitching outside on the edge of the strike zone. I pressed A to initiate the pitch, the D-pad to throw away, and then around 6 taps of the A button. Most of the time that got a swing and a miss while allowing the batter to inch closer to the plate. The next pitch needed 7 taps of A, then 8 on the following pitch. That resulted in a lot of 3 pitch strikeouts to right-handed batters. Left-handed batters were treated similarly, with 4 or 5 taps of the A button instead of 6 or more. Should the batter not swing, I would have to throw one inside to back them off the plate, then go back to the top of the routine for more strikes. This method was not foolproof. I would sometimes walk batters, hit batters on the inside pitches, or generate some mostly weak contact. Overall, I was able to get enough strikeouts to get my pitcher to the full 8 stars and keep them there the entire game, only allowing runs on rare occasions.

Maxing out pitcher star power worked very well!
In spite of my successful pitching strategy, I had no such luck with batting. This was the hardest game in the series for me to generate consistent offense. I would put a large portion of the blame on the star system. Strikeouts are most often the worse batting outcome anyway, but earning a black star on top of that meant the batter was almost certainly useless for the entire game. Most balls put into play are weak contact and easy outs with the dreaded black star. Generating any kind of solid contact was an issue for this entire game. Any sort of loft on the ball was enough to get an opposing fielder underneath it, and even line drives seemed to find gloves quite often. The opposing defense was pretty ruthless in the game, and combined with my propensity for striking out, it made this game doubly difficult.
As with the other season-based games, I kept tabs on my season record as well as notable events that happened throughout, and this should state my case well on how I dialed in the pitching and subsequently failed on offense. The learning phase of the season resulted in a 5-6 record to start. In those 11 games I was outscored 33 runs to 18. Somehow in Game #3, I scored 7 runs in a 7-6 victory, which leaves only 11 runs scored across the other 10 games. After that stretch, I sailed the rest of the way. I allowed only 6 total runs over the rest of the season. In Game #29, I lost 2-0, my only other loss during the season. The very next game, I had my first tie in a scoreless game. I ended up tying 5 games overall, finishing with a final record of 74-7-5.
Here are some other notable achievements. I pitched a Perfect Game in Game #18, a 1-0 victory. Including the perfect game, I had 28 1-0 wins. I won 8 games in extra innings, including two games back-to-back where I didn’t take a lead until the 18th and final inning. Two games were won via the mercy rule, a 10-0 6th inning win in Game #44 and a 9-0 victory in the same inning of Game #80. The only other high scoring games were a pair of 7-run games, a pair of 6-run games, and about a half-dozen 5-run games. Finally, I lost by a walkoff home run in Game #6 and won via a walkoff home run in Game #27. The winning formula for me was excellent pitching and just good enough offense.

Putting up runs is so big.
Now that this long series of NES games are behind me, I can confidently rank this entire series. This was an easy decision to make. In order from least to most favorite, it’s 1, 4, 2, and 3. The first game was easy, the easiest of all of them, but the slow pacing of in-game actions made me want to yank my hair out and makes it the least desirable game to ever consider going back to play. Bases Loaded 4 is next up. It has many improvements in the gameplay and is paced much faster, but the bump in challenge and the potential for long 18 inning ties lock this game in 3rd place. Bases Loaded II was my favorite one to play as my strategy was more focused on defense and baserunning exploits than just hitting or pitching. It was also the quickest full season entry, and the biorhythm system made some players really fun to watch when their stats aligned at the top of the meter. But no matter what, the Perfect Game requirement for Bases Loaded 3 makes it my favorite one of all. It’s a neat way to experience beating an NES sports game, and of course the short overall length was most welcome!
The best way I can describe Bases Loaded 4 is that it combines the full season play of the first two games with the gameplay style and framework of the 3rd entry. The gameplay is solid all the way through. The graphics, music, and controls are all what you would expect out of a late era NES game by an experienced development team. I’m glad the developers improved on the fielding, which was my main complaint about Bases Loaded 3. The star system, while troubling to me personally, is a strong enough mechanic to be a fine addition to the series. Unfortunately, while the game is well made, it isn’t likely to get much attention because it is an uncommon, expensive NES sports game. That’s why I do what I do, to give some attention back to some unloved and underappreciated games, even the full season sports games like this one.

#182 – Bases Loaded 4