Take on the NES Library

An 8-bit Extravaganza!

the

NOV
03
2021
0

#170 – Flight of the Intruder

A very long flight.

I have no idea what this is supposed to look like.

To Beat: Reach the ending
What I Did: Cleared every mission with 2nd highest rank overall
Played: 11/8/20 – 11/17/20
Difficulty: 8/10
My Difficulty: 8/10
My Video: Flight of the Intruder Longplay

It seems at first that the NES is littered with flight-based games, the ones that take place either from inside the cockpit or just behind the plane, and you can fly around in 3D space with enemies approaching from all angles.  They must have been somewhat popular as none of them are rare games.  Despite that, as I’m sure I’ve mentioned before, these games are just not for me.  I attempted to count up how many games fit this description just to see where I stand at 170 games in.  I have counted about a dozen or so, and Flight of the Intruder is the 4th completion of the bunch.  We are spreading these out nicely!  The first two games of these I’ve played, Top Gun and Laser Invasion, are both high quality, twitch action Konami affairs, while F-117A Stealth Fighter took a more tactical approach.  It’s not all bad, but Flight of the Intruder is clearly the least enjoyable of these titles.  Let’s break it down and see what it has to offer.

Flight of the Intruder is a novel written by Stephen Coonts.  He had previously served as a naval aviator during the Vietnam War, and he used those experiences to begin writing a novel.  The book Flight of the Intruder was released in 1986, and the main character, Jake Grafton, would be the protagonist in many future books in the series.  Coonts has written dozens of books since then, up to the present day at the time of this writing.  Flight of the Intruder was adapted into a film in 1991, releasing to poor reviews and not making enough money at the box office to cover its $30 million budget.  A video game was also created in 1990, developed by Rowan Software for PCs.  Flight of the Intruder was released on the NES in May 1991, ported by Imagineering and published by Mindscape.  The game also came out in Europe under the name Phantom Air Mission, where it appears to be limited to only a release in Spain.  It is an extremely expensive game due to its rarity.

The plot of Flight of the Intruder, the novel and film, follows Jake Grafton throughout the Vietnam War.  The plot of the game as listed in the manual doesn’t include any of that story, opting for a more general take.  The only common bond is that both take place during Operation Linebacker in 1972 in Vietnam.  In the game, you play the role of an unnamed pilot who takes to the skies in both an F-4 Phantom and an A-6 Intruder across 12 missions throughout Vietnam around the timeline of Operation Linebacker.  Each mission in broken up into a series of waypoints that you will need to clear to complete your mission.

Just like Metroid, we start out going left.

Upon starting a game, the first thing you will come to is the Map Screen.  After receiving your mission briefing, you see the map zoomed in and the next waypoint blinking.  This will indicate what kind of encounter you will have.  Sometimes you can press Select to skip to different waypoints, whatever the mission necessitates.  Press either Start or A to take on this waypoint.

The next screen is the Takeoff and Landing screen.  This takes place from a side view of the aircraft on the carrier, with the aircraft facing left.  After a short animation of the crew on the ground, it’s on you get the plane off the ground.  Doing so is very easy, simply press and hold Left to increase thrust to 100% and you will automatically begin flying.  There are other points of data on the screen that are show during takeoff that only come into play when you are landing later on.

The starting waypoint in the game is one of the two main modes of action, the cockpit view.  From this first person perspective, you will dogfight with MiG 21 jets using your F-4 interceptor.  This game uses flight controls, meaning you press Up to fly downward and press Down to fly higher.  Left and Right bank your fighter in that direction.  The A button fires your weapons.  Your standard weapon is a machine gun.  You have unlimited ammo, but if you fire too much at once you will overheat and need to cool down a bit before you can fire more.  The Select button can switch between your machine gun and missiles.  The missiles have very limited ammo but are radar guided and will home in on the enemy.  You will need to get an enemy in your sights and lock on before you can get them with the missile.  The B button is used to adjust the thrust of the aircraft.  Hold B, then press Up to increase thrust or Down to decrease thrust.

There are all sort of instruments and things on screen.  The top half is your outside view through the window, where can see air, land, and approaching enemies and missiles.  In the center of that view are your crosshairs for aiming the machine gun.  Two numbers display on either side of that.  The left side value is your airspeed and the right display is your altitude gauge.  The lower half of the screen is the inside of the cockpit.  On the left you will see your thrust as a percentage.  Below that is the artificial horizon.  A circle is broken up into segments that are filled in to show the ground relative to your aircraft in the center of the circle.  For example, if you are flying straight and level, the bottom half will be filled in since the ground is below you, whereas if you are flying straight down the entire circle will be lit up to indicate you are flying directly toward the ground.  The center of the cockpit view is your radar that shows enemies as dots as they approach you.  The top half of the radar shows enemies in front of you that you could see above, and the bottom of the radar displays enemies behind you.  The right side is the message display that shows various information as you play.  When you switch weapons to missiles, the text display changes over to a missile indicator.  A triangle is drawn representing your ship along with small vertical lines to indicate each missile available.

Line em up, blast away, you know the drill.

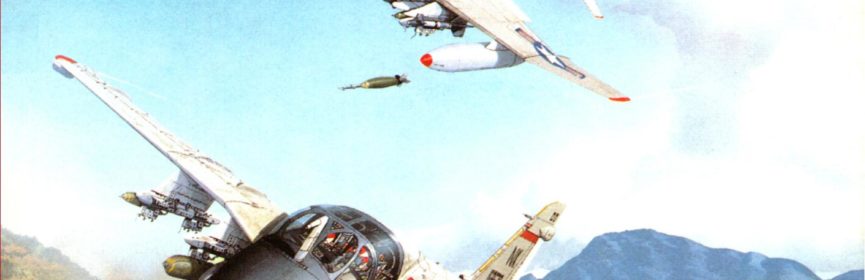
The other gameplay view you have is in the bombing and strafing missions.  Here you see your A-6 Intruder from behind the aircraft.  Enemies will approach from the horizon as you fly overhead, and you are to blow up as many as possible.  The controls here are similar to the first person flying segments.  Use the D-pad with flying controls to steer, press A to fire air-to-ground missiles, and press B to shoot radar guided missiles.  The angle of your ship toward the ground determines where your bombs will land.  You have to compensate a bit for the time it takes for the bomb to strike.  There are no crosshairs for this mode, though the nearest target will highlight a bit on the approach and the hitboxes of the enemies are reasonably generous.  Much of the time these missions are just to fly through and survive, but some of them require you to defeat a primary target.  The mission itself will let you know.  If there’s   a primary target, the music will change a bit to indicate the upcoming targets are mandatory.  Fail to destroy them all and you will need to repeat a portion of the mission and approach again.

There’s other information on this screen you’ll need to understand.  The large number at the top is your score.  This carries over throughout the game, and it is also shown between missions.  There are three other numbers displayed in the row under the score.  The far left number is your strength value, essentially your hit points.  Enemy strikes deal multiple strength damage so avoidance is critical.  The center number is the DEFCON number.  Every target you let pass by subtracts one from the DEFCON number.  When it reaches 0, then any target that gets by will fire a guided surface-to-air (SAM) missile at you.  These are avoidable but are very dangerous and they deal a bunch of damage.  They often lead to more missed enemies and even more SAMs.  The far right number is how many missiles you have.  As you can imagine accuracy is important in these missions, and to that point there are certain targets in these missions that will restore a strength point when destroyed.  You want these if you hope to keep alive.  If strength is maxed out at 9, then it will restore a DEFCON point, and if that reaches 9 then an extra missile is added instead.  Furthermore, if you destroy all targets within a wave, each of those three will increase by one.  Nice!

Once the mission is over, it is important to land your fighter safely.  Landing takes place in the same side view as takeoff, only this time you need the measurements on display to help you land properly.  Left increases thrust and Right to lowers it.  A thrust value of 50% helps you maintain height, whereas higher numbers fly you upward and smaller numbers lower you.  The altitude shows how high you are, and the range shows how much farther to fly to reach the aircraft carrier.  The vertical velocity is important as you need to keep that value from going beyond -10 when landing to touch down safely.  To land, you will use the measurements and adjust thrust to lower your fighter and fly slowly down onto the aircraft carrier.  Press B to release your landing gear, you won’t get far without that.  You want to touch down as soon as you are overhead, then as you cross a series of four cables on the deck, press A to lower your hook to grab a cable and come to a complete stop.  If you don’t hook a cable, you will have to fly through and approach again.  I believe too many misses will cost you a life so make sure you don’t mess up too much.  The game also encourages you to grab the third cable with the hook as evidently that’s what the best pilots do and you are awarded more points that way.

Bombing runs require some calculated aiming.

This was my first time playing Flight of the Intruder, which is no surprise.  I barely remember putting this game into my console to test it prior to this.  I’m not entirely sure but I think someone gave me this game, like a “here I found this in my house you can have it” kind of find.  I might have the box and manual for this somewhere too.  This game isn’t very common but it’s affordable, coming it at around $12 or so for a loose cart.

I did not have an easy time with this game at the start.  The first mission is one of the first person missions and the combat feels a little bit slow and is hard to come to grasps with quickly.  Notably, the gun lags behind a bit, meaning you have to shoot in front of the enemy to hit it.  It’s probably realistic but is a bit frustrating to play.  The enemies also take quite a few hits to go down, and you’ll run out of missiles in the later missions which one-shot the enemies after you lock on.  There’s also fuel to worry about and if you take too long in a mission you’ll crash, which happened a lot later on in the game when there were more enemies.  I had to fly around a lot to try and get behind the enemy, while also avoiding their missiles, and it’s just a lot to handle under a time limit.

The good thing is I did come up with a strategy.  It almost feels like an exploit.  The trick is to fly sideways.  I turn 90 degrees to the right, lining up the horizon vertically in the center of the screen.  Then I just fly up the entire time.  This accomplishes a few things.  First, it keeps the enemies from getting behind me.  Second, when they end up in front, they tend to fly in the same direction attempting to get away and so they sit in front of you long enough to blast away and you can deal a ton of damage.  Third, if they fire a homing missile, it won’t hit me from behind because I’m constantly spinning, and for the ones in front, I’m either in good position to shoot them down or just keep flying up to dodge them.  It’s really the perfect strategy.  

Land softly, then hook the wire to stop.

The other gameplay modes I didn’t have much of a problem with.  Bombing runs are pretty straightforward even though they appear awkward initially.  You can tell by the animation frame of the fighter how low you will land your bombs, so it’s just a matter of learning the timing of aiming.  You will also need to swerve out of the way of enemy fire at the same time, but that sounds harder than it actually is.  At least after lots of practice.  Takeoff is super simple, and I eventually got the hang of landing pretty much every time.  Practice makes perfect, as they say.

The worst thing about this game is how long it is.  There are 12 missions in total, each one longer than the last.  And I mean longer in terms of both number of waypoints and number of targets in each waypoint.  The skirmishes themselves don’t get much more challenging, just more missiles and such to deal with.  It’s mostly more and more enemies to kill within the same time limits, fake difficulty at its finest.  My full playthrough covering every possible waypoint took nearly two and a half hours.  I didn’t realize you could skip sub-missions until after I had finished, and I wouldn’t have regardless, but two-plus hours of the same repeated gameplay is tedious, to say the least.  You only get a few lives and continues to get you through the game, but as long as the losses are occasional, you’ll be fine.  There is also a scoring system here complete with ranks for how many points you have scored across the missions.  I ended up with the Admiral rank, the second highest rank, despite completing every mission and sub-mission along the way.  I had 1,868,600 total points but needed 2,000,000 to get Fleet Admiral.  The scoring system is more nuanced than I would have expected and that is why I didn’t get the best rank.  It does not affect the ending in any way.

I would say this is a competent game that’s just not very fun.  Graphically, it looks okay.  There is good detail to the fighters in the landing and takeoff sequences.  The enemies you fight are distinct but kinda muddled looking.  The music is also just okay, filling up space.  There are no tunes during the first person areas, only the constant beeping of approaching homing missiles.  The other songs aren’t awful but not super catchy or fun either, probably because I got sick of them through the long play time.  The controls are responsive and easy to use, maybe a little bit cumbersome in first person but nothing too bad.  The gameplay is good enough, what you would expect out of a game like this, and there’s just a touch of variety along the way.  There’s nothing really bad here I would say, it’s just that this game is so boring.  It goes on way too long if you intend to see it through.  I play pretty late at night and I’m surprised I managed to stay awake during the entire game.  An hour of this would have been more manageable, and honestly still too long, but two and a half hours of this is just exhausting.  Hopefully this one ends up the worst of all the flight games.

#170 – Flight of the Intruder

#170 – Flight of the Intruder

 
AUG
06
2021
0

#168 – Street Fighter 2010: The Final Fight

Neither Street Fighter nor Final Fight.

The real 2010 wasn’t this exciting.

To Beat: Reach the ending
Played: 10/15/20 – 10/18/20
Difficulty: 7/10
My Difficulty: 7/10
My Video: Street Fighter 2010: The Final Fight Longplay

Knowing what we know now about video games of the past, if you were to see the name Street Fighter 2010: The Final Fight without knowing anything about it, you might get pretty excited.  Street Fighter II and Final Fight are both among the greatest arcade games of their generation, so even under NES limitations, you would be right to expect something great.  Plus, it’s made by Capcom, the same developer for all three!  Well, we didn’t get some glorious NES adaptation of Street Fighter or Final Fight.  What we did get is a futuristic, sci-fi action platformer that ends up one of the more interesting NES titles, for better or worse.

Street Fighter 2010: The Final Fight was both developed and published by Capcom.  It first appeared on the Famicom in August 1990 under the slightly different name 2010 Street Fighter.  The game released on the NES just a month later in September 1990.  Of note, this game released after both Street Fighter and Final Fight in arcades, but before Street Fighter II, when the series exploded.  This game also released on 3DS Virtual Console in all regions in 2014 and also on Wii U Virtual Console in Japan and PAL regions in 2014, with an early 2015 release in North America.

In this game, you play the role of Ken, the greatest Street Fighter in the world.  Defeating all the best fighters in the world doesn’t leave Ken satisfied, so he pursues university studies in the field of Cybotics.  Along the way he befriends Troy, and the two of them invent something called cyboplasm.  In proper doses, this makes men very strong, even helping them stay alive long beyond their normal life span.  At the same time, others in society have perfected travel to distant worlds, though Ken has no interest in all that.  Except now he has to, for one day back at the lab, his cyboplasm was stolen and Troy was murdered.  Ken will avenge the death of his partner, having to defeat many super creatures along the way that have taken too much cyboplasm, which causes them to lose their minds.  This journey takes you across five planets with multiple levels each.  Clear all the levels to see the ending and beat this game.

This first fight is pretty tough just starting out.

This is a side-scrolling platformer game with rather complex movement and controls.  Ken can perform standard platformer movements.  Use the D-pad to walk around, jump with A, and attack with B.  Ken can cling to walls by moving into them while holding A, then he can press Up or Down to climb the walls.  Press away from the wall and jump to jump away.  He can jump down through certain floors by holding Down and pressing A.  When falling through a floor, if you hold Up you can grab onto the underside of the floor.  Continue to hold Up to pull yourself back up onto the ledge, or you may let go of the D-pad and just hang there.  Later you may press A to jump down from the hanging position.  Ken can perform all sorts of punches and kicks with the B button that throw out some sort of energy for a short distance.  Press B rapidly to do a flurry of quick punches, either facing left or right, or while holding Up.  If you hold either Left or Right, you can mash the B button to perform some longer distance attacks.  These always come in a combo, some of them curve downward or upward slightly.  Eventually they turn into kicks that attack at an upward diagonal before cycling back around to the punches again.  If you hold Down and mash B, you’ll perform the diagonal kick attacks first, then start throwing punches in the same cycle as above.  You definitely want to play around with it to get the feel for how it works and how the attacks move.  One more thing.  If you do a neutral jump straight up, then hold the opposite direction you’re facing, you’ll backflip.  When you are upside down in the backflip, you can attack to fire straight down, which is the only way to do so.

Each planet has multiple stages that are framed as one-on-one combat matches.  You’ll get a screen that say “Target vs. Ken” with an image of the enemy you need to take out in this stage.  The levels themselves can take many different forms.  There are single screen levels, scrolling levels, and autoscrolling levels.  Some areas are simply boss fights, some involve infinitely spawning enemies, and others are stages with a boss fight at the end.  Sometimes the target is just one enemy you need to defeat, and sometimes you have to defeat multiple target enemies to proceed.  The goal of each stage is to open up a portal to the next one.  Defeating the target produces some glowing energy that you touch to collect.  This fills up the Open bar at the bottom of the screen, and when it is completely filled up, the portal to the next level appears.  There is a normal stage timer during regular play that sets itself to 10 seconds whenever the portal is open, so you must move quickly to find the portal and enter in time to proceed.

Anticipate spending a lot of time climbing this.

There are items you can collect to help you power up.  Many stages have rocks that you can destroy, some of them hide powerups.  The most common one looks like a circle with a C in the middle.  This increases your power level half a segment.  Each segment of the power bar makes your attacks go a longer distance, but I’m not sure if attacks are more powerful or not.  I never got to full power at any time, but apparently your stronger shots look like spinning disks at full power.  There are some rare powerups that only appear in certain stages.   One is an orb that attaches to your back and deals damage to enemies that touch it.  Another gives you some sort of slash kick.  When you perform a backflip, your feet do damage to enemies on contact.  There are also some items that enemies drop.  Glowing orbs restore half a bar of health, and large glowing orbs restore two bars of health.  You can also get 1ups but they are uncommon.

Structurally, each planet has some sort of theme.  Planet 1 is mostly cityscapes, Planet 2 is jungle-like with lots of vines, Planet 3 is the desert planet, Planet 4 is the water planet, and Planet 5 is pretty much a space station.  Not all levels in each planet strictly follow the theme, but for the most part they make sense.  In between each planet are cutscenes that advance the story, showing where Ken is off to next, that sort of thing.

This is a pretty challenging game for a variety of reasons.  Most enemies and traps take one bar of damage out of the starting five.  Your health carries over from stage to stage, so you’ll often lose lives just from having low health to start a new area.  Health pickups from enemies seem to happen every four kills, which doesn’t help any in pure one-on-one fights.  When you die, you lose your entire power bar.  This is the main reason why I never was able to see what full power was like.  There are no mid-stage checkpoints in the game, and that includes the gauntlet in the final level.  The only aspects in your favor are that you get a health refill at the start of each planet, sub areas stay cleared when you move through the portals, and you get infinite continues.  

A … sanderfall?

This was my first time clearing this game, though I have played it before.  This was a rental way back in the day, and it is the only time I remember playing it up to now.  I seem to remember the final stage, though I’m probably getting my memories crossed up as that would be quite a feat for me as a rental.  I saw the AVGN review of the game a few years back, that’s probably the most of what I remember about this game.  I would consider this game a tad obscure, but it is relatively common from a collector perspective.  This was a $5-$10 game for quite a long time, and I see now it has crept up to around $15 for a loose cart.

This is the type of game that I can sit and grind out a victory in a few hours, depending on length and difficulty.  Street Fighter 2010 took me close to four hours to beat, over two nights.  The first night I worked on it for a couple of hours and got to the final planet before turning it off for the night.  I beat the game the next stream.  It took me about an hour to reach the final stage, then a full hour just to finish off the game.  That last area is no joke.  You have to clear three past bosses, one of those a double fight, and then the final boss, all on one life.  This is the only level where the timer is a major issue as well.  Thankfully I managed it.  As of this writing, it has been over 9 months since I beat the game for this blog.  I ended up replaying the game last week just to refresh myself, and I beat the game in about an hour and a half this time.  I’m honestly surprised I didn’t lose much skill on this.  It’s pretty hard to go back and beat old games that I haven’t touched in some time.  Maybe now I’ll be serious about getting caught up on these writings!

Street Fighter 2010 is a difficult, complex action game that’s not for everyone, but it is a technical showpiece for the console for sure.  The graphics in this game are really good looking.  There’s lots of detail in the backgrounds and enemy sprites, and good animations too.  There’s plenty of variety here as well.  Some levels scroll fluidly in all directions, and there is some split scrolling in some of the boss fights that can be tricky to pull off well on the console.  One autoscroller level drifts in an unorthodox pattern, similar to the airships in Super Mario Bros. 3.  The music is top notch, certainly with some of Capcom’s best composers hard at work.  The controls, while they let you accomplish a lot of moves, can get in the way of the action sometimes.  Clinging to walls, hanging off ledges, and swinging around pillars takes a fine touch, while those same obstacles can get in the way of you trying to avoid enemy attacks.  This is a game that is just as much about mastery of the player character as mastery of the levels and boss designs.  This game is often overlooked as far as Capcom games go, and I think in part that is because it is not as accessible as other games of this style.  And let’s be honest, naming it Street Fighter 2010: The Final Fight was not the best choice.  This game is derided just off the name, but there’s a quality experience here if you can wrap your head around it.

#168 – Street Fighter 2010: The Final Fight

by :
comment : 0
 
APR
16
2021
0

#165 – The Karate Kid

Wax on, wax off!

Some chill vibes here to get focused.

To Beat: Reach the ending
Played: 9/27/20 – 10/1/20
Difficulty: 4/10
My Difficulty: 2/10
My Video: Karate Kid Longplay

Hello, and welcome to another edition of “NES Game Based on a Movie that I Have Not Seen”!  I know.  This one feels more egregious than some of the others, for reasons I don’t fully understand.  It’s not that I don’t like watching movies, but there are just so many things vying for my time and movies are always at the end of the list.  Especially older movies.  Today some older movies are hard to find in the streaming era.  DVDs are much less common now, and not every classic movie is easily obtainable at the local store.  I guess the other thing is that I was too little to watch 80s movie back at the time of release, and many of them I never got around to checking out when I got older.  Anyway, we aren’t here to talk about movies of the past, we are here to talk about their video games!

The Karate Kid is a film released in June 1984.  It was written by Robert Mark Kamen, directed by John G. Avildsen, and produced by Jerry Weintraub.  The movie stars Ralph Macchio, Pat Morita, Elisabeth Shue, and William Zabka.  The film was both a critical and financial success.  It had a small budget of only $8 million but grossed well over $100 million, making it a sleeper hit and one of the best performing movies of the year.  This would become a movie series with two numbered sequels plus The Next Karate Kid.  Of current note is the TV series Cobra Kai which had its third season released earlier in 2021.  The film is also said to have increased the popularity of karate in the US.  There were only a couple of Karate Kid video games released at the time, one of which is this NES version.  The Karate Kid on NES was a North American exclusive game, releasing in November 1987.  It was developed by Atlus and published by LJN.  

Despite the game being named The Karate Kid, the plot of the game follows the story beats of The Karate Kid Part II.  The manual is very lean on story, opting for generic platitudes about using his training, practicing self-control, and such.  This side-scrolling platformer game will start you at the karate tournament at the end of the first film, with the rest of the game taking place in Okinawa in line with Part 2.  This game has four stages and you just need to clear them all and beat Chozen to win.

The climax of the first film is a throwaway stage in this game.

On the title screen, you can select either one or two players.  This is alternating play for the two-player mode, nothing to be excited about.  However, there is a one-on-one mode.  This is a simple fighting game for two player simultaneous play only.  Player 1 controls Daniel on the left and Player 2 controls Chozen on the right.  This is a very simple, bare-bones fighting mode.  You could use it to get accommodated with the controls in a safe space, should you choose, but this mode is too lean to be of any value for two players.

Here are the controls for the main game.  You use the D-pad to move.  This includes walking with Left and Right, crouching with Down, and jumping with Up.  Yeah, it’s one of these games.  The A button does a punch, while the B button does a kick.  You can do jump kicks and jump punches, as well as crouching attacks.  You also possess a couple of special techniques.  Crane kicks and drum punches do a lot of damage as well as help you parry attacks.  However, you have a limited number of these you can utilize, as noted at the top of the screen.  You perform a crane kick by pressing B without pressing any direction, and similarly you do a drum punch by pressing A while standing still.  The Start button pauses the same.  Select is only used to choose options on the title screen.

The first stage in the game is the karate tournament.  Here you will face off against four opponents one at a time.  You begin with four crane kicks if you need them.  The health bars of both you and your opponent is displayed at the top, so you can see your progress for these brief encounters.  This stage is short and sweet, and a fair example of how the combat works for the rest of the game.

The second stage takes place in Okinawa.  This is a side scrolling level with the scrolling locked as you go so you cannot backtrack.  You’ll be faced with enemy fighters that are simpler to defeat than who you faced in the tournament.  You’ll notice the enemy health bar has been replaced with a map indicator.  This is a long bar with a small arrow to show how far you have gone in the stage.  The stage also introduces powerups.  You will sometimes see a small yellow letter C or a small letter D floating in mid-air.  Grab one to add one to your crane kicks or drum punches respectively.  You also gain a small amount of health as a bonus.  The only other powerup you’ll find is one of three bonus characters.  You “collect” them and you restore a large portion of your health bar.  Nice!

While it requires precision, I always liked catching the flies.

The side scrolling stages also contain hidden bonus games.  You’ll find these by jumping into doorways and such that appear in the background.  There are three bonus games you will encounter.  The first of these is the Chopsticks Fly Catch.  Six flies will fly around the screen in a loop-de-loop pattern.  Move Daniel Left and Right and press either A or B to pinch the chopsticks together to catch flies.  The second bonus game is the Ice Block Break.  Here your life meter becomes a power meter that waves back and forth.  The size of the power meter is determined by how much health you have entering the bonus game, so to break through them all you really need full health entering the bonus area.  Press A or B when the bar is as far right as possible.  The third bonus game is the Swinging Hammer.  Daniel is on a center platform with a swinging hammer on a rope going back and forth.  You need to face the hammer as it swings down and press A or B with good timing to parry the hammer, allowing it to swing to the other side.  If you miss you get knocked in the water and the bonus game ends.  Depending on how well you do in the bonus games, you can earn points, crane kicks, and drum punches.

While the first two stages are pretty simple, the final two stages up the ante in difficulty.  Stage 3 is the same exact setting and level design as Stage 2, only it takes place during a typhoon.  So that means you have wind blowing you backward the whole time, as well as flying objects to avoid and to fight through.  These new additions are on top of the enemy fighters you always are fending off.  A patient approach is helpful to avoid falling in pits, but the enemies have a knack of bopping you around and pushing you in anyway.  The final stage does away with the wind, and in fact is a different stage altogether.  This stage features the spear fighters that have greater range.  The crane kicks and drum punches help a lot here if you still have some.  There are not as many bonus opportunities in this stage either.  The stage and game ends with the final battle against Chozen.

Despite not seeing the film ever, I have played this NES game before.  I remember playing this game at my cousin’s house as a kid, falling off the stage over and over in Levels 2 and 3.  This might have also been a rental once, though looking back that doesn’t really make much sense not having seen the movie.  For a long time this was a ubiquitous game that always sold cheap, but this game has eased upward in price over the years.  When I was big into collecting the set, this was a $5 game, and now it is trending more toward a $10 game.  I got it as common filler in a lot and I’m sure I’ve had more than one copy of it too.

Wind, pits, and being surrounded can make this game tough.

My difficulty rating of this game might be controversial.  I know when I played this as a kid it felt nearly impossible.  Having not played this game in many, many years, I cleared it on stream on my first try.  There’s a little trick I learned from seeing speedruns of this game.  In the platforming stages, the game can only spawn two soldiers at a time.  If you can get them behind you, they will follow you, leaving the path ahead wide open.  That helps a lot, but even without that, they aren’t too tough to fend off.  Jump kicks or attacks at the edge of your range work well to defeat enemies, and if they gang up on you the crane kicks and drum punches can cut through their attacks.  The patient approach to jumping pits got me through Stage 3 and maintaining a supply of crane kicks got me through Stage 4.  All that said, this game only gives you three lives to get through it, and there are no continues.  You do gain an extra life for every 20,000 points earned.  I feel like the short length of the game is a good enough reason to give this a lower-than-expected difficulty.  But feel free to disagree with me!

There is one, small goof I committed in playing this game.  I ended up playing and beating this the same night that I beat Days of Thunder.  It was an excellent pallet cleanser, and I’m glad my skills kept up to beat the game right away.  The only problem was that I did not have recording enabled.  I stopped the recording when I completed Days of Thunder but forgot to turn it back on for The Karate Kid.  It would be a few days before I was able to sit down and beat the game again, and it took me two more tries to do it that night.  Making weird mistakes off-game like this is one of my superpowers, I think.

There’s not too much more to say about this game.  I liked it well enough.  The graphics are mostly well done, perhaps a little cluttered at times.  Some of the bonus entrances are unclear.  The music is good with some catchy tunes to accompany the action.  The controls work well enough, even with Up jumping.  There isn’t a better control scheme I can think of to trigger the special moves that wouldn’t interfere with the gameplay the way it is.  This is a simple game to get into and quick to replay after Game Over.  The bonus games are fun and you get rewarded well for playing them well.  All in all, it was a good, slightly frustrating, and brief experience.  Just what the doctor ordered, in my case.

#165 – The Karate Kid

by :
comment : 0
 
FEB
19
2021
1

#163 – The Lone Ranger

Hi-Yoooooooooo Silver!

With a silver bullet!

To Beat: Reach the ending
Played: 7/20/20 – 8/1/20
Difficulty: 8/10
My Difficulty: 8/10
My Video: The Lone Ranger Longplay

Konami is at it again.  This time, they are reviving an old, mostly forgotten property into an NES game.  Normally, I would be reminded right away of similar adaptations such as The Adventures of Gilligan’s Island or Dirty Harry, taking a pretty much dormant property and turning it into a Nintendo game, with little success.  Instead, after exploring this game a bit, my mind went quickly to Laser Invasion.  Both games switch between genres during gameplay.  I liked Laser Invasion quite a lot.  On the other hand, The Adventures of Gilligan’s Island and Dirty Harry did not fare as well.  Let’s see which way The Lone Ranger goes.

The Lone Ranger first appeared on a radio program out of WXYZ in Detroit in 1933, created by station manager George Trendle and writer Fran Striker.  The show blew up in popularity, running until 1954 and surviving the death of the voice of The Lone Ranger, Earle Graser, who died in a car accident in 1941.  The television series, The Lone Ranger, ran for 8 seasons and 221 episodes from 1949 to 1957, starring Clayton Moore for most of the series run.  There were a slew of other media properties starring The Lone Ranger, including 6 films, 18 novels, a long running comic strip, comic books, and some animated adaptations.  The NES game, The Lone Ranger, was released in August 1991 in North America only.  It was developed and published by Konami.

The story is based off of the 1981 film The Legend of the Lone Ranger.  In the Old West, the Texas Rangers were the law enforcement of the day, led by Dan Reid.  His son, John Reid, was also a Texas Ranger.  During a shootout with the Texas Rangers, Butch Cavendish, a bank robber, lost his father to a bullet, and from then on he held a grudge against the Texas Rangers.  Butch and his outlaw gang set up an ambush against the Texas Rangers and had them all killed.  Only they thought they were all killed, as John Reid survived.  A Native American named Tonto found John and got him back to health.  John formed a mask out of his father’s vest and did away with the rules of the Texas Rangers, going at it alone as The Lone Ranger with Tonto as his partner.  Now Butch Cavendish has kidnapped the President and it is up to The Lone Ranger to both rescue the President and get his revenge against the man who killed his father.

Walk on the path, engage enemies, and enter towns

After the initial text scrawl of the story, you start off in the overworld.  Simply use the D-pad to walk around here.  You are forced to stay on the dirt trails but otherwise you can explore the map as you please.  There are several buildings around the map that you can enter that take you into town.  Here you will switch to a more zoomed-in overhead view, where much of the game is played.  You can walk around in all eight directions with the D-pad.  Press A to talk to people, and press B to use your weapons.  Select changes weapons and Start pauses the game.  The towns contain women that you can talk to for information, or bad guys in cowboy hats that you’ll have to shoot before they get you.  Generally, you explore the towns for information to advance the story, or to restock on supplies, typically of many games.

The bottom of your screen shows all the info you need during play.  First up is your life bar, pretty self-explanatory.   You can recover health with the uncommon heart item drop or top it off by paying a doctor in town.  Below that is your money.  Coins are dropped by almost every defeated enemy.  Money is most commonly used to buy more bullets for your revolver, other weapons, and gun upgrades.  The square box with the X in the middle is used in the 3D sections that I will describe later.  Next is your currently selected weapon.  You can fight bare-handed, use a revolver, or TNT.  When weapons require ammo, that is displayed directly above.  Finally, the cylinder of your gun shows how many bullets are loaded and ready to fire.  When empty, you will reload with one of your supply.

There are some special locations inside many towns.  The sheriff’s office is usually a point of interest for gathering critical information on what to do next.  At the gunshop, you can buy normal bullets, silver bullets, and TNT.  You can hold up to 50 clips each of normal and silver bullets, and up to 10 TNT sticks.  Silver bullets cost more but they do twice the damage and pierce enemies so you can hit multiple bad guys with one bullet.  TNT is thrown in an arc and blows up after a short time.  You can also buy upgrades to your gun that let your bullets fly farther across the screen.  The doctor’s office is where you want to go to restore your health bar, at a cost.  A few places in the game even let you play poker for money.  There are other unmarked buildings you can enter, as long as the front door is open.

Even towns aren’t a safe haven from gunslingers.

As teased earlier, there are several types of gameplay in The Lone Ranger.  Aside from the top-down exploring and fighting, there are side scrolling platformer sections.  These parts have standard controls.  You use the A button to jump.  The jumping in this game is reminiscent of Castlevania.  It is a very heavy jump and once you commit to a moving jump you will keep going in that direction, though you are able to slow down a little by pressing the opposite direction on the D-pad.  Another thing I noticed is that you have to be real close to the edge of a platform to make the leap across to another one.  If you press Down while pressing A, you will jump down through some ledges.  The B button attacks with any of your weapons similar to the top-down sections.  With the gun, you can fire in all directions and diagonals except for straight down.  Movement is normal stuff with the D-pad.  You can navigate stairs with Up and Down.

This game also features 3D mazes.  Much like in Laser Invasion, these are Zapper-compatible sections.  At the very start of the game you can choose if you want to use the standard controller or the Zapper for these parts.  You will use the D-pad to navigate the maze.  Press Up to walk forward, Left or Right to turn in that direction, and Down to turn around.  You move in increments through the maze, and at some of these steps you will run into a group of enemies.  You can only fight with your guns in these parts so you better have enough bullets handy.  Use the Zapper to shoot the enemies and collect powerups, including hearts to restore health, packs of bullets, and of course money bags for cash.  Here the X mark in your status bar tells you from which direction the enemies are approaching.  You also get to see the compass direction you are facing to assist in navigation.  You will use the D-pad to turn in the appropriate direction and then shoot with the Zapper.  I had to hold both the controller and Zapper at the same time to play this.  If you are in controller-only mode, instead you move a targeting reticle with the D-pad.  Press B to fire a shot.  Holding a direction and pressing A will turn you in that direction.

Bad guys, money, and Castlevania stairs, oh my!

Early on in the game you will reunite with your trusty horse Silver.  There are a few minor sections in the game where you will ride on horseback.  There are side scrolling sections where Silver runs forward automatically, functioning as an auto-scroller.  You can jump between ledges and fire your gun.  It is different but plays a lot like you are already used to.  You also get into gunfights while on horseback.  These encounters take place in first person similar to the mazes, only you don’t have to wander around, just fight off the bad guys with your Zapper.

To beat this game, you must clear all 8 stages.  Each new level begins at a new subsection of the map and all your money and weapons carry over from one stage to the next.  You typically get an explanation from Tonto on what you need to accomplish next.  This game has a password system to retain your progress, and all your money and weapons carry over through the passwords as well.  Passwords in The Lone Ranger are 16 characters long, comprised of a weird subset of capital letters and the digits 0-9.  In this game there are no lives, and when you die you return back to the start of the current stage.  Some of the stages have several parts and can go on pretty long, so it’s a steep penalty.

This was my first time playing The Lone Ranger.  I was only sort of familiar with the premise and I never knew anything of substance about the character or series.  I bought my copy of the game on eBay for only $6 shipped back in the summer of 2014.  I remember religiously checking new eBay listings for NES games to fill out my collection back then and this one was an instant purchase.  The game was selling for around $10-$15 in 2014, and when I checked the current pricing I was shocked.  The Lone Ranger is now close to a $60 game.  It was averaging around $30 from 2017-2019 and just about doubled in 2020 alone.

Shooty shooty bang bang

This game was a bit more challenging than I would have guessed going in.  Most levels comprise of walking around to get a sense of what to do, and then working through the setpiece parts in that stage.  The difficulty varies throughout the game depending on how many special segments there are and what kinds.  There was only one area that I completed the first time through.  A few times I got lost in identifying the intended route.  When I played this I streamed fairly often, and it took me 8 nights of playing to beat the game.  I made progress every night except one, only to beat that stage the first time the next night.  This was almost a 10-hour playthrough from start to finish, condensed into a video lasting a little over 2 hours.  The last couple of stages were pretty tough, with long segments that really try and whittle away your life.  I want to specifically mention the final boss fight.  When I reviewed my video of it, I had forgotten just how close I was to failing that attempt.  I had sort of found a way to trap the boss but he very nearly took me out on several occasions.  I’m proud to have clutched out victory there!

The Lone Ranger is a game that does a lot of things but does them all well.  This is a very nice looking game, from the character sprites to the detailed portraits at the end of each stage.  The music is all very well done, but to me it is mostly music that could fit any game.  The William Tell Overture certainly is evocative of the time, and the rest of it sounds good, but I am not sure it really fits the game.  The controls are responsive and work well, particularly the Zapper and top-down play.  Konami seems to have a handle on games with multiple genres, and this one is no exception in the gameplay department.  There are only a few things about it that I don’t care about.  The platforming and jumping are a little too stiff for my tastes.  That to me is the least polished bit of this game.  The forced reloading every 7th shot is a pain to handle too.  The difficulty and setback on dying would be turnoffs to some, though I relish the challenge.  This is a very good game that is mostly forgotten or unheard of.  I would suggest checking it out!

#163 – The Lone Ranger

 
OCT
28
2019
0

#131 – Werewolf: The Last Warrior

Ripping straight out of your NES!

Didn’t even realize this game had a 2-player mode!

To Beat: Reach the ending
Played: 7/25/19 – 8/1/19
Difficulty: 8/10
My Difficulty: 8/10
My Video: Werewolf: The Last Warrior Longplay

I’m just going to say this right away.  I think Werewolf: The Last Warrior is gonna be my favorite NES Box Art of 2019. The obvious element is the giant werewolf ripping out of the cover, but look closely and you will see that he bursts right out of an NES cart.  You can make out the gray lines and the chips on the green circuit board inside.  At this time, very few people took the carts apart to see what was inside because new carts didn’t need to have the pins cleaned. I bet this aspect of the cover was underappreciated.  Some other parts of the cover I like are the red text on yellow background for contrast and the huge claws on the werewolf.  With a box cover so awesome, the game inside has to be equally good, right?

Werewolf: The Last Warrior debuted on the NES in November 1990.  The game was developed and published by Data East, with development credit given to Sakata SAS.  The Famicom release came later in June 1991, published by Takara.  There the game was called Cho Jinro Senki Wourufu, translating to Super Werewolf Chronicle Warwolf.  Europe also saw an NES release in September 1991.

In this game, you play as Chief WarWolf.  The evil Dr. Faryan has created a bunch of bio-monsters that have imprisoned nearly everyone in the world.  Guess who is the only hope for civilization?  With the help and powers of the Great Spirit, you can become Werewolf which will give you the abilities needed to defeat Faryan and save humanity from his evil schemes.  There are five stages in the game, culminating in the final battle with Faryan. Beat all the levels to beat this game.

Most of the cutscenes involve this guy.

This is your typical platforming game with a mostly familiar control scheme. An obvious downside right off the bat is that you attack with A and jump with B.  I have no idea why developers did this as the convention of using A to jump and B to attack was the de facto standard.  I’ve played games long enough to be able to handle it no problem, but otherwise there is this artificial learning curve added for no real reason other than to be different.  The rest of the controls are fine.  Press the D-pad directions to move around.  You can duck with Down and climb ladders with Up.  The A button does a simple punch and you can punch high while standing or punch low while ducking.  You also wield a Power Ray as a charge attack by holding A to charge and letting go to unleash the attack.  Pressing B jumps normally, but you can do a higher jump if you hold Up while pressing B.  Start pauses the game.  While paused, you can press Select to show your score and number of lives remaining. 

At the start of the game, you meet the Great Spirit.  The game switches over to a brief cutscene where the Great Spirit gives you some advice.  Immediately after this you are thrown into a fight with one of Faryan’s death slaves. This enemy has a health bar displayed at the bottom and is a recurring mini-boss throughout the game.  Defeat him and he will leave behind a red W.  Collecting this item turns you into Werewolf.  Then you get another cutscene where you see his transformation.  Don’t worry, this scene only happens the first time you transform.

In Werewolf form, you have several new options available.  You maintain this form until you are at about a quarter of health remaining.  By default, your attacks are twice as strong as normal.  Your Power Ray now attacks everything on screen via a shock wave, but this deals you a lot of damage just to perform the move.  You also get four new movement abilities.  You can crawl into tunnels too big for you to enter normally. Simply walk into the tunnel to start crawling.  You can perform a backflip that makes you invincible to all attacks by pressing both A and B together.  You can climb walls in Werewolf form.  Simply jump into a wall to cling to it.  Now you can climb the wall by pressing either Up or Down.  To get off, you press the direction opposite the wall and press B to jump off.  Lastly, you can cling and hand-walk along ceilings with your claws.  Jump up to the ceiling, then hold Up and press A to dig your claws in.  Then you can use Left or Right to move across the ceiling and press Down to disembark. Getting hooked is tough.  You have to connect just as you are falling from the top of your jump so that you touch the ceiling with the tip of your claws.

This early spot is tough when you don’t know how to ceiling walk.

There is an anger meter at the bottom of the screen.  You collect these tiny, white bubbles that add a notch to your anger meter.  When the meter hits five bubbles, then you transform into Super Werewolf.  In this mode, you have all the same powers and abilities as Werewolf, but your attacks double in strength, you move faster, and you jump incredibly high.  The downside is that this mode is temporary as the bubbles gradually decrease.  (I guess they pop?)  Once you run out of bubbles, you switch back to Werewolf mode until you collect enough bubbles for another transformation.

There are several other items you can collect in this game.  Finding items is weird.  Some of them are dropped by enemies, and others you find by striking objects in the levels.  Sometimes these locations are obvious, like posts or boxes.  Other times you find items by hitting ledges or other places you might not expect.  It doesn’t hurt to attack random things just in case.  Anyway, here are the other items to look out for.  Small hearts heal one health point while large hearts are full health refills.  Little red bubbles defeat all enemies onscreen.  Big red bubbles make you invincible for a little while.  Why bubbles are so powerful in this game, I have no idea.  Hourglasses give you more time, dollar signs add points, and 1ups are obvious. Some enemies drop a bullet behind that gives you a single shot attack of your own with A.

The final item you need to watch out for are the blue W’s.  While red W’s upgrade you to Werewolf, the blue ones downgrade you.  They take you from Super Werewolf back to Werewolf, or from Werewolf back to plain War Wolf form.  If you grab one as War Wolf, it deals a significant amount of damage.  Therefore, you want to avoid these at all costs.  The game puts you in some situations where if you reveal a blue W, you are forced to pick it up to proceed.  Just be careful.  The manual suggests there is a way to somehow use both a blue W and a red W to go directly to Super Werewolf.  I have no idea how or if that works, and I didn’t find any information about that mechanic.

Knock stuff around until you find the good items.

The levels in this game are usually laid out a specific way.  Stages move from Left to Right with a few exceptions. Stages also typically have a high section and a low section.  You can find ladders to climb between sections and sometimes you can choose between the upper path or lower path all the way through the stage.  This can add some replay value if you want to try a different path and it lets you experiment to find the best way through a level.  All levels end in a boss fight with one of Faryan’s stronger creatures.

This game treats lives as continues.  When you fall into a pit or run out of health, it is Game Over.  If you have any lives remaining, then you can Continue from the Game Over screen or select End to start over.  When you run out of lives, the game puts you at the same screen only you are forced to choose End.  You start the game with three lives.  You can earn more by collecting 1up items or for every 50,000 points earned.  Every time you die your score goes back to 0, so you are incentivized to play well enough early to earn more lives for later.

This was my first time beating Werewolf: The Last Warrior.  I sort of remember testing this game out one time and playing until I died, which didn’t take too long that time.   I might have went further if I knew the controls.  I bought my cart copy of the game at a game store about an hour away from home that I have only visited one time.  I think I paid either $7 or $8 for it.  The game sells now for around $10 which I believe is the same as the going rate was when I bought mine.

Boss fights are much better as Super Werewolf

Beating this game was yet another installment in the series of “making incremental progress each playthrough.”  The first stage has at least a couple of spots that are tough to pass until you get a grip of the controls and all the moves you have available. The worst stopping point was the waterfall stage.  This is one of those two-tiered horizontal levels where the lower section is all water. Evidently, in this universe, werewolves cannot swim, so once you fall in you have to watch yourself drown.  There are leaping fish that can easily knock you in the drink, in part because you have a tough time hitting enemies in the air. Their placements are not quite consistent either.  It makes for a tough section and you can bleed your remaining lives away in a flash. Some other parts of the game aren’t much easier, but the waterfall was the worst I experienced.  I could have knocked the difficulty down a point or two if that stage were easier.  Still, completing the game in a week isn’t all that bad and it was a straightforward game to boot.

What I will remember most about Werewolf: The Last Warrior is how janky the game is.  I’ve already mentioned a few of these instances of jankiness, such as B button jumping, tricky ceiling clinging, and the seemingly random locations of hidden items. There are plenty more.  The backflip maneuver is very helpful in crossing some parts where taking damage is eminent, since you are invincible during the flip.  One downside of that is that there are two forced jumps associated with the move, and if you didn’t plan carefully, you could leap right into a pit.  Another quirk is that during a backflip, the screen does not scroll ahead.  You can backflip all the way to the right and then walk against the right side of the screen, leaving you completely defenseless to the dangers right in front of you.  Bosses soak up a lot of damage before going down and end up being very repetitive as a result.  Super Werewolf status makes them pretty manageable, but you may only build up to that state once or twice in the whole game.  If you are plain War Wolf, forget even trying to fight a boss.  Your attacks have one-fourth the power of Super Werewolf, and even if you play the fight perfectly you will probably run out of time before winning anyway.  There are still other minor nuisances that don’t even make a blip compared to these issues.

Werewolf: The Last Warrior is a game that falls short of most other NES platformers. I would say the graphics are just average.  Most of the sprites are large and detailed.  The Werewolf character has a lot of different poses and such for all the moves available. The music is pretty decent.  My favorite song is the one that plays when you are normal War Wolf, but unfortunately the more you hear that song the worse you are playing.  The controls take some getting used to with the B button jumping and handling specific moves like backflips and wall climbing.  The gameplay has some notable flaws.  The jumping is rather stiff and favors more vertical leaping than horizontal, which is tough considering most of the game is horizontal scrolling. Bosses and some enemies take way too many hits to defeat, leaving the timer as more of a threat here than in other games. You can tell that Ninja Gaiden was an inspiration for this game with things like its interstitial cutscenes and wall climbing moves.  Those are some huge shoes to fill, and in my opinion, Werewolf isn’t half as good as Ninja Gaiden.  It’s not terrible and there are sure to be some people that will go to bat for the game, but I’d rather play something else.

#131 – Werewolf: The Last Warrior

 
MAY
31
2019
0

#121 – To The Earth

Get your trigger finger ready, you are gonna need it!

Going to Earth? How hard could that be?

To Beat: Reach the ending
Played: 4/7/19 – 4/27/19
Difficulty: 10/10
My Difficulty: 10/10
My Video: To The Earth Longplay

Before starting this project, I had a pretty good idea of what the hardest NES games were going to be. I already had 10-20 games earmarked as potential 10/10s. To The Earth was on my radar but I was certain it would end up a 9/10 for me. As I struggled to make progress and the attempts piled up, I was won over to the idea of rating this a 10/10. It stands up as one of the hardest NES games and likely the most difficult Zapper game to beat.

To the Earth released in November 1989 in North America and in February 1990 in Europe. This NES-exclusive game was published by Nintendo and developed by Cirque Verte. There is very little known about the developer of this game. Evidently Cirque Verte was discovered in copyright records as the author of To The Earth. This is the only game credited to them. I can’t figure out if Cirque Verte is a company or if it is a pseudonym for the actual developer. Very strange.

The story for To The Earth takes place in the year 2050. Earth is under a biological attack from the Raggosians. You are in the cockpit of a spaceship called The Tempest. Your mission is to collect resources from Uranus, Saturn, Jupiter, and the Moon so that you can create an antibacterial agent to defend society from the Raggosian attack. The enemy is relentlessly trying to stop The Tempest from its journey, so you must use your Zapper to fend off the enemy. There are four levels in the game that you must clear to beat the game.

Many passive enemies start off this journey.

This is a very simple game to control and play. To start, plug the Zapper into the second controller port and optionally plug a normal controller into the first port. You can control the game entirely with the Zapper. You fire to start the game and fire to begin each mission. The only thing the controller is used for is to pause the game by pressing Start. When enemies appear on screen, shoot them with your Zapper. You can let most enemies go by harmlessly. Many enemies fire missiles that you can destroy with your Zapper.

The game takes place from the perspective of the cockpit of The Tempest. Therefore, the lower part of the screen contains your ship’s data. You can see the score, destination, and how many minerals you have collected. The most important thing to pay attention to is the yellow energy bar in the center of the dashboard. This is your lifeline and primary mechanic in the game. You lose some energy if you get hit by an enemy or a missile. You gain energy back if you shoot an enemy ship. You lose a little bit of energy if you shoot and miss. You don’t gain or lose any energy whenever you shoot and destroy an enemy missile. You are beaten when you run out of energy, so with the way the system is structured your best chance for success is to shoot as many things as possible as accurately as possible.

There are some pickups that will help. Periodically, a friendly ship will fly across the screen from right to left. There is an E icon in the lower left that appears here. Shoot the E to restore half of your energy. Do not shoot the friendly ship! If you do, you lose a ton of energy. Sometimes a comet will appear on the right side of the screen. Shoot the comet to earn a barrier shield. This lets you take several enemy missile hits without losing any energy. The dashboard changes colors as you suffer damage and when it is red it means you have one hit remaining before the shield is gone. The final item is the smart bomb. You earn this after defeating so many enemies when you are at full energy. The bomb appears blinking in the lower right corner when you have one. Simply shoot the smart bomb to destroy all enemies and missiles on screen. You also earn energy for each enemy defeated just like normal, so the smart bomb is best utilized whenever multiple enemies are on screen.

Just shoot the energy capsule, not the ship.

The game starts off gently. The first stage isn’t that difficult. Some enemies here move pretty quickly but many of them don’t attack you. You will get your first taste of enemy missiles and shooting them down to defend yourself. You get some opportunities to refill your energy and get your barrier shield. At certain times, the screen will flash an alarm and display either Condition Yellow or Condition Red. This is the game’s way of giving you a natural pause. You can sit on this screen for as long as you want, then shoot the Zapper to continue playing. Each level ends in a boss fight. These are the only encounters in the game that take multiple hits to destroy. The first boss is Tri-Opticon, which naturally has three segments you have to destroy.

The second level ramps things up a bit. Most enemies shoot missiles, and some enemies fire more than one missile. I found this level provided the best chance of defeating enemies just as they show up but before they fire at you. This level also introduces the asteroid field. These parts generate a series of asteroids. The lower ones will hit and damage your ship, so make sure to identify and shoot those down. The end-level boss is Zambuka, a long space snake. This level can be tricky but I handled it well.

The third level is where the game gets hard. You start off with a lengthy series of ships that all fire missiles. This part can down you in a hurry if you start missing shots. This level introduces the hyper missile, which is hands down the most difficult thing to deal with in the entire game. These missiles look like spiky balls and move about twice as fast as the normal missiles. You can shoot them down but the timing is very difficult and you need to anticipate where they originate from on the screen to have a real chance of defending yourself. The boss here is Gyron that is surrounded by mini-satellites. I’ll say more about the final level a little later but suffice it to say it is incredibly difficult. The final boss and last line of Raggosian defense is Nemesis.

After each stage, you see a screen that contains for each stage your score, number of shots taken, number of hits, and your accuracy percentage. You also get a total of those columns for the entire game and you get your overall high score at the top. You get the same screen if you lose a level by running out of energy. You are allowed to continue two times at the start of the level where you died.

Often it’s best to shoot only the missiles.

To The Earth was a game I had in my childhood collection. We might have bought this game brand new for cheap, but I can’t remember. I played a few levels of it casually. A couple of years ago, in the Nintendo Age forum thread where everyone collectively beats every NES game, this was the last game remaining. I worked on it for a few days until someone else finished it up. My best progress at that time was near the end of Level 3. This is a cheap, common cart that should cost no more than $5.

The difficulty curve in this game is very severe. It is a gentle curve up until the start of the third level. That first onslaught can be tough but I rarely had issues with it. The introduction of the hyper missiles is what bumps this game up to 10/10. There are a few in the middle of the level but you can just take the hit and be alright. Before the boss there are multiple enemies that all fire hyper missiles. Here there are too many to absorb so you have to fire away and hope for the best. If you can make it past that, the final level is the ultimate test. Nearly every enemy fires hyper missiles. If you can’t defend yourself, you will lose energy very quickly and that’s that. That last level is one of the nastiest single levels I’ve ever played in a game.

My past experience gave me a good start this time. In fact, I don’t think I failed out once in either of the first two levels. The final part of Mission 3 was the first place I got stuck. I needed somewhere around five to ten tries from the start to finally clear Level 3. Keep in mind that since you get two continues, that could have meant I took as many as 30 attempts just at that one part. The final level was even worse. Much worse. I had trouble getting through the first part of the stage with just the normal missiles. After that, everything shoots the hyper missiles for the rest of the time. My accuracy in the first three missions was close to 90%, but with the hyper missiles that dropped to about 75% for that final mission. It is a lengthy stage too just like the others. I spent about two weeks making attempts on that final stage. I could consistently reach Mission 4 with all continues intact. I estimate I played that final level 60-80 times before finally winning. This is another case where I wish I kept better track of my attempts. Either way, that is a significant amount of time. My winning run came on my last attempt that session and on my last continue. I had went to sleep early and woke up wide awake in the middle of the night after about four hours of sleep. So, like any responsible person would do, I got up and played some To The Earth. I beat the game at 3:30am and it was tough to fall asleep after riding that victory high.

If you can even reach this boss, you are doing well.

The thing that makes To The Earth beatable is that the game is almost completely predictable. Enemies approach from the same direction, make the same movements, and fire missiles at the same time. Missiles always move at the same trajectory, and subsequent waves of enemies always come in the same order with the same timing. It’s entirely scripted, is what I’m trying to say. You can use that to your advantage to predict when and where enemies appear. A lot of times you can take out enemies when they are just specks in the distance before they get close enough to fire missiles. In some cases that was mandatory to keep from dying. I found that the game was very rhythmic. I would match my movements and trigger timing to the enemy’s approach. That was particularly helpful when trying to defend against a series of hyper missiles. The only thing I found in the game that was not predicable was that sometimes the game would not pause on the final Condition Red in the fourth stage. It was too easy to let my guard down there and that got me in trouble more than a few times.

When I was struggling to figure out the final level, I got some advice from another player who had beaten the game. He recommended I mess around with the settings on my TV. The claim was you can put the settings in a way that makes it much easier to hit the targets. The manuals for Zapper games do recommend adjusting the brightness and contrast on the TV so that the two can work together as intended. The wrong settings can cause the light gun not to pick up on direct hits, which obviously would be frustrating. On my TV, I already had the brightness turned all the way up and there was no contrast setting. I was hoping to introduce some blur to the image that might give the enemies a larger hitbox. After messing with the TV settings for a while, my results were inconclusive. This is a dark game, so it does make sense to turn the brightness all the way up on the TV. Maybe my settings were already optimal from the start since the hitboxes seemed to be generous enough. It’s just something to keep in mind in case you want to play.

Swarms of enemies with hyper missiles are the worst.

Now it’s time to see how this game stacks up against the other 10/10s. This one is tough for me to decide because all games are very different from each other. I have chosen to put To The Earth as #3 on my current list. My first two are set and are probably going to be at the top together for a long time. I am really trying to compare To The Earth and High Speed and these two games aren’t alike in any way. To The Earth is a 20 minute game and High Speed took me over two hours, but To The Earth took so many more attempts at just one singular level. I think that’s the determining factor to me. You have a lot more leeway with High Speed and all the extra balls you can earn, permitting you to make more mistakes and retry some of the boards multiple times to get the win. You don’t get that breathing room with To The Earth. It’s a close call, but I’d say To The Earth is the more difficult game. Here is my current 10/10 ranking board:

Ikari Warriors
Q*bert
To The Earth
High Speed

To The Earth is a very difficult game, but it is a pretty good Zapper game. The graphics are average I would say. The enemy sprites look detailed and there are several frames of size of each one when you see them from the distance. Backgrounds are usually just stars but you do get to see the planets as you approach the bosses. The music is simple and mostly quiet, but it is fine. You really need a good Zapper with a strong trigger to play this game. That is especially evident during the bosses where you have to drain dozens of shots into them. The main drawback to the game is the high level of difficulty, and also have the proper setup of CRT TV and a Zapper. Even casually it is enjoyable for at least the first couple of levels as a pure target shooter. There is enough depth and strategy to it if you really want to dive in. This was a good accomplishment for me. I just hope there aren’t any harder light gun games after this one.

#121 – To The Earth

 
JUL
17
2018
3

#83 – The Black Bass

Bag and behold the biggest black bass believable!

The music is much better than I expected.

To Beat: Reach #1 ranking
To Complete: Reach #1 ranking and finish the season
My Goal: Be #1 on the final day of the season
What I Did: Met the goal
Played: 4/27/18 – 5/8/18
Difficulty: 5/10
My Difficulty: 5/10
My Video: The Black Bass Final Tournament

I am not interested in fishing. At least as an adult. I fished a few times when I was a kid just because you’ll try lots of different things at that age. Dealing with the hooks, live bait, and the caught fish was all handled for me when I was young. Thinking of doing that now almost sends shivers up my spine. Just let me stay inside with my video games, please! Despite my attitude about it, fishing is still a very popular outdoor activity. If you consider it a sport, it may well be the most popular sport in the world. It’s no surprise then that there is an NES fishing game. If I have to go fishing, I’d much rather do it this way!

The Black Bass first released on the Famicom in October 1988. It was published by Hot-B and developed by Another Ltd. This is the same developer who made Championship Bowling. The NES release came to North America in September 1989. This game is actually a sequel and is known in Japan as The Black Bass 2. Japan’s original The Black Bass game first appeared on the MSX computer in 1986, followed by the Famicom release in 1987. The title screen of the NES version calls the game The Black Bass USA, which is how this game is sometimes referred to in Japan. There have been many games in The Black Bass series since these games, including the NES sequel The Blue Marlin.

The Black Bass is a fishing game with no story. Your task is to enjoy fishing for Black Bass in several tournaments. There is a ranking system that scores you on how well you performed during the tournament. If you do well enough, you can go to different lakes in later tournaments that have bigger fish to catch. The ultimate goal here is to achieve #1 ranking out of a pool of 200 contestants.

You better do what the man says.

There are twelve tournaments you will play in The Black Bass. The tournament season begins in June and ends in September, despite the manual claiming it ends at the end of October. Each month has three tournaments, always on the 5th, 15th, and 25th of each month. There is a clock system in the game denoting the start and end times of the tournament. Each one begins at 6:00am, but the ending time varies depending on the calendar date of the tournament. Early season and late season tournaments have shorter durations than the ones in the middle of the season.

After the title screen, you have some selections to make. First, you enter your name in. This is six characters long consisting of just A-Z. The cursor points to the first character and you have to scroll through the list of characters with Up and Down for each and every character. Press Left or Right to position the cursor to the next character and input that one from scratch. Press A to lock in your name choice. Now you have three more options. You can begin a new game as a new player. This puts you at Lake Amaya on June 5th for the first tournament. The other two options require a password. You can either continue a game mid-season, or just see your stats. Passwords are 16 characters long consisting of A-Z and 1-5, also with the long entry method. This system is tedious, for sure. Also, be careful of zero, O, and Q which look a lot alike. If you choose stats, you see a screen with your information and then you go right back to selecting another option. You have to put the entire password back in if you want to continue a game with the same password after checking stats, so it’s really not worth it.

Once you start a new game, first you see a screen from I guess the tournament director. This shows the lake you are on, the date, and duration of the tournament. The next screen has even more information. Again, you see the lake, date, and timeframe of the tournament. You also see your ranking, which begins at 200th place. Next is the weather conditions. I have seen Clear, Cloudy, Light Rain, and Heavy Rain. You also see the temperature outside and the depth of the lake. Next up is the map screen. This is an overhead view of the entire lake. A small blinking boat shows your current location. You can use the D-pad to move the boat around and choose where you want to start finishing. This screen also shows the current time. Press A to choose your location, and finally it is time to start fishing!

You can boat to whatever spot you want instantly.

The fishing mode starts with your character at the bottom of the screen. There is a white cursor that you can move with Left or Right. This is the direction of your cast. When you decide on the direction, press A to begin casting. This starts a power meter at the bottom of the screen that grows and shrinks. When it lines up with the power you want, press A again to cast out your line. The screen will scroll vertically a long way to keep up with your lure, but it does not scroll sideways. If you cast off the sides of the screen, you lose your lure and have to cast again with a different one. It’s best to shoot it straight up the center most of the time. You can also press and hold B while in the air to try and hit the brakes on your cast and stop it short.

Once your lure is in the water, you have a different set of controls to move it around. Press Left or Right to move the lure sideways. You can press Up to move the lure toward the surface of the water. Press and hold A to reel in your line. If you hold down both A and B at the same time, it will pull the line in all the way back to the boat automatically. This is useful if fish just aren’t coming or you get your line caught on something. The bottom of the screen shows how deep the lure is in the water, and this is also expressed by the same red bar used for casting. The idea of fishing is to move the lure around in such a way to make it attractive to fish, as if the lure is struggling. Sometimes a shadowy fish will appear from off screen and approach your lure. The fish can either bite or leave, and if he bites you try and catch it. If you’re like me, you probably won’t even hook a fish the first time, so we will come back to this later. You are done for now once you reel in your line all the way.

The menu screen should appear next, containing a bunch of different options. You can select the lure you want from a list on the Select Lure screen. Each one is named along with the number you have. Press Up or Down to select the lure, and press Left or Right to change the color between Red, Blue, and Silver. The quantity depends on color and lure type, and you don’t have every option at the start of the game. Choose the one you want and press A to select it. Some lures float on top of the water, and others sink. Each one has its own feel for how you move it around in the water, so feel free to experiment with different ones to find those you like.

By the end of the game, you can use any lure you want.

The next two screens are informational. Select Data For This Point to see the map of the lake. There is a message on the side of the screen that either says “Here is nice bass point” or “This point has little bass” depending on where you moved your boat. You want to fish only at those nice bass points, so you go to this screen to see if you are in a good spot for fishing. Press A to advance to the next screen. This shows the current time, current weather conditions, and the end time of today’s tournament. Press A again to go back to the menu screen. The Your Results So Far Today screen gives you exactly what it says. It shows three at a time the ten biggest fish you caught today, including the kind of fish, its weight, and which lure you used to catch it. The final screen displays the number of bass caught today and the average weight, plus the number of bass caught total and the average weight over all tournaments. Go back to the menu with A.

The final three options are Move, Casting, and End. Move brings you back to the map screen to reposition your boat to a new fishing spot. You go from that screen right back to fishing. Casting sends you back to fishing at your current location. End is used when you are completely done fishing for the day. Only use this option if you are sure you are satisfied with today’s catch or you don’t have enough time remaining to catch any more fish.

Now we are on to the good stuff. You’ve casted your line and attracted a nice fish that bit your lure. Now its time to try and reel it in. The bottom of the screen now shows a picture of a fish. This indicates the strength of the fish, and over time as you fight the picture changes to a more pathetic looking fish. This goes all the way down to an image of fish bones once you get the fish very tired. You also see the depth of the fish in both numeric form and red meter form. Press the A button to reel in your line. You can use the D-pad to try and pull the fish in a certain direction. The B button is for thumbing the line. This essentially acts as a brake by holding your thumb down against the line to keep it from moving. It helps if the fish is trying to swim away. If you decide not to try catching the fish, you can try pressing Select to let it go. This doesn’t always work and you only get one try to free the fish.

If it’s not a black bass, it’s not worth your time.

There are several scenarios where the fish can get away. While you are fighting the fish, you also have to manage the strength of your fishing line. There is a shrill ringing sound you hear whenever the line is close to breaking. You need the sound on while playing The Black Bass to tell since there’s no on-screen indicator. You can cool the line down by letting go of the buttons, but this also allows the fish to recover his strength too. You have to find your technique to manage both of those things so that you can successfully catch your fish. If you reel in too hard for too long, the line will break and you lose both your fish and your lure. This can also happen if the fish gets too far away from the boat or if it travels off the sides of the screen. At random, the bass can also leap out of the water. This can cause the fish to come off the line, either by taking the lure with it or letting it all go completely. Often enough the fish will stay attached and you can continue the fight. What happens seems to be completely random, so it’s not your fault if the fish gets away this way.

To catch the fish, you need to pull it down to the bottom center of the screen. You can do this by wearing out the fish completely so that it is easier to draw in, or sometimes you can catch a fish quickly by hooking it close to the boat. Once you get it all the way in you will see the fish go into a basket. Now you get a celebratory screen of your catch! The most important factor is the weight of the fish you just caught. You get to see the weight tick up from zero pounds and it’s exciting to see how high it goes whenever you reel in a big one. You see the time of day the fish was caught and how long it took you to bring it in. You also see the type and color of bait used. Then you go back to the menu screen.

The tournaments go on for quite some time, but eventually they all end. As soon as your reach the end time, fishing ends abruptly, even if you are in the middle of a fight. You can also choose to quit prematurely with the End option from the menu. This brings you to one more menu. Choosing Ceremony shows your end results from the day, including your new ranking. You also get your password for the next tournament. If you rank well enough, you advance to the next class and get a nice little ceremony to celebrate your accomplishment. If you don’t think you did well, you can choose to Go Back Home from the menu, sending you to the title screen. You can also view your results from today and your overall results from the season.

It’s big indeed!

The ranking is determined on how many bass caught, the biggest one you caught today, and the average weight. Other fish caught such as trout or pike do not factor into the ranking at all. The rank you can get also depends on which tournament class you participated. The starting class is Class C which is for participants ranked 101 through 200. Class B is for places 51 through 100, and Class A is for 1st place through 50th place. The top five in each class advance up to the next class, while the bottom five go down a class. It seems counterintuitive, but it is not a huge loss to go back down a class. Twelve tournaments are a lot, and you can rise up from 200th to 1st place in three tournaments if you are really good. Rankings are also based on the current tournament and are not driven on cumulative results over the entire season. When you advance to Class B, you compete at Japan Lake. At Class A, you alternate between Lake More and San Lake. The lakes at higher classes contain larger fish, so not only is the ranking standard higher, but the difficulty of landing heavier fish also increases.

The ending condition for The Black Bass is up for debate. The game does not end officially until all twelve tournaments are completed. Since the goal of the game is to get the top ranking, that is what I chose as the minimum for considering the game beaten. I don’t think it’s fair to say you beat the game by participating in all tournaments dead last. On the other hand, some say you need to both get 1st place and finish the season, since you don’t get a real ending if you don’t complete the season. My personal standard is to do both things, but I took it a step further and insisted on finishing the final tournament in 1st place.

This was my first time playing The Black Bass. I had no intention of playing this game until the very end of the project, since a long game of all fishing seemed very unappealing at the time of compiling my game list. I picked the game up in an eBay lot for a few bucks. The game falls in the middle of the pack in collectability as a semi-common game costing around $5-$10.

Now I have him right where I want him.

The Black Bass is a long game and I made it longer by not figuring things out right away. My first day of fishing was just figuring out how the game works on a basic level. I finished right where I started in 200th place. The next day I bumped up to 143rd place, but the following day I stepped back to 156th place. At this point I thought there was no way I would improve from here, so I started over. I failed to understand that rankings are only for the day of the tournament, and past days do not factor into it at all. The manual didn’t really explain it clearly, but I suppose I shouldn’t expect it to. The other thing I did was put in a special code listed in the manual to help out. If you input the name “HBMAX” the meters change. Cast out your line and the display where it normally shows the depth of the lure now displays a number of the desirability of the lure to fish. Now you can see if how you are moving the lure around is helping you out or not. You want to get the value at or above 6.0. Once you are fighting a fish, this number switches over to the tension of the line. Once it hits 10 you get the chiming sounds, at I think at 12 is when the line breaks. I think it’s useful to try it out once or twice to ensure your technique is solid.

I started completely over from here. My other sessions allowed me to find all the good bass spots and I was able to advance to Class B on my first try. The next day at Japan Lake did not go well and I got bumped back to Class C, but then I went on a winning streak. I won Class C, Class B, and both Class A tournaments, one at each lake, all in a row. That put me halfway through the season in first place. I wanted to speed my way through the other tournaments just because it was taking at least an hour to do each tournament. My goal was to see how few bass I could catch and yet do well enough to stay at Class A. I had a couple of failures, but I managed to finish most of the remaining tournaments in half the time it should have taken. I wanted to finish the last two tournaments both in 1st place to show off the final tournament in my gameplay video. In the penultimate tournament I thought I did well but ended up 6th. It took me three tries to get first place at the last tournament, mostly because it is the shortest tournament and therefore more restrictive in time to catch enough big fish. I think it was worth it to end up in first place at the end of the season. My biggest catch in my video was a 16-pounder, and my biggest overall was 18.1 pounds. I know there are 20+ pound bass in the game but I wasn’t fortunate enough to bag one.

Some of the bass spots have many obstacles.

Here are several tips if you want to play this game yourself. Each lake has five locations good for catching bass. You can check the Data for this Point screen to see if you are in one of those spots, but there’s a better way to check. All poor fishing spots are in empty, dark blue water. If you are fishing anywhere else, then it’s a good spot. I found the type and color of the lure really didn’t matter much. It may have some effect on either the visibility or desirability, but not much. The pencil bait is the most responsive bait to control so I used that one the most. I switched over to the plastic worm for the middle of the day because it seemed more helpful in getting fish to show up. You have to be able to tell roughly the size of the fish you want as it is approaching your lure so that you can back out quickly if it’s not one you want. My luring technique was a quick move left, a quick move right, a quick move up, and repeat. A good technique is to try and hook fish near your boat so that you don’t have to reel them in as far. You can also try landing a fish in front of a rock or something solid to give the fish a harder time to get away. To catch bigger fish, you need to wear them out. My philosophy is to always keep the fish moving. Thumb the line with B when they are moving away from you, and then start reeling once they stop moving. Ideally, you want the fish to be at least one notch below full strength before your line starts to fatigue with the warning chime. Then it’s a matter of managing your line while keeping the fish from straying too far away. It may take some time, and they can always jump and get away anyway, but eventually it will wear out all the way and then you can finish the job. Finally, try and release any fish if it’s either not a bass or too small. It might not always work, but it never hurts to try. It’s always successful to let a fish off during Class A tournaments.

The Black Bass was more fun than I expected. I would say the graphics are average, but the music is good and a lot better than I would have guessed. There’s a good variety in both lakes and prime fishing spots. The mechanics are sound and have some nuance, which makes it difficult to start playing but becomes more engaging later on. The biggest negative is that the gameplay can become very sluggish. Some lures are very slow to move and it takes a long button press for the lure to respond to your movements. This gets worse when a fish enters the screen. There doesn’t appear to be a lot going on and yet there is some significant slowdown. Your lure can get stuck in some environments and it is especially frustrating when a huge bass bites and you can’t move it at all. Password entry is tedious. The season is long, and the gameplay gets repetitive. I still don’t like fishing, however, even with the issues this is a fun fishing game.

The developer Another Ltd created the only NES bowling game, Championship Bowling, and here they made one of two fishing games on the console. I don’t know if working on one-off NES games like this was something that was planned or not. Championship Bowling is a solid bowling game, and The Black Bass is an equally solid fishing game.

#83 – The Black Bass (1st place)

#83 – The Black Bass

by :
comment : 3
 
FEB
08
2018
0

#65 – Attack of the Killer Tomatoes

Killer Tomatoes seem ripe for an NES platformer.

Oooh, it’s both animated AND detailed!

To Beat: Reach the ending
Played: 12/5/17 – 12/7/17
Difficulty: 5/10
My Difficulty: 5/10
Video: Attack of the Killer Tomatoes Longplay

I know I’ve mentioned before that I don’t watch much movies or TV, but play video games instead in my free time. So Attack of the Killer Tomatoes comes up on my list to play. I know nothing about it at all, but I just know that this is based off some kind of movie or something. It has to be. I turn the game on and I’m greeted by these introductory story segments, further cementing my suspicion. Now that I’ve finished the game and done the research, yes indeed, this is the game based on a cartoon series that was based on a movie. I guess most people figure these things out the other way around, and I just come about it differently than others. But learning is learning, and now I know something about this strange NES game.

The original Attack of the Killer Tomatoes is, according to the movie poster, a “musical-comedy-horror” movie that debuted in 1978. The concept is well summarized from the movie title alone, and it was meant to be a spoof of B movies. It was produced by Stephen Peace and John DeBello, and also directed by John DeBello. The movie concept was conceived by Costa Dillon, and all three worked together to write the film. It has since become a cult classic and eventually spawned three sequels. Return of the Killer Tomatoes was released in theaters in 1988. The other two films, Killer Tomatoes Strike Back! from 1990 and Killer Tomatoes Eat France in 1991 were both direct-to-video films. An animated series, also named Attack of the Killer Tomatoes, aired on Fox Kids in 1990 and 1991, spanning two seasons and twenty-one episodes. This cartoon served as the base for the NES game.

There are two video games based on Attack of the Killer Tomatoes, both bearing this name. The first game came in 1986 for the ZX Spectrum, Amstrad CPC, and MSX, and it is an isometric game. The NES version is a different game that was developed by Imagineering and published by THQ. The game was first released in Europe in 1991, then released in the US in January 1992. It was ported to the Game Boy and was also released in 1992. Japan only got the Game Boy port, where it was renamed Killer Tomato and released in March 1993. Altron published Killer Tomato in Japan.

The tomatoes are killer, and so are you.

Attack of the Killer Tomatoes is a side-scrolling platformer. Dr. Gangrene has evil plans to take over both San Zucchini and the world with the Doomsday Tomato. Young Chad Finletter sets out to stop these plans. A set of huge killer tomatoes called the Gang of Six attempt to stand in his way. Chad travels through the city streets through Dr. Gangrene’s lair and beyond. Stop the evil doctor’s plans and you win the game.

This game has normal platformer controls. Use the D-pad to move Chad. You do a lot of walking left and right, but sometimes you need to climb a ladder or something by pressing Up or Down. The A button lets him jump. The B button is used for a few different actions. You can hold the B button to run, but for unknown reasons this only works in certain areas in the game. Holding B while jumping lets you leap a little farther. You can also hold B while climbing to move faster. In one place in the game, you can also press B to throw rocks. Holding down B and pressing Select lets you toggle the background music if you want. The Start button is just for pausing the game. There’s a weird glitch that happens when the game is paused. You can press Select to advance the game one frame at a time. That sounds like something that could be exploited but it’s not really helpful.

There is a status bar in the upper-left corner during gameplay. It displays your score counter, number of lives, and your health bar. Chad begins each new game with three lives and three bars of energy out of a maximum of six. There are items found in the game that can increase all three of these things. These are found on the ground and are not dropped by enemies. Fertilizer sacks are the most common item that just give you points. Lunch bags restore health and this amount varies depending on the pickup. Sometimes it is just a couple of health points and other times they give you even more than six. The rare lunch box adds an extra life. The design of these pickups is poor because they all look a lot alike. The lunch bag is folded on the top compared to the sack that looks like it is closed by a drawstring. I had to really pay attention to see if it was worth grabbing. I only came across one lunch box in the game and I couldn’t tell you how it differs graphically from the others.

That fertilizer sack is camouflaged!

There are a few enemies that show up in the game and most of them are tomato related. There are tiny little hopping tomatoes as well as larger ones that split into two tiny ones when stomped. There are tomato spiders and other tomatoes that sort of run at you. There are also rats and bats. You can jump on all these enemies to defeat them and you just fall through them when you kill them. A lot of times in platforming games you will bounce off defeated enemies a little, but it makes sense that tomatoes would just get squished. Each enemy deals one point of damage if it hits you, and there are also various stage hazards that can hurt you. A platforming game wouldn’t be complete without bottomless pits that can cost you a life.

The Gang of Six appear throughout the game, but instead of acting as boss battles they are mostly roadblocking enemies and should be avoided. The first one you meet in the game does need to be stomped to get it to run away, but all the other ones stand in your way and try to knock you around. It even hurts to jump on most of them, so don’t even bother. It seems like a strange choice to use these characters as merely stage hazards instead of bosses, but it seems to work fine. You do want to be careful around them because sometimes they can juggle you in the air and hit you multiple times.

Some of the stages in the game are mazes. The manual calls them 3D mazes but that’s a little misleading. These areas are still side-scrolling platforming levels that have a bit of a three-quarters perspective to them. There are branching pathways visible either into the background or into the screen, and you can press Up or Down to walk to the adjacent screen. They may seem difficult but are pretty straightforward as far as mazes go. If you take the wrong path, you won’t have to backtrack too far to figure out the correct way through.

You don’t wanna mess with these guys, just jump over them.

If you lose all your lives, you get to continue. One of the killer tomatoes spells out the message “Try again tomato head” when you lose all your lives. I like that better than the standard Game Over! You get a new set of three lives, but you can only continue twice before having to restart the game.

This was my first time playing Attack of the Killer Tomatoes. It was one of the later additions to my collection. In fact, I bought this copy in the same lot that contained the recently-beaten Kiwi Kraze. That lot was five games for $35, so I did well getting the game for essentially $7. It’s not a common game to find and sells in the $15-$25 range today.

Platformers with limited continues are normally the kind of game I would rate as a 7/10 or 8/10 difficulty. There are lots of way to take damage or die, and you have to play the game repeatedly to get the hang of it. Attack of the Killer Tomatoes gets an average rating because the game is very short. During the first night of playing I got majorly stuck during the third level. It doesn’t look like you can go anywhere at first. You need look for something within the stage that lets you proceed and I just completely overlooked it. The next night I saw my way through that part and ended up beating the game directly from there. I wasn’t recording because I didn’t expect the game to end so soon. I recorded a run the next night in around 15 minutes, only dying once in the first level and again near the end of the game.

Mazes aren’t as complicated as they seem.

Because Attack of the Killer Tomatoes is so short, I’ll run you through the whole game. These are all spoilers, so skip this section if you want to try this on your own. You begin on the streets at night working your way to the right. You have to bop Tomacho five times to progress to the manhole on the far right. This takes you to the sewer maze. Work your way past Ketchuk twice and chase the shadowy figure to a room with a large pipe organ. Here you throw rocks and must break each pipe of the organ to move on. You go back to the streets briefly before going into the tomato factory. Avoid Beefsteak on the floor and the roving robotic arm above and work your way to the top where you will flip a switch on the wall that reverses gravity. This was the part I didn’t get at first. You will need to go up through the ventilation shaft and end up in a small room where you need to bop some enemies for awhile until Dr. Gangreen opens the door ahead. This takes you to the tower. Fang and Zoltan will get in your way at various points as you climb to the top of this maze. Reach the Doomsday Tomato and Chad stops it on his own, loading the end credits. Now that game isn’t quite done yet because you get eaten by a huge tomato and need to work your way through the final maze inside. Just keep moving and get past Mummato when you see him and you’ll get to the end. If you hit a dead end you will probably find a lunch bag to refill your health anyway. Grab onto the large stalactite at the end to crush the tomatoes for good!

Imagineering may not have the best track record for platformer games on the NES, but Attack of the Killer Tomatoes plays well enough and has some neat technical moments that helps it stand out a little bit. Thrown tomatoes help spell out the letters during the credits sequences. Street lights illuminate the character palettes in a clever way. The tomato squishing graphics are oddly satisfying, and splitting bigger tomatoes in two is pulled off seamlessly. The platforming and character movement aren’t the greatest, but may well be the best of their games I’ve played so far. The music is good too.

Despite all the neat touches, the game is only average in gameplay and it is over just as soon as it gets started. It would have been disappointing buying this game when it came out at full price. I really have no idea of the popularity of the cartoon at the time and if that had any bearing on the sales of the game. Word of mouth of the short length of the game might have deterred it from selling well. Both of these could be factors for why the game is a bit on the uncommon side. Attack of the Killer Tomatoes is merely NES library filler. Though I’m glad I played it, like I feel about most NES games, I would say skip this one.

#65 – Attack of the Killer Tomatoes

 
AUG
10
2017
0

#49 – Kings of the Beach

No crowns required to be kings in this four-player volleyball game.

Very chill setting!

To Beat: Win a tournament
To Complete: Beat the game on the Difficult setting
What I Did: Completed the game
Played: 4/7/17 – 4/13/17
Difficulty: 5/10
My Difficulty: 5/10
Video: Kings of the Beach – Tournament Mode Final Matches

I am not good at sports. I still like to play them when I get the chance even though I wasn’t blessed with any ability. If there’s one game I am at least decent at, it would be sand volleyball. I organized a weekly sand volleyball night with a bunch of friends for several years, and that afforded me the opportunity to practice often. Now don’t let me fool you, I’m still not all that good at volleyball. However, I am pretty good at playing video games. Therefore, it shouldn’t be that much of a stretch for me to complete one of the few NES volleyball games.

Kings of the Beach is a volleyball game developed and published by Electronic Arts in 1988 on DOS. It was ported to the Commodore 64 in 1989 and the NES in January 1990. Ultra Games published the NES port. However, it is unclear if either Konami or Electronic Arts developed this version of Kings of the Beach. The game was only released in the US.

Kings of the Beach is a two-on-two beach volleyball game. You play as professional beach volleyball players Sinjin Smith and Randy Stoklos. In single-player mode, you only control one character and your partner is computer controlled. The main draw for single player is the Tournament mode. Here you will play against other pairs of players in five different locations all around the world. To win the tournament mode and beat the game, you must win three consecutive matches at each of the five beaches for fifteen total matches.

Interesting cursor choice!

At the start of the game, you move a green cursor around in an overhead map of the beach. This is your menu. The first place you will want to go is the registration tent, which is the game’s options menu. To start, you can assign either a controller or computer control to Smith, Stoklos, and two other competitors. Kings of the Beach supports up to four players simultaneously using the NES Four Score accessory. Next, you can choose between cooperative play or competitive play. This is only needed for a two-player game to decide if you want to play on the same team or not. You can set the difficulty of computer opponents to either Easy, Medium, or Difficult. You can choose if you want to play either a single set or a three-set match, and you can toggle the sound on and off. Choose Exit to Beach to go back to the main menu.

The other menu options are for practice or setting up a game. At the top of the screen there are three beaches labeled Bump, Set, or Spike. If you choose one, you are put in a practice beach where you get easy setups to practice the basic moves. Press Select at any time to exit the training and go back to the menu. At the lower left of the menu is the Match option where you jump directly into an exhibition match with the defined settings. This is the mode you want for a three or four player game. The bottom right part of the menu starts up the Tournament mode. You can select either a new game, or continue a previous game with a password. After that you jump right into the action.

Kings of the Beach plays by standard volleyball rules. Each side has two players and each point starts with a serve from the back of the court. Each side can hit the ball up to three times before hitting it over to the opponent’s court, and teammates must alternate hits. If the ball lands in your opponent’s court, the opponent hits the ball more than three times, or the opponent hits the ball out of bounds, then you win the point. The serving team is the only team that can score, otherwise the non-serving team gains control of the serve if they win the point. In a single set match, the first team to fifteen points wins. In a three-set match, teams play to twelve points per set. In either case, teams must also win by two points. This means play will continue beyond the required winning score until a team leads by two.

Bump, set, spike!

The basic strategy of beach volleyball is to use your three hits to bump the ball, then set the ball, and finally spike the ball. You will use the D-pad to move your player around the court. Quite often you will move on your own to the spot where the ball will land as it’s heading toward you, but sometimes you need to position yourself properly. The ball casts a shadow on the sand that will guide you toward where you want to stand. Press A to bump the ball in the air toward your teammate. To set the ball, press B. To spike the ball, press both A and B. The spike is a powerful jumping hit toward the opponent. You will need to focus on timing for all hits, but spiking the ball requires the best timing. The idea is to run up to the net and jump, meeting the ball with your hands at the top of your jump. For all hits, you can guide it in a direction using the D-pad in conjunction with the hit.

The above moves are mostly offensive moves, but you do have a couple of defensive moves at your disposal. If you know the opponent will spike the ball, you can move up against the net and press A and B together to jump up and attempt a block. Sometimes you can repel the ball right back into the opponent’s court for a quick point. Stoklos has his own signature block called the Kong block, which is very powerful. The other defensive move is called the dig. This happens automatically whenever the ball is just far enough out of reach normally. You will make a dive toward the ball to bump it back up into the air. I didn’t seem to put myself in good positions to do this very often, so in my experience it was left to chance.

Serving the ball effectively is a vital skill. When it’s your turn to serve, you can move up and down the line to put yourself in the position of your choice. There are three different ways to serve the ball. The easiest method is the underhand serve. Simple press A and B together to lob a slow serve at the opposite court. You want to pay attention to the flags that indicate wind direction because an underhand serve may come up short if the wind is blowing in hard. The overhand serve is more powerful. Press A to toss the ball straight up, wait for the ball to come down, and then press B to do a standing, overhand hit. You can use the D-pad to aim the ball while serving. The most powerful serve is the jump serve. Like the spike, it’s the most difficult serve to perform. Press A to toss the ball just before, but this time press A to jump and hit the ball. The more powerful the hit, the more likely the opponent will be unable to return the ball.

With the right timing, the jump serve is the best one.

One neat thing you can do is argue a call with the referee. Every now and then the line judge will make a mistake on a ball that lands near the lines. If you think a bad call went against you, then you can run up next to the judge’s stand and press Start to dispute the call. You will see your player make a scene as persuasively as possible. If you are successful, the referee reverses his call and you get the ball! If the judge disagrees, then he will shake his hand no and hold out a penalty card. This can be either a yellow card or a red card. The yellow card is just a warning, but if you lose a second disputed call in a set the referee will give you a red card instead and you lose a point off your score. Your opponents and even your partner can dispute a call on their own. One key thing is that if you want to dispute a call, you need to decide quickly and get over to the referee right away to plead your case. You lose your opportunity to argue a call if play advances to the next serve.

As stated earlier, to complete Tournament mode you must win fifteen total matches broken up into groups of three. After you win three consecutive matches on the same beach, you get a password for the next beach. The passwords are up to eight characters long and are normal words that are easy to write down or remember. I noticed that the passwords are the same for each beach no matter what difficulty or length of match. For instance, you can win the first round of matches on the Difficult setting with three-set matches, and the next time you play with the password you can select Easy difficulty and single set matches. You can play however you want!

This was my first time playing Kings of the Beach. The game was a later addition to my collection, but it is pretty common and inexpensive so I have had a few copies pass through my hands. I am not a huge fan of sports games even though I enjoy playing a little volleyball. Chances are I would not have given Kings of the Beach much of a chance if not for this project. Chances are I will also say this same thing about many other future games!

Digs are done automatically. This one was successful!

For my playthrough, I decided on playing single set matches on Medium difficulty. I played as the default Smith and let the computer play Stoklos for me. My intent was to learn the game on Medium difficulty and then go back and play the game again on the Difficult setting. At first, Medium difficulty was enough of a challenge. I understood the fundamentals early on, and other than some mistakes with spiking I was already playing well enough to make some progress. My struggles came in the third match of any beach. I could play well enough to win the first two matches, and then I would lose the third and have to start over at the top. That is awfully frustrating. Kings of the Beach became a fight of attrition and required some good old fashioned grinding to seal the win.

It seems like many sports games have some kind of exploit or tactic that makes life much easier. I found one such tactic that helped me win points much more often. The first thing is I needed is the setup to spike the ball myself. Usually this required getting the first hit on the return so that I could get the third hit and spike, but sometimes I would take the spike myself on the second hit instead. It’s a little riskier but it can catch the opponent off guard. My spike position was up against the net either slightly above or below the center. I would spike toward the corner of the net and the closer side line. For example, if I set up below center, I would aim for the lower line near the net, and do the opposite when closer to the top. The opponent tended to favor guarding the larger area so I could sneak it in on the other side close to the line without either player getting to it. That trick does not always work, but it works often enough to be useful.

My partner is disputing a call unsuccessfully.

I beat the entire game on Medium over the course of a few days. Once I accomplished that, I bumped up to the Difficult setting and repeated the final three matches with the last password. If I can beat the last beach on Difficult, then I should be able to beat any other configuration, so I didn’t bother repeating anything else on Difficult. I did not notice any significant changes between Medium and Difficult settings. Perhaps the opponents make fewer mistakes or make powerful serves more often on the higher settings, but I could not tell the difference. With my spiking tactic, I could score more often than not regardless of difficulty. I recorded my video of the final set of matches on Medium difficulty, and then played the final matches again on Difficult unrecorded. The ending is the same on either difficulty.

I would have considered the game more difficult overall if not for the fact that the computer controlled Stoklos handled nearly all the defense for me. Actually, my computer partner played very well in general and handled many situations better than I could have. Most of the time he plays close to the net so he can utilize his powerful Kong block. My job was to back him up and try to get to anything hit past him if I could. We worked together well on the offensive side too. He is a good spiker and serves very well. He’s not a perfect partner and makes mistakes that are unavoidable, but in my opinion he is a more consistent player than I am. It’s a pleasant surprise to have a competent computer player for once!

There are not many volleyball games on the NES to compare, but I think they did well with Kings of the Beach. The game sets itself apart somewhat for having a simultaneous four-player mode. It also performs well as a single player game. The computer controlled players are competent both as opponents and partners. The graphics and music are well done, just as you would expect in a Konami game. The game is a tad lengthy and repetitive, but it’s just the nature of the game so it hard to fault Kings of the Beach for that. If you are looking for an NES volleyball game, you won’t do wrong with Kings of the Beach.

#49 – Kings of the Beach

 
MAR
31
2017
2

#39 – Little Nemo: The Dream Master

What dreams are made of!

I usually listen to the good music for awhile here!

To Beat: Reach the ending
Played: 11/27/16
Difficulty: 7/10
My Difficulty: 5/10
Video: Little Nemo Longplay

There are quite a few games I have discovered in the NES library where I play it and immediately realize that I have been missing out for years. Little Nemo: The Dream Master is one of those games for me. I had most of the popular games growing up and many other good games, but there are so many games on the console that some end up being skipped. I am sure I had my opportunities to play the game much earlier since I was definitely aware of Little Nemo long before I played it. Either way, it’s better late than never! Little Nemo is a game that I really like and I am excited to tell you more about it today!

Little Nemo in Slumberland is a comic strip created in 1905 by an American cartoonist named Winsor McCay. It follows the story of Nemo and his adventurous dreams where each strip ends with Nemo waking up out of bed. The comic was published in the New York Herald until 1911 when McCay moved to the New York American. McCay was able to retain the rights to the characters and he brought Nemo to the American under the name In the Land of Wonderful Dreams from 1911 to 1914. In 1924, McCay returned to the Herald and revived Little Nemo in Slumberland until 1926 when it ended due to lack of popularity.

Little Nemo branched out into other forms of media over the years. A play was created in 1907 and another was created much more recently in 2012. There was a film made about McCay in 1911 that involved him creating animations of Little Nemo characters. There was an original opera performed in 2012. There have also been compilations of McCay’s original work, and McCay’s son even tried to bring back Little Nemo after his father’s death with lackluster results. However, the most notable work was the joint American-Japanese film named Little Nemo: Adventures in Slumberland. This 1989 movie serves as the basis for the NES game.

You know you’re in for a treat when one of the first things you see is a giant mushroom!

Little Nemo: The Dream Master was released on the NES in North America in September 1990. It was both developed and published by Capcom. The Famicom release, titled Pajamas Hero Nemo, was released a little later in December 1990, and the European NES release debuted in December 1991. The story of the game follows closely to the 1989 movie. Curiously, the film was not released in the US until 1992, two years after the NES game. Capcom also released a separate arcade platformer simply named Nemo in 1990.

Little Nemo: The Dream Master is a platformer game. You play Little Nemo as he is tasked by a messenger of the princess to rescue Slumberland and King Morpheus from the Nightmare King. Nemo must work his way through eight areas to beat the game and save Slumberland. True to the source comic strip, each area in the game is a separate dream with Nemo hopping into bed to start the level and being woken up by his mother after the level.

On his own, Nemo is not very powerful. He can move around reasonably well, including jumping and ducking, and he can throw pieces of candy. However, the candy can only temporarily stun enemies without dealing any damage. Nemo can feed certain animals three pieces of candy which causes them to fall asleep. He can then take a ride on the animal or sometimes actually become the animal, which gives Nemo the means to clear obstacles and fight enemies. You can press Select to switch back to regular Nemo and from there take control of a different animal if desired.

The Frog lets you make these tall jumps.

There are several animals in the game and each one provides Nemo a set of additional capabilities. For starters, each type of animal has a certain amount of health points that may vary from Nemo’s own health. Enemy attacks deal one point of damage to Nemo and he loses a life when he runs out of health. More important than health are the different animal abilities needed to properly explore the stages. For instance, in the first level Nemo can become a frog that can jump higher than Nemo to reach tall ledges, and he can defeat enemies by jumping on them. Later you come across a mole that lets Nemo dig underground to explore even more. Some animals can climb walls, some can swim or fly, some have useful attacks, and so on. You have to play around a bit to figure out what you can do with a new animal. If there is an obstacle in the level, then there is an animal nearby capable of tackling it. Therefore, the platformer has some puzzle elements to it where you need to track down different animals and experiment with their capabilities.

There are a few items that will help Nemo out. Small bottles restore a single point of health, and first aid kits restore all of Nemo’s health. There are 1up icons that give Nemo an extra life. Finally, the most important items in the game are keys. At the end of most levels there is a locked door with several keyholes next to it. To finish the level, you need to collect enough keys scattered throughout the stage in order to unlock all the keyholes. Unfortunately, you have to reach the end of the level first to see how many keys are required, and you are forced to backtrack if you come up short. Some of the keys are well hidden in alcoves and branching paths. You will need to master all of the creatures in the game and search high and low to meet the level requirements.

There are many different environments in the stages. The first level is a mushroom forest with giant mushroom mountains as well as caves to explore and waterfalls to climb. There is a jungle level, a sea level, and others. There is also an auto-scrolling train level thrown in there for something really different. There is always something new to explore and there is a lot of variety to keep things interesting.

What kind of toy house has crushers like this?

This is a bit of a spoiler, so jump ahead a paragraph if you don’t want to know. Toward the end of the game Nemo gets an actual weapon that he can use to take out the bad guys when he doesn’t have an animal helper. The difficulty gets significantly bumped up here in part by introducing boss battles. Not only do you have to get more used to controlling Nemo on his own, but you have this new weapon to figure out. It may seem like an unnecessary change in the game, but I find it quite a bit of fun.

Little Nemo is typically regarded as a difficult game, and to an extent I agree. The difficulty curve feels a little bit uneven with some levels more taxing than others, and then the game takes a significant bump up in challenge toward the end like I just mentioned. The game has infinite continues which limits the difficulty, however, the whole game is long and challenging enough where you may not be able to grind through it in a single sitting.

I didn’t own Little Nemo until much later in my NES collection, but I remember reading about the game quite a bit. I probably ended up emulating it first but only just to try it out for a bit. One of my good friends has a very small collection of NES games but Little Nemo is one of them, and he would tell me about how good the game is to play. That sold me on the game enough to seek it out. I don’t remember when or how I ended up getting my copy, but when I did I ended up playing through it shortly thereafter. I have played through it at least a couple of times before covering it now.

You can “bee” deadly if you must!

Despite my experience with the game, I don’t know it well enough to just breeze right through it. I remembered enough to beat the game in a single sitting, but not well enough to look good doing it. I recorded my playthrough but it is definitely not my best effort. I had to continue a few times, and I forgot some of the keys and had to go back and find them. Thankfully this blog is about finishing the games regardless of skill or style, so I’m satisfied with getting to the ending of the game.

I want to take a moment to praise the soundtrack. Capcom games tend to have really memorable music, and Little Nemo follows that trend. The soundtrack is often upbeat and I think it really captures that dreamy feel that should accompany a game like this. Some of my favorite tracks are right at the start, including the prologue, title screen, and Mushroom Forest theme. You can listen to all the songs at the VGMPF website.

Little Nemo: The Dream Master is one of those games that should be in any NES library. The graphics, music, and gameplay are all top-notch. There is quite the variety of animals, level layouts, and obstacles for a game of this length. Despite that fact that each animal behaves differently, the controls feel good and make sense all around. This is a title that is still affordable for any cart collector. The only negative I see is the uneven difficulty and the endgame challenge, but I welcome it so that’s not a problem for me at all. If somehow you missed playing this game like I once did, I would recommend giving it a try!

#39 – Little Nemo: The Dream Master