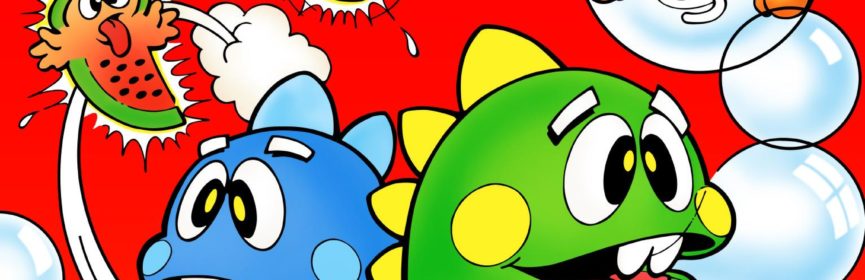
#176 – The Flintstones: The Rescue of Dino and Hoppy
Have a Yabba-Dabba-Do time!

Including the iconic theme song!
To Beat: Reach the ending
Played: 5/18/21 – 5/24/21
Difficulty: 5/10
My Difficulty: 5/10
My Video: The Flintstones: The Rescue of Dino and Hoppy Longplay
When you mention The Flintstones to someone who knows a lot about the NES, specifically the collecting side, they don’t think much about the cartoon, or Fred and Wilma, or Hanna Barbera, nothing like that. Minds go straight to The Flintstones: The Surprise at Dinosaur Peak. If you don’t know, it’s the hardest to find licensed NES game aside from Stadium Events. The collector will either be smug about owning a copy (I try not to be this way!) or go on some long monologue about how collecting old games shouldn’t be so expensive and all that. But Surprise at Dinosaur Peak is not what we’re here to talk about today, for there was an earlier Flintstones NES game that is much more affordable, and also a pretty decent game in its own right.
The Flintstones is an animated sitcom that premiered on ABC in September 1960. The cartoon ran through April 1966, spanning 6 seasons and 166 episodes. It was the longest running and most successful animated series until it was dethroned by The Simpsons all the way back in 1997, which is still going strong today. Despite its apparent success, The Flintstones was not well received by critics at the time, only catching on as a classic through repeated reruns over several decades. The series and characters have been featured in numerous spin-offs, films, TV specials, and all kinds of other media, on a consistent basis since release.
The Flintstones have appeared in several video games, even pre-dating the NES entries. The first Flintstones game was called Yabba Dabba Doo! and it was a European only release on a few different computers in 1986. There were a couple more Flintstones games that appeared on personal computers before they started to come to consoles. The first console Flintstones game is the one we are covering today. The Flintstones: The Rescue of Dino and Hoppy was developed and published by Taito, releasing first on the NES in North America in December 1991. It was subsequently released in Europe, Japan, and Australia in 1992. Mattel was the publisher for the Australian release. Sol Corporation is also credited as a developer on this game, but not much information is known about their development credits so we cannot say for sure.

There sure are some interesting gadgets in these times.
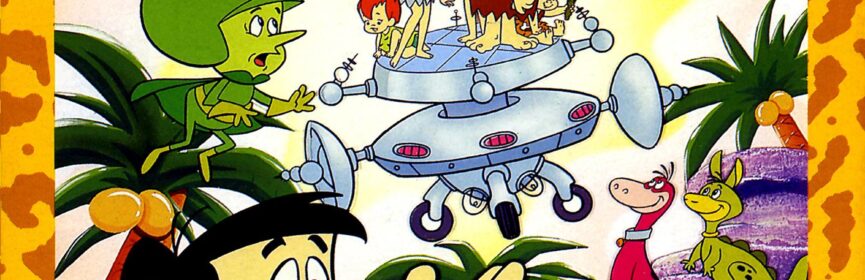
The plot of the game is simple and almost completely evident from the game’s title. The Flintstone family was hanging out with their neighbors, the Rubbles, and their alien friend Gazoo. Suddenly, a time machine appeared that was piloted by Dr. Butler. He is from the 30th century and preparing a zoo full of prehistoric creatures, and so he kidnaps the families’ pets Dino and Hoppy. Not only that, but on the way out he destroys Gazoo’s time machine so they cannot follow him, scattering the parts all over. It is up to Fred Flintstone to collect the pieces over several platforming stages in order to rebuild the time machine and travel to the future to rescue Dino and Hoppy.
As soon as you finish the opening cutscene, you’re jumping right into the platforming. Move Fred around with the D-pad. Press the A button to jump. Fred can grab onto ledges and pull himself up to get to higher ground. Press and hold the A button while at the edge of a ledge to grab on. If you release A, Fred lets go quickly, but if you press and hold Up while continuing to hold A, Fred slowly pulls himself up the ledge. The B button swings Fred’s club. This is a short range attack to bop enemies. Also, you can hold the B button down to charge up a swing, then let go to bash even harder. There are secondary weapons you can find along the way, and you use them by holding Up and pressing B. The Select button cycles through the secondary weapons, while Start both pauses the game and summons Gazoo to help out with some other special abilities.
The display at the bottom of the screen tells you all you need to know. Fred’s lives and current health are on the left side of the display. On the right side you have the power meter, which grows while Fred is charging a club attack. Below that on the bottom right are the number of coins. These are spent as Fred uses his special weapons, so you’ll want to have enough of these for tougher encounters. In the middle of the display is a square that shows which secondary weapon Fred has selected.
Fred also collects various weapons and items throughout the stages. Defeating enemies cause coins to drop so you can stock up on cash. The other items are found in barrels or crates. The heart item restores all of Fred’s health points. The cactus cooler, which looks like a log with spikes out the top, extends Fred’s maximum health by one heart. The bronto burger extends the maximum length of the power meter for stronger hits on the bad guys. The 1up item in this game has Fred’s head on it. In the barrels you also uncover the secondary weapons. The stone axe costs 3 coins per use, and it travels in an arc much like the axe from Castlevania. The slingshot is a simple projectile attack that also costs 3 coins. You need 10 coins to wield the boomasaurus egg. It is akin to a time bomb that damages enemies in a wide range.

Sweet hang-time in prehistoric basketball!
Another fun thing you can do is play the basketball mini-game. After clearing the first stage you are brought to the world map. Some of the areas on the map are the basketball stages. Your opponent, Hard-Head Harry, has some useful tools for you as long as you can best him in a match first. Each match lasts only one minute, and you earn two points for every basket made. When Fred has the ball, you can jump with A, then press B at the top of the jump to throw the ball. The baskets are the mouths of giant birds that can open and close at will, a fun visual gag the likes of which you’d see in an episode of the show. On defense, you can press B to do a body bash and try to knock the ball away from Harry. You have to outscore Harry outright to win, no ties allowed.
Defeating Harry on the court unlocks one of three special powers that you can utilize in the platforming stages. Press Start to summon Gazoo, then select the power. The Jump power summons a giant Hoppasaurus that can take one mighty leap before leaving the scene. The Fly power gives Fred bird wings allowing him to fly until landing. The Swim power dons a snorkel and flippers to swim more effectively in water. These abilities cost coins to use but can be very helpful in some situations.
This was my first time playing through The Flintstones: The Rescue of Dino and Hoppy. This game is a bit uncommon, but not super hard to find. I’ve only had one copy that I picked up in a lot. For a couple of months back in 2008 or 2009, I started buying a few specific NES games and bidding on bulk lots on eBay. After a few auction wins, I already started to get overwhelmed with the extra games and duplicates, so I stopped doing that. I do remember that I got this game and Metal Storm in the same lot, and those games were cheap back then, so I made out very well in the long term. Anyway, I’m not even sure if I tried the game back then or not, I just shuffled it into my collection.

Getting dinner together the old fashioned way.
If you haven’t been paying attention to the dates, I’ll point out that I have criminally fallen behind on posting these reviews. Here almost two and a half years late I’m finally getting around to it! Writing is going to be a bit of a struggle to try and recap something from so long ago, but where I can I’ll attempt a replay to catch back up. Maybe it will help the thoughts crystallize somewhat, or it will make the game feel brand new again. Who knows?
Back in 2021, I was able to beat this without too much trouble. I had to continue once or twice, but it has unlimited continues so no issue there. The final stage and final boss are the trickiest parts, but a few attempts was all it took. In my recent replay, I felt like I had a harder time beating this than I did before. I needed several continues in the mid and late game, especially that final stage. Beating the final boss went better than I thought, but also felt a bit like I got lucky with dealing a bunch of damage while not caring about Fred’s own health, and surviving just long enough to finish. The little bit I remembered from playing this back in 2021 helped a lot in that respect. Anyway, I do not think a fourth playthrough is in order, that’s enough Flintstones, it’s time to move on!
The Flintstones: The Rescue of Dino and Hoppy is your typical average NES platformer. Graphically, the game is quite appealing. The characters are all drawn well and are recognizable even as tiny sprites. The environments are varied, with different levels themes and gameplay tweaks sprinkled throughout. The transformations, while seldom used, add an extra element to help get through certain sections. The music overall is pretty good as well, with the familiar Flintstones theme done well, along with others. There was nothing here that was particularly catchy or an earworm, but solid anyway. The gameplay is a tad bit weaker. The controls and movement feel just a bit sluggish, while some enemies are much more mobile and difficult to handle. Fred’s club range is shorter than you would expect, and when charging up the club there’s really no clue how much damage you’re actually dealing. On the other hand, grabbing a ledge to climb feels more generous and is used often in the level design to good effect. The Flintstones is somewhat of a mixed bag but is generally a good game. I’m excited to see what the expensive sequel has in store.

#176 – The Flintstones: The Rescue of Dino and Hoppy