Take on the NES Library

An 8-bit Extravaganza!

games

MAR
09
2018
0

#68 – Super Team Games

Great, another exhausting Power Pad game!

Some balloons burst to get you started.

To Beat: Win all four events in single player
To Complete: Win all events on the highest difficulty
What I Did: Beat all events on the lowest difficulty
Played: 12/21/17 – 12/28/17
Difficulty: 7/10
My Difficulty: 7/10
Video: Super Team Games – All Events

Another Power Pad game already? I just finished World Class Track Meet not even a week before this. There are only a handful of Power Pad games that reached the NES, and it is just dumb luck that we get two such games almost back to back. This may have been a good thing here since my Power Pad muscle memory from the previous game carried over to this one. I needed that because Super Team Games is significantly more challenging than World Class Track Meet.

Super Team Games was developed by Sonata (who would later become Human Entertainment) for release in Japan in November 1987. It was originally published by Bandai, and it was the seventh game in their Family Trainer series. Nintendo published the NES release in November 1988, branded as a Power Pad game. It did not include any Family Trainer or Family Fun Fitness branding, just like World Class Track Meet. This was the final game of the Famicom’s Family Trainer series to reach North America.

Super Team Games is a running race game where you compete in different types of events and try to beat your opponent. There are several smaller events that are arranged into larger obstacle courses. There are several different modes for single player, two players, and two teams of players. Since multiplayer modes are competitions against each other, only the single player modes count for beating Super Team Games. There are four different obstacle courses in single player mode, and when you win all of them you have won the game.

You gotta start jumping pretty early.

This Power Pad game uses Side B, which contains blue buttons on the left and red buttons on the right, all individually numbered from 1 to 12. In single player, we are only concerned with the blue buttons. The top row buttons are 1 and 2, the middle row buttons are 5 and 6, and the bottom row buttons are 9 and 10. Multiplayer games use the red buttons, so just add two to each button number to get the same mappings for the second player.

The menu controls are the same as World Class Track Meet. On the title screen, press Select to move the cursor and press Start to go to name entry. In the tournament mode, you first select how many teams you want between three and six. Use the D-Pad to move the cursor at the bottom and press Select to lock in your choice. You then move to name entry which is identical for all modes. The blinking cursor at the top part of the screen determines which character in the name you want to choose, and you move that cursor by pressing B to move it left and A to move it right. Use the D-Pad to move the letter selection cursor at the bottom part of the screen. Press Select to write the selected character in the name field. When all names have been entered, press Start to begin.

Now you move to the event screen. There are flags displayed with the names of all the events. Press Select to choose the event and press Start. In 1 Player and 2 Player modes, the events are Super Obstacle Course, Obstacle Course A, Obstacle Course B, and Skateboard Race. The 2 Team Play and Tournament mode events are 6 Legged Race, Tug of War, and Relay Race. More on these modes later. The next screen is the versus screen showing who is competing in the race. If you are playing Tournament mode, you will see a screen in between showing the bracket setup. In single player, the versus screen lets you decide which computer character you want to race against. Press Select to choose from either Ollie, Jimmy, or Jack, and press Start to go to the race. Ollie is easy mode, Jimmy is medium difficulty, and Jack is the fastest.

What lovely flags!

The gameplay screen has the same structure in all events. The left runner, designed as the White team, is displayed on the top part of the screen and the right runner, or Red team, is below. At the bottom of the screen is a minimap that shows how far each player or team has reached in the current race. You also see times for each runner. This timer freezes briefly during checkpoints so you get a better glimpse of how you are doing as you compete. To begin the race, all active participants must be standing on the Power Pad in their designated spots. For single player, stand on 5 and 6. A whistle is blown and soon the referee fires the starting gun.

Let’s look at each of the events first. Then I will explain how they combine into the different courses.

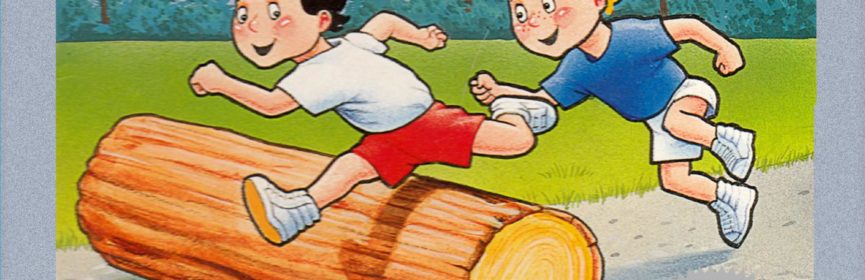
The Log Hop is exactly how it sounds; you run and jump over stationary logs. This introduces the standard controls that apply to many events in the game. Run on 5 and 6 in the middle row to move forward. Take a step back and run on 9 and 10 to back up a little bit if you need to. You can run right up to the log and then jump in the air so that your character jumps as well. The logs are medium height so they aren’t too tough to jump over. You can even land on top of the log and run right off.

No, you can’t run around the ball.

The Belly Bump Ball has the same controls as the Log Hop. Here a giant beach ball is in the middle of the track and you have to bump it forward by running into it. The faster you run into it, the farther down the track it goes. Ideally you want to get into a good rhythm of bouncing it far ahead and then running fast to knock the ball ahead again. If you come at it slow, the ball won’t go very far and then you don’t have the distance necessary to build up speed unless you take a few steps back and give yourself some running room.

Water Cross is similar to the Log Hop. There are pools of water on the track that you want to jump completely over if you can. Run up to the edge and jump to hopefully get across. More than likely you will fall into the water. You can swim by running on 5 and 6, but you will cross very slowly and use up a lot of time.

In the Crab Walk, I guess you wear a crab outfit? It’s weird. You want to put your left foot on the 1 and your right foot on the 9 and then run in place to inch ahead. It’s different than the other events since your feet are much further apart. I could move forward but really couldn’t get the hang of this one like I should have.

The Wall Jump is exactly like the Log Hop. The walls are thin and much taller than the logs. You really need to jump high to get to the top of the wall. Not only that, but there are two different heights of walls just to make things more exhausting.

This is a very sturdy bubble.

In Bubble Run, you first approach an air pump and must blow up your bubble. Hit 1 and 2 in the first row to inflate your balloon. The manual says to hit the buttons with your hands, which makes sense since you are working an air pump. You can run on it if you want, but my legs needed a break! Once the bubble is filled, then run on 5 and 6 and take the bubble to the end.

These are all the basic events that combine to form the larger events that you choose from the menu before play. In the Super Obstacle Course, you run all six of the above events in that exact order. In Obstacle Course A, you do the Log Hop, Water Cross, and Wall Jump, and in Obstacle Course B you do the Belly Bump Ball, Crab Walk, and Bubble Run. The Relay Race in the team play modes is the same as the Super Obstacle Course. Instead of running the whole thing alone, you pass the baton and substitute team members after each pair of events.

That’s not all! There are also three other unique special events:

The Skateboard Race is for one or two players. In this mode you don’t have to run, which is quite the relief! Your front foot position will either be on the 5 or 6, and your back foot position is either 9 or 10. First, stand on 5 and 6 to start with the whistle blow, then put your front foot on 5 and your back foot on 9. I like to face right while on the mat. This will position you in the top row in your course. Move your front foot to the 6 and then move your back foot to the 10 to move your character to the bottom row in the course. You can switch positions one step at a time to slide your skateboarder. You may rhythmically step between positions to slalom and that lets you move faster down the course. You also need to sidestep to dodge obstacles on the course. Some obstacles block both lanes and you must jump to get past them. If it sounds complicated, I’m sure you will get it once you finish the course once or twice.

Try to weave around the obstacles.

The 6 Legged Race is a team event only. You need six players for this event! Each team of three stands back to back on the respective spaces on the Power Pad so that there is a foot on every button. Each team must take left and right steps together as if their feet are tied together. If someone is out of step the racers will fall over and make it harder for the team to continue to walk. There’s no feasible way for me to play this event, but I bet it would be hilarious!

The Tug of War is another team event that can be done with either two, four, or six players against each other. Within a team, the first player stands on 5 and 6, the second player stands on 1 and 2, and the third player stands on 9 and 10. The other team takes the respective positions on the right side of the Power Pad. When the firing gun starts, everyone runs as fast as they can. Whichever side has pulled more of the rope after 30 seconds wins the Tug of War.

I’ve never been a Power Pad player, so this was my first time playing through Super Team Games. All of the Power Pad games tend to teeter between common and uncommon, but they are neither difficult nor expensive to track down if you really want them. Well, aside from Stadium Events that is. I got my original copy in a lot on eBay early on when I had made my big push to collect the other half of the NES licensed set. I remember seeing it and getting pretty excited since I had never seen the game before and thought it might have been worth something. I quickly found out that it was cheap because no one wants it. I’ve had a few different copies come through my possession.

This was a really bad jump attempt.

Super Team Games is a significant step up in difficulty from World Class Track Meet. Naturally, I learned this the hard way. My first time playing I picked the Super Obstacle Course against the fastest computer runner Jack. He completely blew me away. He completed the entire course in under three minutes while I hadn’t even reached the halfway point yet. I had to stop and step away in the middle of the race for a little while to catch my breath. I kept at it just to get through it, but I never did finish the race. After 10 minutes have elapsed, the race just ends. I was at the very end of the course with the finish line in sight when this happened. So annoying. I’m calling it impossible for me to beat this on the hardest difficulty and immediately accepted the idea of beating it on Easy and stopping there.

I moved on to the Skateboard Race next which is the easiest mode and much less strenuous. It still took me two attempts to beat easy difficulty Ollie. The first attempt was learning the course and the controls, and then the second try was enough to win the race. I then switched over to trying Obstacle Course A and managed to win that race too. The only problem is I forgot to hit the record button on my PC. That really upset me and I knew I wouldn’t be happy unless I completed it again. I was completely spent from playing this game to the point where I had to rest for a couple of days before trying again.

I finished all of the modes over the next three play sessions. The Super Obstacle Course took me two tries to win against Ollie. He finishes the race in around six minutes. I was about twenty seconds behind the first try and then I won by more than that the next try. It also took me two tries to beat the Obstacle Course A again. The first try I quit part way because I was too far behind and exhausted from winning the Super Obstacle Course just before. The next try I won the race by just barely passing Ollie on the final stretch. That was way too close for comfort. Obstacle Course B is quite a bit easier than the other two obstacle courses, but I think that took a couple of tries as well. I used the Skateboard Race as a warm up exercise and finished it a couple more times for good measure. I learned from my mistakes and recorded everything the way I wanted.

That’s how close I was to losing Obstacle Course A.

I think Super Team Games requires more consistency and better form than World Class Track Meet. You can be successful by stepping on the Power Pad as quickly as possible, since that’s more or less what I did. However, it does seem that you are rewarded for having proper form in your steps and jumps. I will caution that I cannot be entirely sure about this. The manual tells you what to do, but not how to do it well. It’s not really feasible for me to test any hypotheses either because I can only play a little bit at a time before wearing out. My theories will have to do. I was able to do a really long jump a few times and I never understood how it happened. I’m sure it has to do with the timing of my jump while running with some speed, maybe even by jumping off of one foot and landing on the other. I also noticed that I accelerated sometimes while jogging for some distance. There does seem to be some momentum inherent in the game physics as long as you keep going without slowing down too much or missing any steps on the buttons. Again, these are just theories. I assume there has to be some kind of technique that I didn’t understand that could help me perform at a higher level.

I do have a few observations about racing Ollie that might be helpful if you want to play this game single player. I found that I was about on par with Ollie in all events but two. Ollie does the Crab Walk well, but does the Belly Bump Ball terribly. I have no idea what the secret is to crab walking and I always lost ground during that event. The Belly Bump Ball is best way to take a big lead. Ollie gets no momentum at all and only pushes the ball a short distance while never backing up to get a better shot at it. If you run fast, pause briefly just after you bump the ball, and repeat, you should clear the event quickly. This was the key for me completing the Super Obstacle Course and Obstacle Course B, leaving only Obstacle Course A without an easy exploit. The sad thing is that the game manual tries to make you feel bad for even coming close in a match with Ollie. From the manual: “Ollie: A push over. Shame on you if you lose!” Let me tell you, there is no shame in losing to Ollie. This really is a tough game.

Super Team Games is not fun to play in my opinion, but it is a competent title. The graphics are simple and clean. The music, while not notable, is decent. The controls work well once you learn how to navigate the menu. There is a wide variety of events, especially when you include many players. The real fun of Super Team Games lies in playing this game with someone else. Racing against another player or coordinating large groups for team events are the kind of activities that form memories and build bonds, even in the heart of strenuous competition. Super Team Games is also a good exercise tool for Power Pad owners, so long as you take it easy and don’t worry about trying to outrun the computer players. Trying to beat the game in single player mode is too tedious and exhausting to be fun, and I missed out on everything in the other modes that would have made it enjoyable. I think the best part of Super Team Games was the feeling of relief to check it off the list and move on to the next game.

#68 – Super Team Games (Super Obstacle Course)

#68 – Super Team Games (Obstacle Course A)

#68 – Super Team Games (Obstacle Course B)

#68 – Super Team Games (Skateboard Race)

 
NOV
06
2017
2

#57 – M.C. Kids

This fun, golden platformer isn’t kidding around!

This screen doubles as a little playground to move around in.

To Beat: Reach the ending
To Complete: Beat all stages and collect all puzzle cards
What I Did: Completed the game
Played: 8/27/17 – 8/29/17
Difficulty: 6/10
My Difficulty: 6/10
Video: M.C. Kids 100% Longplay

McDonald’s is one of the most iconic and ubiquitous brands in the world. Ronald McDonald is a household name, and just about everyone recognizes the golden arches. It’s no surprise that there are licensed video games based on their cast of characters. What may be surprising is that the NES game is quite good. M.C. Kids channels the spirit of Super Mario Bros. 3 with some clever twists that makes it a great NES platformer.

McDonald’s is an American fast food restaurant that was first founded in 1940 by Richard and Maurice McDonald as a barbecue restaurant. In 1948, they changed over to a hamburger stand and subsequently expanded to other locations. Ray Kroc purchased the chain from the McDonald brothers in 1955 and established McDonald’s Corporation. Today, McDonald’s has vastly expanded worldwide approaching 40,000 total restaurants in over 100 countries.

The character Ronald McDonald may have been created by Willard Scott. The former NBC Today Show’s weatherman was the original Ronald McDonald in three television ads in 1963, and he claims to have created the clown character himself. McDonald’s expanded their advertising by introducing McDonaldland in 1970-1971. Many new characters came and went over the years to accompany Ronald. McDonaldland was officially phased out of advertising in 2003.

Something tells me the kids weren’t part of McDonaldland.

A few video games were created using the McDonaldland characters. The Famicom exclusive Donald Land was released in Japan in 1988, and was both developed and published by Data East. The NES game M.C. Kids was released in North America in January 1992. It was both published and developed by Virgin Games. The European version was renamed McDonaldland and was published by Ocean Software in 1993. In a strange twist, the Game Boy port of this game was released as McDonaldland in Europe and rebranded as Spot: The Cool Adventure for North America. A Sega Genesis follow up named Global Gladiators was also released in 1992. Another Genesis game, McDonald’s Treasure Land Adventure, was released worldwide in 1993 by the developer Treasure.

M.C. Kids (pronounced “Em-Cee” Kids) is a side-scrolling action platformer. The Hamburgler has stolen Ronald’s magic bag, and Ronald asks the kids Mick and Mack to help him track it down. To do this, the kids must locate some of Ronald’s puzzle cards from the levels in the world. When you collect enough puzzle cards, the path to the next world is open. This cycle repeats until you track down the Hamburgler and recover the magic bag.

On the title screen, you take control of Mick. This is a great place to get a basic feel for movement and jumping in a safe environment. There is a signpost pointing to the left labeled 1up, and another pointing to the right labeled 2up. Walk off the appropriate side of the screen to activate either one-player or two-player mode. Above the signposts are moon blocks. Bumping your head into the block changes you between Mick and Mack. They control the same, so simply pick the one you prefer. For two-player mode, the second player gets the other character. Two-player mode is alternating play.

This map style reminds me of some other game…

After the introductory story, you are taken to the world map. Use the D-pad to walk on the predefined paths between stages. Press A to enter a stage or house. Each stage is noted with a flashing M with a signpost next to it indicating the level number. At the top of the screen, you see the name of the world you’re in, as well as the level name if you are standing on a stage tile. You also see how many puzzle cards you need for this stage, the number of lives remaining, and how many arches you have collected. The puzzle is on the top right of the screen in a rectangle of six tiles. The cards not yet collected are displayed as M tiles. For each puzzle card you find in the levels, a tile is flipped over revealing part of the puzzle for this world.

The levels themselves are large side-scrolling levels where you control the kid directly. The controls are easy to understand but movement takes time to master. You move with the D-pad and use A to jump. You can duck by holding Down. You get a higher jump by jumping while ducking. You run automatically by walking on the ground in one direction for a while. Movement is momentum based and you maintain your speed well while jumping around. There are slopes that can either boost or reduce your speed accordingly. Running at full speed or close to it produces the highest jumps.

The B button is used to pick things up. The most common thing to grab are blocks that you hold above your head and use as weapons. Walk into a block and press B to lift it, or you can stand on a block, duck, and press B to grab them that way. You then throw the block with B. You can throw the block up or down, or press B without a vertical direction to throw the block forward. Thrown blocks will bounce once or twice before dropping off the screen, and sometimes you can hit more than one enemy with the same block.

Well, I need health, so this little bird has got to go!

At the top of the screen in a level you see a few indicators. The M stands for how many arches you have. These are floating M’s within the levels that you collect just by touching them. The L shows how many lives you have. Underneath that are hearts that represent your health. You begin each new life with three hearts. You lose single hearts when colliding with enemies, and you die when all hearts are depleted. There are no item drops or health pickups in M.C. Kids, but you can restore hearts in a couple of ways. Defeating ten enemies will restore one heart, and if you defeat two enemies with the same block you also recover a heart. You start with three hearts but can go up to four. Health also carries over between stages which is something to keep in mind.

The most important item in M.C. Kids is the puzzle card. They are solid blocks with an M on them and you collect the card by picking up the block. To keep the card permanently, you need to finish the level after grabbing it. You end a level by touching the goal line situated between two goal posts. There is a floating M across the line that will give you some arches if you touch it while breaking the string. When the level ends, you will high five your friend and see a message indicating which puzzle card you acquired, if any. Some cards in a world are for a puzzle in a different world, and some levels have two cards instead of one. The cards can be well hidden or stashed in hard to reach places, so it’s crucial to explore the levels thoroughly.

Most puzzle cards are a little harder to find.

There are several types of blocks in M.C. Kids. Blocks with a 1 on them are extra lives, and you will see many of them in the game. The reverser is a left-facing arrow block that sends you flying and flipping all the way back to the start of the level. Sometimes you will see a block outline moving around in a level. If you find a similarly shaped fill-in block and touch it to the outline, it will make the block solid and you can use it as a platform. A boat lets you float on water and you can climb in it and use the D-Pad to move the boat across water left and right. You can even grab this boat like a block and throw it into a different body of water. There are also porous blocks that float in the water and drift forward on their own. There are sand tiles that you can dig through like in Super Mario Bros. 2.

One of the neatest elements in M.C. Kids is the spinner block. It is a solid, fixed block that is located at the end of a long platform. You want to get a running start and run right over the spinner block. Do this and you will run around to the underside of the block, letting you walk on the ceiling with reversed gravity. You can reach high areas this way. One thing to note with reversed gravity is if you fall off the top of the screen, you lose a life just as if you fell down a pit.

There are also several different springboards and lifts found in stages. Small springboards let you jump high. These are usually found in the open but sometimes are hidden behind grabbable blocks. Super springboards require you to carry a block with you to spring very high. The travel lift is a platform that begins stationary and starts moving when you jump on it. The continuous lift winds around in a predefined pattern and you have to watch it for a while to see its path so you can reach it safely. The conveyor lift shows up near the end of the game. It travels along a guidewire and you move it yourself by standing in the center of it and walking either left or right. Walking left moves it forward and walking right moves it backward. This lift is particularly tricky to learn. The zipper is neither a springboard or lift, but it comes up often. Press B while standing in front of it to transition to either a new room or different location within the level.

This path for this lift winds around a lot.

As you play, you will accumulate arches. You will lose some whenever you collide with an enemy. If you manage to collect over 100, the arch counter rolls over and starts blinking. If you finish the level from here without dying, then you get to play a bonus game. This is a small level containing four blocks on upward rails. One of the four will light with an up arrow, and then shortly after the rest will display downward arrows. You want to jump quickly to the one with the up arrow to slide it upward a little bit before the down arrows activate and lower the block you are standing on. The idea is to lift at least one block high enough to reach a ledge at the top with a couple of zippers. Use the zipper to go to a 1up room with several 1up blocks suspended over a pit. Grab as many as you can! If you fall off the blocks in the bonus game, there’s a moon block on the floor you can use to switch characters if you want.

When you collect enough puzzle cards, you can go to the house in that world and speak with its owner. He or she will then provide you a path to the next world. If you are missing cards for a particular puzzle, you can drop by the house for a hint. Collecting all the cards for a world and visiting the house may provide some other benefits. There is nothing on the map to indicate if a completed level still holds a card, which makes it more difficult to track down missing cards. However, you don’t need every card to beat the game. You may also find secret cards. There is an optional secret world in the game that you can find that only opens if all secret cards are collected.

This was my first time playing through M.C. Kids, though I have owned the game for quite a while. I bought it during a brief collecting phase I had around 2009 or so. There was a deal on eBay where you could pick 10 games for either $20 or $30, and M.C. Kids was one of the games I chose. Those kinds of deals make me wonder if I had missed out on another game that would eventually become more expensive. M.C. Kids sells in the $10-$15 range these days, so it ended up being a good purchase.

This bonus level features multiple fake goal markers.

It took me a couple of days to beat M.C. Kids. The first night I streamed gameplay on Twitch, and I was doing decently until the end of the third world. I was really struggling to figure out a few different sections, and after 90 minutes or so I called it a night. The next night I pushed my way through to the end of the game in a near three-hour session. It wasn’t pretty but I got the job done. However, I wasn’t recording my attempt, and I also beat the game without visiting the special world at all. Once you get to the ending, there’s no way to go back. I also missed two puzzle cards that weren’t necessary to play all the levels and I looked online to find out where they were hiding. I had ideas on where both cards were located, but I don’t think I would have found them on my own unless I grinded out a few more hours of playing. With all that in mind, I beat the whole game again on my third attempt and captured video this time. I had to play the special world blind, but it went relatively well for the toughest stages in the game.

The deeper I get into this project, the harder time I have figuring out how to rate games on difficulty. If you can keep your NES running for a long time, then you could probably beat M.C. Kids. There are unlimited continues, and beyond that there are several places where you can grind out extra lives to not even need to continue. There is at least one level that has two extra lives right at the beginning, so by grabbing both and dying right away, you can slowly build up a stock at any time. I also found a cache of eight lives or so in a level in the first world, which is even better for grinding. Therefore, lives are not much of an issue in beating the game. The two things that make the game challenging are the momentum-based physics and locating some of the trickier-to-find puzzle cards. This seems like an average difficulty game to me, but I decided to tick up the rating to a 6 since I had trouble the first night I played.

M.C. Kids is a fun NES game that I recommend playing. The levels are often sprawling with many things to do, and the game introduces many different elements along the way that keep the experience fresh. The reverse gravity gimmick works well and it is used in clever ways. The graphics are very clean with some nice animation, and the music is equally great. I had this track stuck in my head for several days after playing. It’s no Mario 3, but it resembles it enough that it’s an easy game to recommend. The AVGN video on M.C. Kids has raised awareness of the game, but it’s been long enough since that review that the game has backed up a bit into mild obscurity. Now that I’m shining some light on the game, make sure you don’t skip this one.

#57 – M.C. Kids

 
AUG
10
2017
0

#49 – Kings of the Beach

No crowns required to be kings in this four-player volleyball game.

Very chill setting!

To Beat: Win a tournament
To Complete: Beat the game on the Difficult setting
What I Did: Completed the game
Played: 4/7/17 – 4/13/17
Difficulty: 5/10
My Difficulty: 5/10
Video: Kings of the Beach – Tournament Mode Final Matches

I am not good at sports. I still like to play them when I get the chance even though I wasn’t blessed with any ability. If there’s one game I am at least decent at, it would be sand volleyball. I organized a weekly sand volleyball night with a bunch of friends for several years, and that afforded me the opportunity to practice often. Now don’t let me fool you, I’m still not all that good at volleyball. However, I am pretty good at playing video games. Therefore, it shouldn’t be that much of a stretch for me to complete one of the few NES volleyball games.

Kings of the Beach is a volleyball game developed and published by Electronic Arts in 1988 on DOS. It was ported to the Commodore 64 in 1989 and the NES in January 1990. Ultra Games published the NES port. However, it is unclear if either Konami or Electronic Arts developed this version of Kings of the Beach. The game was only released in the US.

Kings of the Beach is a two-on-two beach volleyball game. You play as professional beach volleyball players Sinjin Smith and Randy Stoklos. In single-player mode, you only control one character and your partner is computer controlled. The main draw for single player is the Tournament mode. Here you will play against other pairs of players in five different locations all around the world. To win the tournament mode and beat the game, you must win three consecutive matches at each of the five beaches for fifteen total matches.

Interesting cursor choice!

At the start of the game, you move a green cursor around in an overhead map of the beach. This is your menu. The first place you will want to go is the registration tent, which is the game’s options menu. To start, you can assign either a controller or computer control to Smith, Stoklos, and two other competitors. Kings of the Beach supports up to four players simultaneously using the NES Four Score accessory. Next, you can choose between cooperative play or competitive play. This is only needed for a two-player game to decide if you want to play on the same team or not. You can set the difficulty of computer opponents to either Easy, Medium, or Difficult. You can choose if you want to play either a single set or a three-set match, and you can toggle the sound on and off. Choose Exit to Beach to go back to the main menu.

The other menu options are for practice or setting up a game. At the top of the screen there are three beaches labeled Bump, Set, or Spike. If you choose one, you are put in a practice beach where you get easy setups to practice the basic moves. Press Select at any time to exit the training and go back to the menu. At the lower left of the menu is the Match option where you jump directly into an exhibition match with the defined settings. This is the mode you want for a three or four player game. The bottom right part of the menu starts up the Tournament mode. You can select either a new game, or continue a previous game with a password. After that you jump right into the action.

Kings of the Beach plays by standard volleyball rules. Each side has two players and each point starts with a serve from the back of the court. Each side can hit the ball up to three times before hitting it over to the opponent’s court, and teammates must alternate hits. If the ball lands in your opponent’s court, the opponent hits the ball more than three times, or the opponent hits the ball out of bounds, then you win the point. The serving team is the only team that can score, otherwise the non-serving team gains control of the serve if they win the point. In a single set match, the first team to fifteen points wins. In a three-set match, teams play to twelve points per set. In either case, teams must also win by two points. This means play will continue beyond the required winning score until a team leads by two.

Bump, set, spike!

The basic strategy of beach volleyball is to use your three hits to bump the ball, then set the ball, and finally spike the ball. You will use the D-pad to move your player around the court. Quite often you will move on your own to the spot where the ball will land as it’s heading toward you, but sometimes you need to position yourself properly. The ball casts a shadow on the sand that will guide you toward where you want to stand. Press A to bump the ball in the air toward your teammate. To set the ball, press B. To spike the ball, press both A and B. The spike is a powerful jumping hit toward the opponent. You will need to focus on timing for all hits, but spiking the ball requires the best timing. The idea is to run up to the net and jump, meeting the ball with your hands at the top of your jump. For all hits, you can guide it in a direction using the D-pad in conjunction with the hit.

The above moves are mostly offensive moves, but you do have a couple of defensive moves at your disposal. If you know the opponent will spike the ball, you can move up against the net and press A and B together to jump up and attempt a block. Sometimes you can repel the ball right back into the opponent’s court for a quick point. Stoklos has his own signature block called the Kong block, which is very powerful. The other defensive move is called the dig. This happens automatically whenever the ball is just far enough out of reach normally. You will make a dive toward the ball to bump it back up into the air. I didn’t seem to put myself in good positions to do this very often, so in my experience it was left to chance.

Serving the ball effectively is a vital skill. When it’s your turn to serve, you can move up and down the line to put yourself in the position of your choice. There are three different ways to serve the ball. The easiest method is the underhand serve. Simple press A and B together to lob a slow serve at the opposite court. You want to pay attention to the flags that indicate wind direction because an underhand serve may come up short if the wind is blowing in hard. The overhand serve is more powerful. Press A to toss the ball straight up, wait for the ball to come down, and then press B to do a standing, overhand hit. You can use the D-pad to aim the ball while serving. The most powerful serve is the jump serve. Like the spike, it’s the most difficult serve to perform. Press A to toss the ball just before, but this time press A to jump and hit the ball. The more powerful the hit, the more likely the opponent will be unable to return the ball.

With the right timing, the jump serve is the best one.

One neat thing you can do is argue a call with the referee. Every now and then the line judge will make a mistake on a ball that lands near the lines. If you think a bad call went against you, then you can run up next to the judge’s stand and press Start to dispute the call. You will see your player make a scene as persuasively as possible. If you are successful, the referee reverses his call and you get the ball! If the judge disagrees, then he will shake his hand no and hold out a penalty card. This can be either a yellow card or a red card. The yellow card is just a warning, but if you lose a second disputed call in a set the referee will give you a red card instead and you lose a point off your score. Your opponents and even your partner can dispute a call on their own. One key thing is that if you want to dispute a call, you need to decide quickly and get over to the referee right away to plead your case. You lose your opportunity to argue a call if play advances to the next serve.

As stated earlier, to complete Tournament mode you must win fifteen total matches broken up into groups of three. After you win three consecutive matches on the same beach, you get a password for the next beach. The passwords are up to eight characters long and are normal words that are easy to write down or remember. I noticed that the passwords are the same for each beach no matter what difficulty or length of match. For instance, you can win the first round of matches on the Difficult setting with three-set matches, and the next time you play with the password you can select Easy difficulty and single set matches. You can play however you want!

This was my first time playing Kings of the Beach. The game was a later addition to my collection, but it is pretty common and inexpensive so I have had a few copies pass through my hands. I am not a huge fan of sports games even though I enjoy playing a little volleyball. Chances are I would not have given Kings of the Beach much of a chance if not for this project. Chances are I will also say this same thing about many other future games!

Digs are done automatically. This one was successful!

For my playthrough, I decided on playing single set matches on Medium difficulty. I played as the default Smith and let the computer play Stoklos for me. My intent was to learn the game on Medium difficulty and then go back and play the game again on the Difficult setting. At first, Medium difficulty was enough of a challenge. I understood the fundamentals early on, and other than some mistakes with spiking I was already playing well enough to make some progress. My struggles came in the third match of any beach. I could play well enough to win the first two matches, and then I would lose the third and have to start over at the top. That is awfully frustrating. Kings of the Beach became a fight of attrition and required some good old fashioned grinding to seal the win.

It seems like many sports games have some kind of exploit or tactic that makes life much easier. I found one such tactic that helped me win points much more often. The first thing is I needed is the setup to spike the ball myself. Usually this required getting the first hit on the return so that I could get the third hit and spike, but sometimes I would take the spike myself on the second hit instead. It’s a little riskier but it can catch the opponent off guard. My spike position was up against the net either slightly above or below the center. I would spike toward the corner of the net and the closer side line. For example, if I set up below center, I would aim for the lower line near the net, and do the opposite when closer to the top. The opponent tended to favor guarding the larger area so I could sneak it in on the other side close to the line without either player getting to it. That trick does not always work, but it works often enough to be useful.

My partner is disputing a call unsuccessfully.

I beat the entire game on Medium over the course of a few days. Once I accomplished that, I bumped up to the Difficult setting and repeated the final three matches with the last password. If I can beat the last beach on Difficult, then I should be able to beat any other configuration, so I didn’t bother repeating anything else on Difficult. I did not notice any significant changes between Medium and Difficult settings. Perhaps the opponents make fewer mistakes or make powerful serves more often on the higher settings, but I could not tell the difference. With my spiking tactic, I could score more often than not regardless of difficulty. I recorded my video of the final set of matches on Medium difficulty, and then played the final matches again on Difficult unrecorded. The ending is the same on either difficulty.

I would have considered the game more difficult overall if not for the fact that the computer controlled Stoklos handled nearly all the defense for me. Actually, my computer partner played very well in general and handled many situations better than I could have. Most of the time he plays close to the net so he can utilize his powerful Kong block. My job was to back him up and try to get to anything hit past him if I could. We worked together well on the offensive side too. He is a good spiker and serves very well. He’s not a perfect partner and makes mistakes that are unavoidable, but in my opinion he is a more consistent player than I am. It’s a pleasant surprise to have a competent computer player for once!

There are not many volleyball games on the NES to compare, but I think they did well with Kings of the Beach. The game sets itself apart somewhat for having a simultaneous four-player mode. It also performs well as a single player game. The computer controlled players are competent both as opponents and partners. The graphics and music are well done, just as you would expect in a Konami game. The game is a tad lengthy and repetitive, but it’s just the nature of the game so it hard to fault Kings of the Beach for that. If you are looking for an NES volleyball game, you won’t do wrong with Kings of the Beach.

#49 – Kings of the Beach

 
JUN
29
2017
0

#45 – Rollergames

Maybe this game should have been called Skate or Die instead.

They aren’t even shy about this being a Konami game.

To Beat: Reach the Ending
Played: 12/30/16 – 1/2/17
Difficulty: 6/10
My Difficulty: 6/10
Video: Rollergames Longplay

I used to go roller skating often growing up. The local roller rink was the place to be for young kids on a Friday night, and even though I was not particularly good at skating I still enjoyed being there with my friends. It wasn’t until years later that I learned about the contact sport roller derby, and it just so happens there is also an NES game based on the sport. With a library this vast, I guess I should not be so surprised!

The sport of roller derby originated in the 1930s. The game is played with two teams of skaters who skate laps around a banked track. The object of the game is to score points by having a designated member of the team lap opposing players. The sport grew in popularity during the 1940s and 1950s. As interest started to decline, and as television became more prominent, the sport shifted more toward storylines and theatrics and away from pure competition. Since then the sport has shifted back toward its competitive roots. Roller derby has seen a resurgence beginning in the early 2000s, predominately in all-female leagues.

In the middle of all this is Rollergames, a 1989 TV show that went all in on the theatrical approach to roller derby. There were changes made for Rollergames, such as introducing a figure eight shaped track instead of the traditional banked oval track. Rollergames is like the WWE with a heavy focus on rivalries and storylines. The show was quite popular, but despite that it only ran for one season because some of the show’s producers when bankrupt.

Complete with broadcasters!

There are two video games based on Rollergames. The first is an arcade title of the same name developed by Konami in 1990. The gameplay is modeled closely after the TV show. The second name is the NES version of Rollergames, also developed by Konami and published under the Ultra Games label. This version is also influenced by the show, but it plays more as a classic beat-em-up game. It was released in the US in September 1990 and in Europe in October 1991. It was not released in Japan or ported to any other systems.

Rollergames is a side-scrolling beat-em-up game with some platforming elements included. Members of a criminal organization have corrupted three of the Rollergames teams leading to the capture of the league commissioner, and the only people that can save him are the members of the other three good teams. The introductory cutscenes frame the game as a storyline fitting of the TV show. You must complete all six levels to save the commissioner and win the game.

At the start of each level, one of the sideline reporters asks you which team you would like to choose. You can pick either Ice Box of the Thunderbirds, Rolling Thunder of the Hot Flash, and California Kid of the Rockers. Each character plays differently so that you want to choose the team best suited to clear the current level. Ice Box is the slow but powerful character, while Rolling Thunder is the weak, but speedy character. California Kid is naturally the balanced choice.

You can knock down the bad guys quickly.

The controls are very natural. Use the D-Pad to skate in all eight directions. The A button is for jumping and the B button is used to attack. The standard attack is a basic punch, but you can do a jump kick by pressing B during a jump. You also have a special attack that you trigger by pressing both A and B at the same time. Each character has a slightly different special move. Ice Box does a body slam, Rolling Thunder does a spinning jump kick, and California Kid has a double jump kick. The moves are powerful but you are limited to only three per level, so use them wisely.

The levels all play from a side-scrolling perspective, but there are two different types of levels. The normal levels can scroll in all directions and you progress linearly through the level. There are many slopes to navigate and pits to jump across, as well as other enemies and traps that stand in your way. These can be quite tricky to clear while on roller skates! As you go, you will run into groups of enemy skaters and you must beat them all up before moving forward. Three normal levels revolve around each of the bad teams, which are the Bad Attitude, Maniacs, and Violators, and these levels have two sections each. The final level is in this normal style but it has four parts.

The other type of level is an auto-scrolling level. The skater of your choice is always moving forward here and the goal is to survive to the end. These levels follow along a broken highway so there are many gaps to cross. Of course, there are also various obstacles, traps, and enemies to contend with. These levels also feature boss-like encounters, but all you need to focus on is dodging the attacks until they go away, ending the stage.

Roads are always under construction!

At the top of the screen, there is a timer in the middle. This countdown only applies to the normal stages where you have to move ahead on your own pace. At the lower left is a vertical health bar. Your skater can suffer several hits before losing a life, though falling down a pit or landing on spikes results in immediate, swift death. The lower right area shows markers that indicate how many special attacks are remaining for the stage. There is a separate screen at the start of each stage that displays your score, high score, current level, and number of lives remaining. There are no powerups in the game for replenishing any of these elements. However, you can earn an extra life when reaching either 20,000, 50,000, or 80,000 points.

The obvious gimmick to Rollergames is that you play the entire game while on roller skates. As a result, your character controls in a fitting manner. It’s akin to playing a game with nothing but ice levels and ice physics. The skaters are generally slow to accelerate and slow to come to a stop. Often, I found myself making quick turns in a different direction than where I was moving to keep myself from falling. The game has various sections of platforming where you need clear gaps of different sizes. Not only that, but there are falling platforms, moving platforms, and crumbling floors to deal with. It’s a tough combination to work with and there is much trial and error involved to learn the right moves.

Slopes and tiny jumps on roller skates don’t mix.

The game balances this difficulty out in several ways. The levels tend to be reasonably short with checkpoints after every sublevel. The hand-to-hand combat is simple and the enemies themselves don’t pose much of a threat. Lastly, there are infinite continues in the game, so you can keep banging away at each level until you clear it. You always start at the beginning of each sublevel if you die, so once you reach the checkpoint you don’t have to play past sections again.

Seeing as it’s a Konami game in the middle of the NES lifespan, Rollergames is a quality title. Not only do the controls make sense, but the game has good graphics and some excellent music. It’s the soundtrack that really stands out overall. In my mind, it has a similar sound to TMNT II and III. Maybe that is because both games are beat-em-ups, but regardless it sounds good and it suits the game well.

I first played Rollergames last year for the NintendoAge weekly contest. Unfortunately, I did not have much time to play that week and I only reached Stage 2. That was barely any experience so this was the first time I seriously played Rollergames. This was one of those filler titles that I acquired in a random NES game lot that I purchased back in my collecting heyday. When it showed up on the list, I knew that Rollergames was a pretty good game that is easily overlooked, so I was happy to play through it.

This part is particularly devilish.

I beat Rollergames over two days and those two days just happened to fall on either side of New Years, making this the first game I have played for the project over two separate years. On the first attempt, I reached Stage 5-1 and this is where I got stuck. The first part of level isn’t all that bad, but the section right before the checkpoint is pretty nasty. You have to cross along the edge of a cliff where the ground periodically crumbles away in front of you. It forces you to move slowly to reveal the hidden gaps, and then you must back up enough to get the momentum to leap to the other side. But you must be careful not to go too far past the hole or you will fall into the next one. It wouldn’t be so bad if the controls weren’t slippery, but here it’s a pretty evil little section under the game’s ground rules. After several attempts at Stage 5-1 I turned the game off for the night.

The next time I sat down to play, I performed decently up to 5-1. After many new attempts, I reached 5-2 and from there I pushed my way through to the very end. I recorded my playthrough on video, but it was the ugliest playthrough I have recorded so far. There are several sections that must be practiced, and without any of that experience I died a bunch of times until I made it through. There are enough problem spots that I would have to beat the game a few times just to record a decent run. However, a game finish doesn’t have to be pretty to count, so I’ll accept this one and move on!

Rollergames is a fun game that I enjoyed playing. It’s got that Konami standard level of polish to it with solid controls, good gameplay, nice graphics, and catchy music. The one problem with the game is that there’s a significant amount of platforming that doesn’t properly fit the game’s slippery physics. It makes this game less accessible than other NES games of similar style right off the bat. If you can get by the initial hurdles, I think you would enjoy playing the game. It’s also an inexpensive cart for the collector or player insisting on the original cart. It’s too bad that it is overlooked because I think it deserves more recognition than it receives.

#45 – Rollergames

 
12