Take on the NES Library

An 8-bit Extravaganza!

tradewest

JUN
05
2020
0

#152 – John Elway’s Quarterback

John Elway is probably in here somewhere.

Not shown is a football spiraling across.

To Beat: Win a Single Game
Played: 3/13/20
Difficulty: 2/10
My Difficulty: 2/10
My Video: John Elway’s Quarterback Longplay

There are so many sports games on the NES, but so far the balance of them for this project is way off.  I have played several basketball, baseball, wrestling, and even volleyball games already, but most other sports have received very little or no representation yet.  For instance, I have yet to play either a golf game or a tennis game.  Until now, I had yet to play a football game either.  For one of the most popular sports in America, it is finally time for football to get its due on Take On The NES Library.  And so, for this special occasion, we are starting off with … John Elway’s Quarterback.

This game was originally released as Quarterback in the arcades in 1987, developed by Leland Corporation.  In 1988, John Elway agreed to endorse the game and so it was renamed to John Elway’s Quarterback.  The game was ported to various PCs, as well as the NES in North America only.  The NES port of John Elway’s Quarterback was released in March 1989, developed by Rare and published by Tradewest.

John Elway’s Quarterback is a straightforward football game.  It can be played solo or with two players.  At the start, you select your team out of 14 total teams.  That seems impressive but the only thing it appears to change is the name of the team on the scoring at the top.  Player 1 is always the blue team and Player 2 is always the red team.  Once you press A or B to lock in your team, play begins automatically with a kick off from the red team to the blue team.  There are no other modes or anything in this game, just single matches.  Win one game to beat the game.

Kickoff time!

The controls are pretty simple.  You use the D-pad to move around.  You always control the player with the 1 displayed over his head (or 2 as the second player).  The A button is basically the jump button.  Without touching the D-pad, A jumps straight up which is useful for intercepting the ball.  With a D-pad direction held, the A button does a dive move.  You can use this to tackle the ball carrier or sneak out a yard or two on offense when surrounded.  The B button is for throwing the ball on offense.  First hold the B button down and a cursor will be displayed.  You can move this cursor freely to aim your throw.  When you have the direction you want, let go of B to throw the ball.  On defense, B is used to switch control to a different player.

Before each down, on both offense and defense, you will choose which play you want to run.  The offense has nine different plays to run, as well as kicking a field goal or punting.  You can also select Reverse Play by pressing A when Normal Play is highlighted.  I didn’t know about this when I played, but I think it might just flip each formation from left to right.  It’s not documented in the manual at all.  The defense can choose from one of six regular plays, as well as a punt return formation and a blocked kick formation.  Use the D-pad to select the play and press either A or B to choose the play.  There is a timer and the highlighted play will be automatically chosen if you don’t make a selection.  After the snap, the other players will move in line with the play you selected.

The only other unique play element is the kick, whether it is an extra point, kickoff, or punt attempt.  At the start of the play, a cursor appears at the edge of the screen at a random position.  Before the player automatically kicks the ball, you can move the cursor with Left or Right on the D-pad to adjust the angle of the kick.

Line the arrow up to kick the extra point.

There’s really not much else to say about this game; it is a simple game of standard, exhibition football with few features.  There are four quarters of 15 minutes each, though in real time it is much shorter.  In single player, you receive the kickoff at the start of the game and kickoff to the other team after halftime.  All possessions are four downs to gain 10 years or you turn over the ball to the opposition.  I don’t believe there are any penalties of any kind.  I don’t think you can fumble the ball, but the ball can be intercepted during a wayward pass.  There are basic stats displayed at the top of the screen, from the current down and yardage, time remaining, team names, and score broken down by quarter.  Like I said, it’s a simple, no frills kind of experience, to the point where I’m struggling to be any more verbose about this game than I usually am.

This was my first time playing through this game.  This is one of those super common NES games that you see all the time when buying game lots, and the cart only price is low.  I’m not sure why you would want to buy one individually.  That said, I didn’t have this game for quite awhile when collecting.  I got it around the middle of the pack in terms of the entire licensed NES set.

My playthrough of the game went really well.  I am not sure if this was just beginner’s luck or if it is just not that hard to win.  On my first try of the game, I played for about a quarter and a half just to get the feel of it.  The score was tied 7-7, so I could have kept going and would have won, but just to be sure I started over.  I finished the new game 28-0, a shutout on my first full playthrough of the game.  I scored one touchdown each quarter.  In terms of strategy there really wasn’t much to it.  On defense, I sort of followed around whoever was open.  Then once the pass was thrown, I pressed B to switch to the nearest defender to the ball and pressed A to try and jump in front of the ball to intercept it.  That worked often enough to keep them from scoring.  On offense, I messed around with different passing plays to find an open man and then zig-zagged up the field to dodge defenders.  With the right timing and movement, it seems possible to avoid a diving defender most of the time if not all of the time.

Sneak a peek at the screen and lookie at all the plays to draw from!

When doing research for this blog post, I stumbled upon what appears to be a glitch to help make this easy game even easier.  On the offensive play screen, put your cursor on top of Normal Play and leave it there until the play selection timer expires.  Normally whatever play is highlighted when time expires is the play you get, but since Normal Play isn’t actually a play that you can select, it gives you some sort of default play to run.  For this play, you need to get space to pass right away because the defenders come at you quickly.  If you can do a successful pass to a teammate, for some reason he has incredibly high speed and should score easily.  I tested it out once just to see and it is hilarious how fast he goes.  The next time I tried it I allowed a safety, so you do want to perform this carefully in a game.

I have little experience with NES football games so it’s hard to say how this one measures up to the rest, but I would guess that this is not a very good football game.  It is competent enough at it’s best but that’s about it.  The graphics are very basic, a step up from Atari graphics but only by a little bit.  There’s no music during the game, just organ sounds and sound effects, and the little songs across other parts of the game are nothing to write home about.  The controls are the best part of this game as they are simple enough to play the game effectively.  The gameplay is bare bones with just enough there to resemble a game of football.  In whole, while this is an underwhelming game, I wouldn’t call it a bad game or shovelware or anything like that.   It’s a functional NES football game, it’s just that the NES is capable of much greater things than this.

#152 – John Elway’s Quarterback

 
MAY
03
2019
0

#117 – Magic Johnson’s Fast Break

Now Get Ready To Catch The Magic!

Pink on gray isn’t usually the best color choice.

To Beat: Win a game
Played: 3/10/19
Difficulty: 2/10
My Difficulty: 2/10
My Video: Magic Johnson’s Fast Break Longplay

I realize that many of these reviews I write are too wordy and descriptive. It’s kind of my thing and I’m not going to stop doing it this way. Deep dives can be interesting and fun! Magic Johnson’s Fast Break is testing my ability here. So far, I have been able to find enough to write about for all the sports games I’ve done so far, but Magic Johnson’s Fast Break is such a bare bones game that this is destined to be one of my shortest reviews. Sorry if that will disappoint you! I’ll see what I can do.

Magic Johnson’s Fast Break was originally released in arcades in 1988. It was developed by Arcadia Systems. The game was also called Magic Johnson’s Basketball in some cases. It was released on several home computers as well as the NES. Software Creations developed and Tradewest published the NES version of the game. It released in March 1990 and was a US-only release.

Since it’s called Magic Johnson’s Fast Break, Magic Johnson’s likeness is featured in this two-on-two basketball game. This game was also sponsored by Pepsi and you can see the old Pepsi logo in the game. Leaving some of that graphical flair aside, this is a simple basketball game. You can only play single games and you just need to win one game to consider this one beaten.

While nicely detailed, you see this way too often.

When you start up the game, you’ll see a nice-looking title screen. Leave it on the screen for awhile and you’ll see a profile for Magic Johnson next to a picture of his face. Then you’ll see some developer credits. You’ll also see an attract mode of the game play. Press Start to bring up the menu. You can choose from either one-player, two-player, or four-player game. Yes, Magic Johnson’s Fast Break supports the NES Four Score accessory. After this selection, for a single player game only, choose the computer’s difficulty setting from A-E. A is Rookie, B is Average, C is Advanced, D is Expert, and E is Professional. Then you start the game!

This is a two-on-two full court basketball game. You control the blue team with your basket on the left. The opponent is the red team shooting for the opposite basket on the right. Two-player games have the first player playing the blue team and the second player using the red team. In a four-player game, the first two controllers are for the blue team and Controllers 3 and 4 are used to move the red team. Each game of basketball consists of four, three-minute quarters. Every quarter begins with a jumpball to see which team gets control. Press either A or B to jump for the ball and pass it to a teammate. During play, the view scrolls left and right to follow the ball-carrier.

Controls in the game are easy. Use the D-pad to move around. You only control one player at a time as indicated by an arrow. Switch control to the other player by pressing B. When holding the ball, B passes the ball to the other player while also switching control. Press A to shoot the ball or press A to try and steal the ball from the opposing team. You also steal the ball if you are in the middle of a pass attempt between players. You can press A to jump and try to recover a rebound.

Faceless wonders, these guys.

The referee will blow the whistle to signal the end of the quarter. You transition over to a statistics screen. You see the score for both teams. You can view the attempts, shots made, and percentages for both free throws and field goals. For three-point shots, you only see the number made. You also see the number of rebounds and steals. Press A to move on. You get to see Magic’s face again along with some advice for the next quarter based on how you played.

You can get fouled in the game or commit fouls. The most common violation you will likely see is the back court violation. Once you bring the basketball to your half of the court, you can’t step back over the line again or you cause the violation and have to give up the ball. This is not actually considered a foul, however. Each team can commit up to five fouls each quarter and turn the ball over to the other team. Any fouls after that award free throws. There was only one foul in the entire match that I committed, so I didn’t see anyone shoot any free throws and I don’t know how it works. If back court violations had counted I might have seen some free throws.

Magic Johnson’s Fast Break also has a salary system. Depending on the difficulty of the opponent and how well you play against them, at the end of a game you will be given a salary. You don’t get to spend the money on anything; you just see what you earned. If you think that sounds like a high score table, you would be correct. You can enter in your initials and everything. There’s no visibility into the scoring system at all, just the final tally at the end.

This was the best place to shoot from.

This was my first time playing Magic Johnson’s Fast Break. This is the third of ten NES basketball games I’ve played so far. It’s a common cart that is dirt cheap. If you collect NES, you probably have this one already without even trying. I have only owned a few copies of this game though. One copy I sold had checkerboard lines cutting through the entire label down to the plastic. I guess someone thought so highly of this game that they decided it would be more fun mutilating the game than playing it.

When I booted up the game for the first time, I decided to try playing on a lighter difficulty just to get a feel for the game. My goal is always to find some kind of exploit in the AI or a way to consistently hit three-pointers. I played through a quarter on Average difficulty, and though I didn’t find a good technique, I was leading by 10 points already. I reset the game, started the recording, and set the game to Professional difficulty. After the first quarter this time, I was losing by a score of 38-24. I figured it out partway through the second quarter, cruising to a final score of 139-101. The best place I found to shoot threes is from the top of the key. (I think that’s the right terminology.) On an inbound, position your other player at either sideline at midcourt. Then pass the ball to him and you will be in good position to go right to the spot and shoot. Any misses are compensated by the times you will steal the ball back from the opposing team. I didn’t have any trouble taking and keeping the lead once I got consistent at getting to the right spot to shoot. I finished with a salary of $2.4M which was good for 2nd place. A better first quarter should have put me at the top spot but reaching the top of the chart was not important to me for this game.

I guess that’s pretty much everything to say about this game. It’s not an awful game, just trimmed down to the bone. The music was written by Tim Follin, my favorite NES composer, so it’s got great tunes that are a bright spot here. The graphics, controls, and gameplay are all at least average. It’s a very easy game to beat and the quickest one to finish so far. Compared to the other two basketball games I’ve played, Roundball and Jordan Vs. Bird, I would put this one at the bottom of the list. There’s just no substance to this game at all, especially for a 1990 release. The game kind of reminds me of NBA Jam without any of the things that made that game interesting and fun. There’s no player selection, no dunks, none of that good stuff, just the same visual perspective, the two-on-two action, and lots of stealing the ball. Happy to have another game quickly checked off the list!

#117 – Magic Johnson’s Fast Break

 
MAR
15
2019
0

#113 – High Speed

High Speed, high stakes, and high scoring.

Featuring voice samples!

To Beat: Board the rocket to beat the system
To Complete: Beat the game and get the high score
What I Did: Beat the game with a score of 62,356,760
Played: 1/14/19 – 2/2/19
Difficulty: 10/10
My Difficulty: 10/10
My Video: High Speed Longplay

It’s another milestone here at Take On The NES Library. Game #113 is the first NES pinball game. There are a grand total of six NES pinball games, so I’m not that surprised the first one took some time to show up. Pinball machines are always a good time, even though I tend to fail out after only a few minutes. I have only been a casual player but I’ll play every time I see a machine. I know I would have to dedicate myself to playing a pinball game for a long time to get good at it. That’s what I had to do here to play High Speed. I don’t know if it’s due to my lack of experience, but this was a very challenging game to beat and another 10/10 in difficulty.

The High Speed pinball machine was released by Williams in 1986. Designer Steve Ritchie was inspired to make the game by his own police chase in California where he was supposedly driving at 146 mph. High Speed was a popular machine with a production run of 17,080 machines, which is well above the average of 2500 machines per run. The NES game was developed by Rare and published by Tradewest in North America in July 1991. PAL regions received the game in 1994. This was the final NES pinball game released by date.

The controls are simple. Any direction of the D-pad flips the left flipper, while the A button triggers the right flipper. There is an upper flipper on the right side of the playfield that also is triggered by the A button. The Select button nudges the table from the right while B nudges it from the left. In my experience, Select directs the ball slightly to the left and B nudges it to the right. The Start button pauses the game but you have to hold it down for a little bit before pausing kicks in.

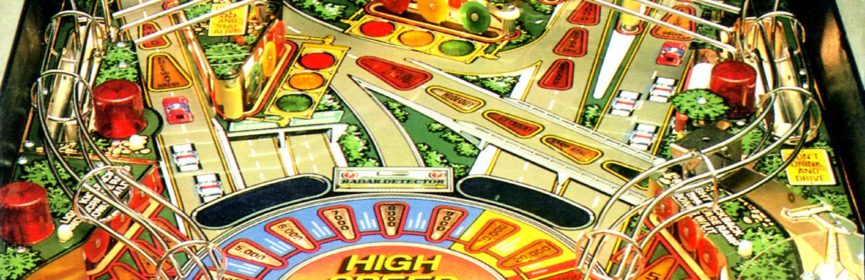
It only looks like standard pinball.

Begin your game by launching the ball from the plunger on the bottom-right. Hold the A button to pull the plunger down and release the button to launch the ball. You can control the strength by how long you hold the button down. I like to launch at a little greater than half-strength so that I have better reaction time for hitting the ball with the upper-right flipper.

The bottom of the screen displays the text that would normally appear at the top of the actual machine. You can see your score on the left and miscellaneous text on the right for different events during game play. The score display only contains seven digits but the game maintains score up to one hundred million. A neat feature of this game is the split-screen effect. The playfield is too tall to see the whole screen at once. There is a screen split at the bottom of the screen so that the flippers are always visible. The top part of the view scrolls upward enough so that you always see the lowest ball.

High Speed also contains voice samples. These are like the ones on the actual pinball machine. The downside is that playing the samples freezes the board entirely during its duration. They are short clips, but in a long game you will hear them all the time. Fortunately, you can disable them if you want. On the Pause screen, there are two boxes you can toggle with the A button. The left one toggles the music and the right one toggles the voices.

The playfield contains a long lane on both sides that the game calls highways. They connect at the top and you can loop the ball all the way around. There is a smaller lane left of the right ramp that contains an eject hole. The ball is held briefly before being sent down the right lane in front of the upper flipper. There is a ramp in the middle of the playfield. It is best hit from the upper flipper. The top of the ramp connects to two return lanes, one on either side of the playfield, that drop the ball above the corresponding flipper. The ramp also exits by the upper flipper again, creating another loop. There is a set of three pop bumpers below the ramp as well as some targets indicated by stoplights. At the bottom by the flippers, each side has a slingshot and two lanes. One leads the ball to the flipper and the other leads the ball down the drain.

You’ll see the ball go up the ramp a lot in this game.

As you play the game, the stoplights will go from green to yellow to red. You can advance the stoplights by hitting the targets or more commonly by taking the ramp. When the light is red, take the ramp to start the police chase. This triggers two voice samples along the ramp loop. During the police chase, hit the ramp again to initiate multi-ball. The ball is locked and you get two more to launch from the plunger for up to three-ball multi-ball. This also triggers the jackpot. It starts out at 250,000 points and increases as you score points on the board. The jackpot maxes out at two million points. Hit the ramp one more time during multi-ball to claim the jackpot. This also locks the ball until all other balls are either locked in the same way or lost down the drain. Going back to one ball stops this sequence and the lights go back to green.

The inner lanes near the flippers light up the two outer lanes at the top of the playfield. These are only lit for a little while. Take the lane to get the highway bonus. The highway bonus points increase the more you take those lanes. Once those points max out, you can then trigger the hold bonus feature which maintains your main bonus score to the next ball after you lose one. Advance one more time to trigger the extra ball. You then have to shoot the ball into the eject hole to collect the extra ball. It is best to maintain both multi-ball and the extra ball for as long as you can.

The NES version takes the standard game play up a notch. There are items appearing on the board that you collect by hitting them with the ball. Money bags give you points and subsequent money bags give you progressively higher amounts. There are also safes and helicopters that eventually trigger a couple of mini-games. Those are fine, but in an evil twist, there are also several enemies on the board you have to deal with that mess with your ball or flippers in various ways. Enemies stay away while you have multi-ball enabled, which is another fine incentive. You can also fight back.

Bombs and other enemies make your life difficult.

Here are each of the enemies. Water puddles just slow your ball down. You can destroy it by hitting a ball over it quickly. Tumbleweed will grab your ball and drop it directly down the drain in the middle. You can destroy it with a fast ball or by shaking the table as it descends. Rust balls attach to your flipper mountings and destroy the flipper completely. Supposedly you can shake them off the flipper but I never got that to happen. A simple touch of the ball removes them from play. Should you lose a flipper, you will automatically trade a previously collected safe or helicopter to recover your lost flipper after a short time. Heli-bombs float toward your flipper and blow them off when they detonate. You can touch the bomb with the ball to destroy it. To foil the bomb, you can flip them up briefly with the flippers. If it explodes while not touching your flipper, it does no damage. Acid patches grab your ball and try to dissolve it. You can shake the playfield when held to remove the acid. The manic mechanic chases your ball and slows it down, eventually destroying it if contacted too many times. You can damage the mechanic with a fast ball and eventually drive it away. Barriers block the two upper lanes. You can destroy the barrier by hitting it twice from the front or once from behind. Finally, the magnetic helicopter pulls your ball toward the middle of the playfield. Eventually it will collect the ball and try to carry it away. When held, shake the table quickly to destroy it. All enemies are defeated when you start up multi-ball.

There are two mini-games that take place on separate screens. These appear by collecting either three safes or three helicopters. Collecting three of each will interrupt whatever mode you are currently on except for active multi-ball. Three safes create one large safe in the center. Hit a ball inside when it opens to take that ball to the pachinko mini-game. If multi-ball is in effect, you can send multiple balls to the game. The mini-game starts once all balls either enter the safe or are lost. Similarly, three helicopters send in a big helicopter with a dangling rope ladder. Send a ball up the ladder to board the helicopter for a racing mini-game.

Let’s start with the racing mini-game. It takes place on a miniature pinball table. There are four cars and you are the red car. The idea is to win the race by hitting the red car to speed it up or hitting an opposing car to slow it down. Every ball you bring in is included for the duration of the race. Losing a ball down the drain sends it back up to the playfield for free after a brief delay. There is a 59-second timer. The race ends when either time expires or one car has completed nine laps. There is a lap counter at the bottom and the cars are ordered by their place in the race. There are some objects on the field like rocks or trees. You can destroy them and sometimes they drop a powerup. You can get a timer increase or a bomb that spins out all opposing cars. There are also nitro boosts that appear at random and you get a big speed burst by collecting that. To beat the race, you need to place either first or second. You earn some points based on how well you completed the race. You only play one race at a time. Beating three separate races triggers a nice fireworks sequence.

Racing in a pinball game? Well Rare did make RC Pro-Am.

The other mini-game is pachinko. Instead of flippers, you control a mini-cannon at the bottom of the table. Use Left or Right to aim the cannon and press A to shoot a ball upward. There are pegs and cups on the board and to beat the table you have to collect a ball in each cup. There is a drain at the bottom that collects the balls and puts them back into the cannon. You get either 59, 79, or 99 seconds to complete the board depending on how many balls you brought into the mini-game. There’s a ball meter at the bottom and I don’t fully understand how it works. You can’t run out of balls but when it is low you can’t shoot as many at once. The meter slowly fills back up all the time. Sometimes, a clock will appear that adds time if you collect it. Every two pachinko boards completed starts up a fireworks sequence. You also get points for how well you played the mini-game.

The fireworks sequences from either game unlocks some special bonuses features. You collect these special bonuses by getting the ball into the eject hole. In total, there are eight pachinko boards and six races for a total of six sets of fireworks and six bonuses. The bonuses are, in order, Kickback, Ball Return, Saucer, Drive Again, Lightning Bombs, and Rocket. Kickback lights the two outer flipper lanes to kick up and recover a ball heading down the drain. Ball Return acts like an extra ball by sending the lost ball back into play right away. The Saucer bonus sends a UFO onto the playfield and you can send a ball into it. This takes you to a screen where it claims you “beat the system so far” and gives you a cool one million points. Drive Again is an extra ball. Lightning Bombs are really powerful. You get three of them and you can activate them by pressing A, B, and any D-pad direction. It sprays lightning across the screen that both collects powerups and defeats any enemy on the playfield. Too bad you get them so late in the game. The Rocket is a lot like the saucer. Board the rocket and you get a screen claiming “you’ve beaten the system this time” and earn two million points. After all that, the sequence starts over again.

I have played a little bit of High Speed in the past. It was a Nintendo Age weekly contest game back in 2014. That week I struggled with the game and scored about 3.4M on my best attempt. The winning score that week was over 18M. I like playing pinball, but on actual machines and not so much video game versions. This game sat for several years until I beat it now. High Speed is a relatively common game that sells at around $8 or so for a loose cart.

I have three main sources of information I use to determine when to consider a game beaten: The NES Ending FAQ, NA’s “Can NA Beat Every NES Game” yearly thread, and TheMexicanRunner’s website. In this case, all three sources had different ideas for considering High Speed beaten. The NES Ending FAQ says there is no ending and to max out the score at 99,999,999. The NA thread says to get first place on the game’s high score chart, which is surpassing 51,627,910 points. TMR’s goal was to beat the system twice by completing every mini-game. My take is that TMR got this one right. Beating the system twice ensures you have gotten all possible bonuses and beaten all distinct mini-games, plus you get a screen saying you “beat the system this time” which is pretty clearly an ending to me. Certainly, it’s possible to max out the score without beating all the mini-games, but I think you have to see and clear all the unique content to consider the game beaten.

Without extra balls, I would still be playing this game.

TMR had High Speed as one of his ten toughest NES games, and I would have to agree with that. This is certainly worthy of the coveted 10/10 difficulty rating. I would guess I spent about 20 or so attempts where I scored under 4M points. I had some sudden improvement and then went another 20 attempts hovering between 7M and 16M for most tries. I needed around 10 more attempts to put me over the edge. It seems to me that if a game takes me around 50 tries or more to beat, then it is probably going to be a 10/10. This is now my 3rd 10/10 game along with Ikari Warriors and Q*bert. I would slot High Speed below both the other two in difficulty comparatively.

This is a challenging game for a few reasons. For pinball in general, you have to be good at making shots you want while also keeping the ball from situations where you are likely to lose it. In real life, I will have balls come right down the middle through the flippers. I found that didn’t happen all that often in High Speed, at least with a single ball in play. I was more likely to lose balls down the side, particularly the left side. (Left side kick back is often enabled when the right side is not, meaning balls may favor falling to the left if caught in between.) You have to constantly nudge the table to your advantage, for example, when that kick back is missing. There were two shots I had issues with when hitting the ball with the very edge of either flipper. Hitting the edge of the left flipper sends the ball off the right side, off the left side, and then right down the center. The edge-of-right-flipper shot goes off the left side, off the right side, and directly down the outside drain. I had to recognize those shots right away and start shaking the table to try and recover early. The left flipper shot can be saved with some Select button shaking, but the right flipper shot will sometimes go down the drain no matter what you do. Multi-ball causes complications too, since ricochets go down immediately or I don’t notice balls falling down the side drains. You also need to be careful not to shake the table too quickly or frequently so that you don’t cause a tilt condition and the table stops working. Just like a real machine! It is a necessity at times when the ball gets caught by an enemy. You just have to be aware of when you get in danger that you try and ease up on shaking for a while. These were specific issues I needed to grasp to beat this game.

The pinball part is hard enough to learn, but the pachinko boards are on a whole other level. They seem harmless at first but soon they start to feel impossible. There seems to be some randomness, but even after beating the game I am not so sure. I can fire a string of balls in a row that all fall down the same way. There is a trick to this that is not mentioned in the manual or anywhere written that I saw. You can speed up a ball by holding down the A button. You can visually see smoke behind the ball when it is going really fast. This will allow you to change up some of the ricochet angles and make some cups possible to reach. Even knowing that, often it is hard to tell how to reach certain cups on the board. I know for one shot I first had to tap A to clear a peg, then hold A to send it to a distant cup. Another issue is that some of the lower pegs are put in places where they end up blocking most of your shots. You would think that would help narrow down possibilities, but that wasn’t the case for me. If you fail, you have to collect three safes and try again. You can do this as often as necessary. It just puts more risk on you keeping things up on the pinball side.

These later pachinko tables are a huge test of patience.

My winning run was something magical. Before that, I mustered a 26M run and a 44M run. The 44M game was particularly infuriating in that I was one pachinko game away from getting the rocket. In fact, I was one cup away that I just could not figure out how to reach. I had four tries at that last board and always came up short. The winning run was as close to perfect on the pinball side as I could have possibly hoped. I needed the help of several extra balls for sure. I just happened to counter and save nearly every bad shot. I also found the timing for the left-hand lane. I had started avoiding it because if I missed to the left the ball would find the drain way too often. I couldn’t believe how many times I hit that lane this time. I ended up beating all the mini-game boards and scored 55M all on Ball 1. At least two pachinko games were won after time ran out on my last ball or two. I spent over two hours playing on a Saturday morning, and I had to lose intentionally just to appease my family and get on with our weekend. I finally ran out at over 62M points but I think I could have maxed out the score on that attempt if I wanted to and had more time.

One thing that helps is that when you really get good at the game, you’ll find that extra balls are plentiful. The extra ball you get from the eject hole can only be collected one at a time, but you can get it again after losing a ball. There are some other ways to earn extra balls that stack on top. Collecting Drive Again from the bonus features gives you an extra ball. The Ball Return bonus feature is like a hidden extra ball since it comes into play immediately instead of awarding bonus first. There is also a sun-shaped powerup that bestows an extra ball. The enemies’ appearances are scheduled by a lengthy sequence and the extra ball shows up at the very end of that sequence. Any time you lose a ball, you get the right to earn it back from the eject hole, no matter how many other balls you have saved up. I was able to stack up a bunch of extra balls and keep them going for a long time. It’s too bad that getting that far requires a lot of time, patience, and learning.

I believe that High Speed is a really good NES pinball game. The graphics are nicely drawn. The music is pretty good even though you will hear the same couple of tunes a lot while playing. If you don’t like it you can just turn it off. The voice samples sound a bit muffled, but it’s the type of sound quality you would expect to hear from a police radio, so in that way it fits perfectly. Unfortunately, the samples interrupt game play so often that I know it used up several minutes of a two-hour run. The gameplay is good and varied with the mini-games. Admittedly, I’m not a huge fan of the enemies on the table, seeing as they caused me much hardship that I could have done without. However, it’s something you don’t see often in a pinball video game, and it makes for an interesting feature that you can employ only in a video game. One problem I have with the game is that the balls move very slowly if two or more are at the flippers at the same time. Perhaps the game was not programmed for handling multiple calculations with the angles. What happens is you will hit one ball and then the other ball goes full speed, meaning it goes through the flippers unless you react instantly. Multi-ball is so important that I feel cheated if I lose it due to technical issues. This is a very difficult game to beat and a big one checked off my list. For casual play or even longer sessions like I had, it is a competent pinball game with some unique features. It’s worth checking out.

#113 – High Speed

#113 – High Speed (Final Score)

 
JUL
31
2018
0

#85 – Danny Sullivan’s Indy Heat

Bringing the heat!

Even the logo is heating up!

To Beat: Finish 9 races
My Goal: Get the high score
What I Did: Finished three loops with a score of 544
Played: 5/17/18 – 5/18/18
Difficulty: 1/10
My Difficulty: 1/10
My Video: Danny Sullivan’s Indy Heat Longplay

As evidenced by my review of Bill Elliott’s NASCAR Challenge, I am not a fan of racing video games. Danny Sullivan’s Indy Heat is a bit of an outlier in that I find it mostly enjoyable. The differences between the two games are clear. Bill Elliott’s NASCAR Challenge focuses on realism and the grind of a full season. Danny Sullivan’s Indy Heat is a pick-up-and-play arcade style game. If I have to play a racing game, I’d rather do it the Danny Sullivan way. It helps too that this game is unbelievably easy.

Danny Sullivan is a former racer who primarily competed in open-wheel car racing. His career began overseas competing in Formula Three and Formula Two racing. In 1982 he debuted in the PPG Indycar series in the US, and the next year he was recruited by a team in Formula One, which is the highest level of open-wheel auto racing in the world. He only competed there in 1983 before returning to the US and the PPG Indycar series in 1984. He won the Indianapolis 500 in 1985, the premier race in North American auto racing, and he also won the PPG Indycar series championship in 1988. Danny Sullivan briefly dabbled in NASCAR in 1994 before retiring from auto racing for good in 1995.

Danny Sullivan was well known enough to star in his own game, Danny Sullivan’s Indy Heat. It was originally a 1991 arcade release, developed and published by Leland Corporation. The game was ported to the Commodore Amiga, Atari ST, and Commodore 64 in 1992 in Europe. Those versions were developed and published by Sales Curve. The NES version was released in August 1992 in North America, and also appeared in Europe in 1992. This port was developed by Rare and published by Tradewest.

Is that a Transformer in his glasses?

Danny Sullivan’s Indy Heat is a top-down single-screen racing game. You compete with four other racers, including Danny Sullivan in the yellow car, across multiple laps of nine different tracks. In single player mode you control a red car. The game continues to loop over all nine tracks again until you lose too many races, and sadly there is no real ending to the game.

The controls are simple. While driving, you hold A to accelerate and release A to brake. The B button uses a turbo for a quick speed boost. You steer with Left and Right on the D-pad. Up and Down have no function in the game so there’s no need to worry about shifting gears. You also use Left and Right to enter your initials at the beginning of the game or to select any upgrades later on. Both the A button and B button are used to confirm selections. The Start button starts the game and pauses the action during a race. That’s all there is to it!

The first thing you’ll do in the game is press Start on the name entry screen. Danny Sullivan’s Indy Heat supports up to four players at the same time with the NES Four Score accessory. First player gets the red car, second player blue, third player green, and fourth player white. Danny Sullivan is always the yellow car for a total of five players. Each race has five drivers going at once and computer opponents fill in all remaining slots. You will first enter your initials and then the driver you want. The driver selection is just cosmetic so pick the one that looks the neatest or most like you or whatever. The game proceeds once all players have made their selections.

Make Danny do all the work.

From here the game shows the location of the next race, but before you get to the action you can select upgrades for your car. You begin with $100,000 to spend on your vehicle any way you want and you win more money the more you play. The easiest way to jump into the action is to let Danny choose your upgrades for you. Danny’s Choice is pre-selected, so press A or B if you want him to choose. He will spend as much available money as possible on what he considers the best upgrades automatically. Then you can press A to begin the race.

Here are the upgrades you can pick from if you want to decide yourself. Turbos cost $30K for a pack of 10. These are quick bursts of speed you can engage at any time during a race by pressing the B button. You begin with 60 of them and can hold up to 200. All remaining options are permanent upgrades for your car. Brakes cost $30K and let you stop faster when you let go of A. Tire upgrades cost $40K each and better tires let you reduce skidding on the track and give you better turning speed. The Crew option costs $40K and lowers the amount of time you will spend in pit lane. MPG costs $50K per upgrade and gives you better gas mileage so you don’t have to make pit stops as often. Finally, the Engine upgrade increases your acceleration for $50K each. You start at level one across the board and can upgrade each option as high as level ten over many races.

Now it’s time to race! Gameplay is in the top-down view and you can see the entire race all at once. The action is very straightforward, simply drive along the track in the direction everyone else is going. Left always turns your car left and Right always turns your car right relative to the direction you are driving. It might be a little disorienting to turn your car while heading downward, but with a little experience it becomes second nature. If you need a little burst of speed for any reason, simply tap B to use a turbo.

I don’t know why the highway runs across the track.

The bottom of the screen displays specific information color-coded within a small box for each player. The left side of the box is the condition indicator of the car. This lets you know if you are okay or if you need to make a pit stop. The middle contains an indicator for your RPMs and what gear you are driving in. The right side displays a bar on top for fuel and a bar on bottom for your turbos. Fuel decreases as you drive, and turbos decrease as you use them. Even though you can purchase many turbos, your car can only hold 25 at a time, so the bar indicates how many you have while in the car.

Somewhere on the track is a large sign that displays other information common to all drivers. The top part of the sign shows who is winning the race. The sign displays which lap each driver is on, color-coded to match the race car, as well as the position order. If your color is on top, you are leading the race. The final lap is displayed as F. Below that shows how many total laps are in the race along with the time elapsed for the current race.

You will need to make pit stops in the game. The indicator on the bottom of the screen lets you know if you need to pit, and also a member of your pit crew in your matching color will hold up a sign on the race track letting you know that way. To pit, simply drive onto the spot in pit lane of your color. You don’t have to let go of the gas or anything. You will stop automatically and your pit crew will go to work, repairing any damage to your car, refueling the car, and maxing you out on turbos. Keep in mind that the race is still going on while you make your pit stops, so make them count.

Pit stops allow you to refuel, repair, and replenish turbos.

Danny Sullivan’s Indy Heat has a damage system as well. If you collide with a wall too hard or another racer rams into your car, you will see small pieces fly off. If this happens too many times, either the front or back of your car will catch on fire, reducing your driving performance dramatically. You can make a pit stop to fix the damage, but this will set you behind a lot if you need to make an extra unscheduled pit stop because of this. This can also work to your advantage because you can intentionally damage Danny or any of the other drivers, putting them in the same predicament and giving you the upper hand.

There are nine tracks in all. They are Western Canada, New Jersey, Southern California, Michigan, Illinois, Ohio, Eastern Canada, Colorado, and the Tradewest Speed Bowl. All tracks are five laps long except for eight laps in Illinois and twelve laps in the Tradewest Speed Bowl. The two longer races are simple, round tracks, while the other ones can have several twists and turns.

At the end of each race, you earn both points and money depending on how well you do. First through fifth place earns you 20 points and $100,000, 16 points and $90,000, 14 points and $85,000, 12 points and $80,000, or 10 points and $75,000 respectively. You will see the standings for the current season of nine races. Then you have the opportunity to spend the money you just earned on more upgrades for your car. For the Tradewest Speed Bowl, both the points and dollar amounts are doubled. In addition, there is a bonus dollar award after this race depending on the final standings from the entire season of nine races. This award money is also double the purse for any individual race. You end up with a huge influx of cash for finishing the season that you can put toward the first race of the next season.

Get knocked around too much and your car catches fire.

If you are unable to win a race, you lose a life. You get three lives to start the game. You can’t earn any more of them, and there’s no way to see how many you have remaining. If you lose all three lives, you can continue up to three times. Losing a life always puts you at the next race no matter how badly you do. When all lives and continues are exhausted, your final score is shown and ranked against the high score chart.

I have played Danny Sullivan’s Indy Heat before as part of the NintendoAge weekly contests. I only played a couple of times that week and performed reasonably well for a new player. I bought my copy at a game store for $8 sometime in 2014. I had never been to this game store about an hour away from home, so I made the most of it and bought a small handful of games for solid prices. This is an uncommon game, so I was happy to snag a copy the first time I saw it for sale. The game sells for around $20 now, mostly due to relative rarity.

I knew I could beat the game again since I did it once before during those contests. I decided I would play through the game twice, once to warm up, and again to record. I set a soft goal for myself of reaching the top score on the high score list, so I had to earn over 500 points to do that. I had not reached that score when I played the game for the contests, and on my first attempt this time I still fell short. Lucky for me, during my longplay video I earned 544 points over exactly three seasons of racing. I lost the Tradewest Speed Bowl on my last life, meaning I earned a bunch of bonus money that I wasn’t able to put to use. That didn’t matter anyway since I had maxed out on upgrades late in the third season. I was happy getting that far in the game with a nice score.

Danny becomes too much to deal with at the end.

One aspect of the game that can be really annoying is Danny’s aggressiveness level. If you are behind in the race, Danny eases up and goes slowly. He gets more aggressive if you start closing in on him, and if he is behind you he goes all out. This is often referred to as rubberbanding, as if you and Danny are connected by an invisible rubber band and he is easily able to close the gap between you two if he is behind. There is a tricky balance when making games to build this kind of effect into the game without making it visibly appear to be unfair. In this game, the developers didn’t come up with a good way to balance the difficulty other than to give Danny impossibly high speed when he is trailing. The rubberbanding here is one of the more severe cases I’ve seen. Losing a race because Danny drives faster than you possibly can is both frustrating and unfun. The best technique I found was to stay just ahead of Danny at all costs so that he will at least keep pace with you. Earlier in the game I could skip a pit stop late in the race and just turbo my way through the course if I ran out of fuel. Later on, Danny will become too much to handle unless you can play perfectly for a long time.

Having said all of that, you might be wondering why on earth I could rate Danny Sullivan’s Indy Heat a 1/10 in difficulty. If you have been paying close attention and done the math, you may have figured it out already. You can see all the races and effectively beat the game without doing much of anything at all. The key is that you don’t have to repeat levels in this game if you lose a race. With three continues of three lives each, plus the three lives you start with, you can have up to twelve lives total. With only nine races, you can lose every race and still go partway into the second season. I tried it for myself and it works. Start each race and put the controller down. Coming in last each race still gets you 10 points and a trip to the next race. Make sure to continue when given the option. You don’t even have to buy upgrades. With the bonus points from the final race, you can earn 130 points and 8th place on the high score list by barely lifting a finger. I’m not saying you should play the game this way, but if you wanna stick it to that rubberbanding cheat I can’t say I blame you.

Danny Sullivan’s Indy Heat is a fun racing game. For a single screen game, there is plenty of variety in the race tracks and there’s enough room to get around them. The tiny car sprites are well detailed and animated. I didn’t notice much flickering where I might have expected to see some. The track details are also well drawn. The music is solid as well. Four player games don’t come around often, and I imagine this would be a fun one to try with a group of people. The only real downside is the frustrating rubberbanding AI of Danny Sullivan. In the long run of this NES completion project, this game will only be memorable for how simple it is to see everything in the game without actually needing to play the game. That only affects me, and I certainly don’t mind an easy clear on occasion. For everyone else, this game is worth at least one try.

#85 – Danny Sullivan’s Indy Heat

#85 – Danny Sullivan’s Indy Heat (High Score)

 
AUG
22
2016
1
Ikari Warriors Box Cover

#24 – Ikari Warriors

This challenging top-down shooter is an early contender for most difficult NES game ever.

Not shown is the neat animation with the heroes wasting a lot of ammo on nothing.

Not shown is the neat animation with the heroes wasting a lot of ammo on nothing.

To Beat: Reach the ending after Level 4
My Goal: Beat the game without using the continue code
What I Did: Beat the game without continues
Played: 4/26/16 – 8/18/16
Difficulty: 10/10
My Difficulty: 10/10

I think that I have accomplished many impressive feats in a number of NES games over the years. Name a popular NES game that has any pedigree of difficulty and I have most likely beaten the game with ease many times over. There are many other NES games out there that are less talked about that also pose a stiff challenge. This is where Ikari Warriors fits in. I have come to find out that the NES version is known primarily for two reasons. One reason is that it is part of a series of three NES games, and the other is that it is generally mentioned in a short list of the most difficult NES games to clear among players with a broad understanding of the library. Now that I have experienced this game in full on my own, I can attest that it deserves its rank among the most challenging games on the console.

Ikari Warriors started out in the arcades in Japan in February 1986 titled simply as Ikari, meaning Fury. It was released worldwide a month later in March 1986. Ikari Warriors was developed by SNK and published by Tradewest in the United States and Europe. It is regarded as the first major arcade hit for SNK in the US. The NES game was developed by Micronics and published by SNK. It was released on the Famicom in Japan in November 1986 and it made its way to North America in June 1987. In addition to the NES version, it was also ported to the Atari 2600 and Atari 7800 as well as several home computers.

The arcade cabinet utilizes rotary joysticks, and though the game was not the first to use that type of joystick it is the first major hit to use one for the controls. A rotary joystick is a standard eight-way joystick that can also be twisted like a dial or knob providing additional input into the game. In Ikari Warriors, the player character can walk around by tilting the entire joystick and aim weapons in another direction by rotating the joystick handle in the desired direction.

The plane crash cutscene is surprisingly well done!

The plane crash cutscene is surprisingly well done!

Ikari Warriors is a vertically scrolling top-down shoot-em-up game. Paul and Vince are two soldiers who are tasked to invade an enemy nation as their plane crashes into enemy territory. The game begins with the crashed plane at the bottom and play constantly continues upward as they make their way deeper into enemy territory. In single player only Paul is used. Paul is equipped with a machine gun capable of firing three on-screen bullets at once. He is also armed with grenades that can be thrown in an arc and they deal more damage than the standard bullets. Press A to throw a grenade and press B to shoot the machine gun. Ammunition is limited to a max of 99 bullets and 99 grenades, and while that sounds sufficient it is easy enough to run out of weaponry in a critical spot unless more ammo is found.

There are a bunch of enemies to contend with along the way. Most of the enemies encountered are blue foot soldiers but they have several different attack patterns that they can use and you can only tell how they will behave by observing them. Some soldiers simply run forward and retreat, some shoot bullets and change walking direction every few steps, some chase you around, some toss grenades, some hide underwater and pop up occasionally to shoot, some snipe you from afar, some fire missiles, and some trigger a suicide explosion when you get too close.

There are also several types of larger enemies that require more than the standard bullet to dispatch. There are tanks that drive around a defined path and shoot missiles, including a big tank that can be difficult to take out. There is a large stationary tank that fires a spread shot as well as a large fortress with a gunner inside. There are other enemy types that are local to specific areas in the game and as a result they appear less frequently than the standard enemies described here.

If only the plane had crashed further ahead...

If only the plane had crashed further ahead…

In addition to the enemies there are three other recurring hazards that must be dealt with. The ground in Ikari Warriors is scattered with landmines that only reveal themselves when in close proximity. There is ample time to recognize and avoid them, but in the heat of battle a little bit of lost focus is all it takes to collide with a mine and lose a life. The next recurring annoyance are sensors that also show up when standing nearby just like the landmines. Get too close to a sensor and a guided missile shows up from offscreen and explodes right on top of the sensor. In some cases, it is possible to run right through a sensor and miss the eminent explosion entirely, although that is a risky strategy that does not always work. The third danger is what I like to call the “hurry up” missile. The game requires constant progress and so to enforce that if the screen does not scroll for awhile or even advances ahead too slowly, a series of missiles will fire down randomly from above until you make enough forward progress. It’s really important to take your time in this game while also being mindful of moving forward enough to avoid triggering these missiles.

Fortunately Paul and Vince have a number of upgrades and pickups that are essential to completion. The most important of these is the rideable tank. A flashing stationary tank indicates that it is ready for personal use. Press A while standing on the tank to get in. While in the tank you can only attack by pressing B to fire missiles that deal grenade damage at the cost of one grenade. When on foot grenades only deal damage when they hit the ground, but missiles fired while in the tank hurt enemies at any time along the flight path. The tank does not take damage from bullets, but being hit by a grenade, missile, or even a grenade explosion causes the tank to stop working and self destruct after a few seconds. In that case, you must exit the tank by holding the A button and pressing B and get out of the way quickly. The other benefit to the tank is that you can aim in one direction while moving in another direction. The NES does not have any sort of rotary joystick, and with the lack of buttons on the controller that means on foot you can only fire weapons in the direction you are walking. The tank gets around this by taking advantage of the unused A button while riding. Hold the A button and press the direction pad while not moving to rotate the turret in one of eight directions.

While tanks are incredibly useful, they do have some drawbacks. Typically a tank will start off with 100 units of fuel that tick down via an onscreen counter. When it reaches 10 it will set off an annoying low fuel chime, and when it hits 0 it stops working and starts the self destruct sequence. Just like when the tank is destroyed you can escape when out of fuel, but you must be quick! Tanks also cannot be driven in water. The game is very intentional about placing bodies of water where you are forced to ditch the tank to proceed forward.

That sweet, sweet tank!

That sweet, sweet tank!

It’s worth mentioning that in a few spots you get the chance to pilot a helicopter for a very short time. You can fly over the water and most solid obstacles as well as fire both a triple shot and missiles if you so choose. The only problem is that it only starts with 28 units of fuel, but it is fun and helpful while it lasts.

Aside from the heavy equipment there are several other powerups. The basic ones are usually dropped when pink soldiers are defeated. The F powerup allows bullets to penetrate walls and other solid obstacles. The L powerup extends the range of shots and the S powerup makes shots travel faster. The B powerup strengthens the grenade by greatly extending the damage radius of the blast. All four of these powerups will also apply to the missiles fired while riding in the tank. Occasionally a green soldier will appear that leaves a K powerup behind that destroys all enemy soldiers on screen when grabbed. There are also ammo pickups typically found when destroying the larger stationary enemy types. Grenade ammo restores 50 grenades up to the 99 maximum and the bullet ammo fully restores the bullet count back to 99. The fuel pickups are the best. Not only do they restore fuel back to the maximum of 100 if you are riding in the tank, but they also act as both grenade ammo and bullet ammo even when not in the tank. Sometimes when destroying a small enemy tank a regular rideable tank is left behind that you can get in. These tanks can be a really useful surprise but they only give you 32 fuel to start with so their use is limited.

There is also a set of special powerups that do not appear from enemy drops except in some very rare cases. These powerups are hidden throughout the levels and are made visible by shooting their hiding places. Memorizing the location of these special powerups is essential to success in Ikari Warriors. The SS powerup doubles the walking speed from lethargic to at least an acceptable pace. The knife powerup allows Paul and Vince to defeat most enemy soldiers by simply bumping into them instead of taking a death when that occurs. It also makes them immune to a few types of enemy attacks making the knife more of a defensive upgrade than an offensive upgrade. There is a super fuel powerup that looks like a fuel can with the letter H written on it. It restores all ammo as well as setting the fuel to 200 when in a tank, though I found that only came into play one time in the entire game. There is a triple shot powerup which sounds great but ultimately it should be avoided at all costs. Upon collecting the triple shot all bullet powerups are stripped away. If you have the triple shot and grab a bullet powerup, then you lose the triple shot. Now only does it downgrade your machine gun but it also affects tank missiles so it is not worth it at all. Finally, the heart powerup is the most critical powerup in the entire game. Collecting a heart allows you to keep all of your weapon powerups including super speed and the knife if you die. It only works once so you will need to find another heart if you die while having one.

Gates aren't really checkpoints but they do provide a brief change to the main music loop.

Gates aren’t really checkpoints but they do provide a brief change to the main music loop.

There is also one more set of items that simply add to your score. An ammo box is worth 1000 points, the clock is worth 2000 points, and gold bars add 5000 points. There is also the bikini-clad Athena from another popular SNK arcade game that bestows a random number of points. You can earn 1500, 2500, 5000, or 10,000 points when you touch her. That is not nearly as creepy as it sounds!

You may have noticed I did not mention any extra life pickups. That would be because there are none in the game. The scoring items are useful because you can gain extra lives via point milestones. You get an extra life at 50,000 points, another at 100,000 points, and an additional life at every 100,000 points beyond that. You start the game with two lives and adding more through score is the allotment for the entire game. While there is a score counter, grenade counter, and an ammo/fuel counter, there is no way to see how many lives you have other than tracking it mentally yourself.

There are no continues in the game, so when the lives are through it is Game Over and back to the start. Now there is a continue code that is just about as well known as the game itself. There is a lengthy delay between losing the last life and Game Over, and if you input the buttons ABBA within that period you will respawn with two additional lives. It is a simple code, but unfortunately it is not published in the manual that came with Ikari Warriors. Therefore to me the usage of the continue code is strictly off limits. As it turns out there is a specific part of the game where the continue code is rendered useless anyway.

These club wielding hulks only show up in Stage 2.

These club wielding hulks only show up in Stage 2.

I think the picture is starting to paint itself for why Ikari Warriors is so challenging, but it gets far worse from here. While the arcade version and all the other Ikari Warriors ports to my knowledge contain only one long level, for some reason the developer Micronics decided to lengthen the NES game considerably by adding three more levels of equal length. I watched a full playthrough of the arcade version and the entire game consists of the first three-quarters of NES Ikari Warriors Level 1 with the other quarter of the game loosely resembling part the end of Level 3. This is the root of why Ikari Warriors is such an incredible gaming feat to finish. The four long levels add up to about an hour of play all the way through with a strictly limited allotment of lives. Even with the continue code there is still a portion of the game that needs to be memorized where the code fails, not to mention the effort it takes just to reach that point in the first place.

Truly the way to beat Ikari Warriors on NES is to flat out master the game all the way through by playing it over and over again. Many of the enemies and powerups are predetermined so the game is largely an exercise in anticipating the enemy threats and developing the muscle memory to fight through these threats in an appropriate manner. However some of the enemies and hazards have randomness to them that can easily throw a wrench into the best laid plans. One unexpected fatal attack with no heart to revive powerups can utterly cripple a playthrough at just about any time. The game also pulls a dirty trick by removing all powerups at the start of a new stage unless you happen to hold a heart all the way to the end of the previous level.

Naturally with the amount of time I spent trying to beat Ikari Warriors I think it is clear that this was my first time beating the game. There is no special story to how I got the game because it is pretty common to find and cheap to boot. I think it’s easy to find because it is both an early NES game and one that not many people want.

This is both the hardest screen in the game as well as the strangest one.

This is both the hardest screen in the game as well as the strangest one.

Here are some statistics of my time spent with Ikari Warriors that should indicate just how deep this rabbit hole went. I started playing the game on April 26th and my winning run was on August 18th which is a span of 115 days. There were 14 days where I was not able to make an attempt so I played the game for 101 days. It took me a whopping 328 attempts from the start to beat Ikari Warriors and my total game time was 103 hours and 50 minutes. (My timekeeping was rough at best but it’s reasonably close.) Including off days I played slightly fewer than three attempts per day with an average play time of 19 minutes per run. The most impressive stat of all is that I did not break a single controller while playing this game. Talk about willpower!

I also documented some milestones because why not?

  • 05/08/16 – Attempt #91 – Finished Level 1
  • 05/13/16 – Attempt #106 – Cleared Level 1 deathless
  • 06/15/16 – Attempt #210 – Finished Level 2
  • 06/28/16 – Attempt #237 – Cleared Levels 1 and 2 deathless
  • 07/13/16 – Attempt #269 – Finished Level 3
  • 08/04/16 – Attempt #303 – Reached the Final Boss
  •  

My last day of playing Ikari Warriors was somewhat interesting due to some external circumstances. I have had times where I really struggle to get gaming time in my personal life and I had to go to some lengths to try and get attempts once each good run started reaching 45 minutes and beyond. I typically stay up really late to play but sometimes I sleep for a couple of hours and then wake up to do some chores and sneak in some video games while everyone else is asleep. My winning run happened during the early morning but this time it was way later than normal. I got up at 3:00 a.m. to do dishes and then against my better judgment I decided to start a run after 4:00 a.m. My penultimate run was a pure throwaway run when I lost all my lives at the very beginning of the game, and then I started a new game and made it to the end. I finished at 5:20 a.m. and my hands were shaking as I took as many pictures as I could while trying to cherish the moment. I was beyond pumped but I had to keep it down not to wake up anyone. I tried to go back to bed for a little while but I think I got barely a few minutes of sleep after all of that!

Behold this rare screenshot of the final level!

Behold this rare screenshot of the final level!

My winning run was really solid from a game play perspective. I cleared the first two levels without dying which had been a problem on many late attempts. I died once at the end of the helicopter section in Level 3 and I took an intentional death at the end of the stage to clear it. I never could figure out how to finish that section without dying so sacrificing a life there to ensure forward progress is the next best thing. Level 4 was the best I have done on that stage. I can’t remember if I died once randomly there but if I did it was only once and in a good spot. The final segment of the last stage is very difficult but manageable with all powerups intact and I got there with maybe five lives remaining. I died a few times to the last couple sets of enemies and I lost all of my powerups right before the final boss. I died once or twice to the final boss but I managed to get into what I think was a safe spot and I beat the game from there. I think I may have had one life remaining but I could very well have been on my last life. The ending screen is just horrible but oh so sweet to lay eyes on!

I think most people would agree that the legitimate way of beating Ikari Warriors is to avoid using the continue code, even though the premise of trying to beat the game on a single credit is ridiculous enough to begin with. The question I have is if the developers intended for players to use the continue code to work through the game normally. The ABBA code is both short and easy to remember and there is a long enough window before the Game Over screen to input the code successfully. On the other hand, there is a stage select code that is a whopping 32 key presses long, so why would the continue code be so much shorter if it were really meant to be hidden? The thing is that I can’t find any evidence of how the continue code was first revealed. It’s not included in the manual, so perhaps it was spread by word of mouth, published in a gaming magazine, or revealed publicly by the creators somewhere. The truth may never be known. That said, there’s a documentary video of SNK on YouTube that contains a segment about the decision to add the continue code to the NES version of Ikari Warriors. I will leave it up to you to decide what that true intention was.

I really can’t recommend anyone to try and play through Ikari Warriors like I did. I was dedicated to beating this game as much as anyone and it took every ounce of effort and time I could pour into it. The game itself is competent for 1987 but not particularly notable outside of its crushing difficulty. The player character is way too slow for this kind of game and the NES port is hurt by not allowing walking in one direction and aiming in another. The graphics are okay and the music is okay as well even though there are only two songs in the entire game that loop constantly. The game is average at best and the difficulty for sure drags it down to below average overall. If you are dead set on trying it out, please consider using the continue code. If you want to try beating it the same way I did, then you have my deepest sympathy.

I don’t know if Ikari Warriors is the hardest NES game, but of all the games I’ve played on the console I know this is easily the most difficult game I’ve finished and I consider my victory one of my top achievements in all of gaming. In spite of all the flaws and difficulty, I had fun with it. If I ever have the opportunity to show off my NES gaming skills this will be the game I pick now that I know I can handle it, and now I won’t be embarrassed to use the continue code!

#24 - Ikari Warriors

#24 – Ikari Warriors

Final Score - 577,600

Final Score – 577,600