Take on the NES Library

An 8-bit Extravaganza!

operation

MAY
10
2019
0

#118 – Thundercade

Where there’s lightning, there’s Thundercade.

Featuring a slow rise and shiny gleam!

To Beat: Reach the ending
Played: 3/10/19 – 3/16/19
Difficulty: 7/10
My Difficulty: 7/10
My Video: Thundercade Longplay

Thundercade appears to be an unassuming game. It’s a scrolling shoot-em-up and an arcade port. These are things we’ve seen come up time and time again, and there will be plenty more like this. There’s just one thing that sets Thundercade apart from the rest. This game is hiding a deep, dark secret. Not a malicious one this time, but it’s something quite extreme that I haven’t seen before on the NES. But before we get there, let’s take a look at this game.

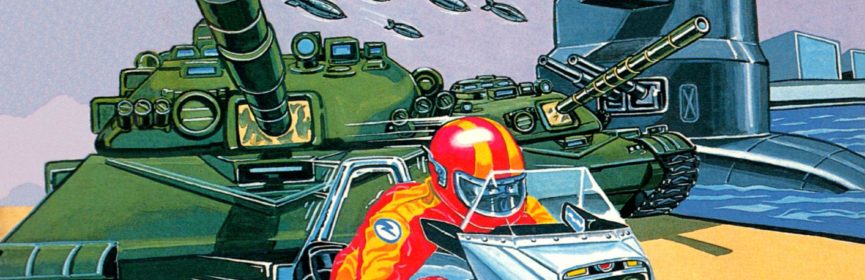
Thundercade was released in arcades in 1987. It was developed by SETA and published by Romstar. The game is also known as Twin Formation in some regions. The only other platform the game appeared on was the NES in July 1989. The NES port was developed by Micronics, published by American Sammy, and released only in North America. This is the first American Sammy published game I have played for this project.

Unlike the arcade version, the NES version included a brief story in the manual. The AATOM, Atomic Age Terrorist Organization of Miracali, has built a nuclear power plant and are threatening to destroy the world with it. You play the role of a combat motorcycle driver under Operation Thundercade with the goal of stopping the terrorist threat. The mission takes place over four areas, culminating in a final battle at the nuclear plant. Destroy the power plant to complete your mission and beat the game.

This tiny motorcycle just blew up a huge building.

This is a relatively simple game with simple controls. Use the D-pad to move your motorcycle in all directions. Press B to fire your cannons. You have unlimited shots but no autofire. Press the A button to deploy bombs via your air support. Bombs typically remove all enemy shots from the screen while dealing heavy damage to parts of the screen. If you deploy another bomb right after the first, then the bomb pattern for the second bomb covers more of the screen. You start the game with three bombs as indicated by the B in the lower left of the screen. You also see the number of lives remaining at the bottom and your score on top. This game has two player simultaneous play with the second player’s information on the right side.

Your normal cannon fires single bullets straight ahead, which are weak in the thick of the fight. Supplement your firepower by attaching side cars. This setup is reminiscent of Tiger-Heli (another Micronics-developed NES port) and its support helicopters. You can find side cars out in the open or within destructible objects like buildings. Simply drive into them to attach them to your motorcycle. They attach to whichever side of the motorcycle you touch and you can have one on both sides at the same time. Collecting a new side car replaces the old one on that side. Some side cars fire shots horizontally while others supplement your vertical shots. You can mix and match to your heart’s desire. Side cars are destroyed when shot, acting as defensive tools since they shield you from taking damage. Your motorcycle is otherwise destroyed in a single hit. There are several different kinds of side cars and you can find more powerful ones later in the game.

One car can shoot ahead and the other shoots sideways.

There are other pickups to find besides side cars. Red bomb icons add a bomb to your reserves. You can also find 1up icons for those precious extra motorcycles. The V-shaped icon is a Vulcan cannon which is a very powerful weapon. You automatically get two side cars with cannons that fire large bullets in a V-formation. This is hands down my favorite weapon in the game. You get to keep it until you die, lose a side car, or collect a different side car. These items are all hidden in the environment and you need to blow up various objects to reveal them.

There’s one more item that sends you off to a bonus game. At the end of the first two stages is a boss battle with a huge gunship. It has multiple turrets that you must destroy. If you take too long to defeat it, enemy support helicopters start appearing and the fight is much more difficult. If you can manage to defeat the gunship before that happens, then the bonus stage item appears behind it. The bonus game is an opportunity to grab a bunch of items. The view changes to side scrolling and a plane will fly overhead, dropping the goods. Steer left and right to collect them as they fall. Most of the items are parachutes that contain four missiles each. At the start of the next stage, you will automatically fire these powerful missiles when you shoot your normal cannons. Too bad they only last at the start of the following stage because they are quite powerful. You can also collect bombs, 1ups, and Vulcan cannons from the bonus stage. You also enter the bonus stage for free just for completing the third stage.

There’s an interesting game mechanic that comes up from time to time. There are sometimes inclines or other hazards such as pools of water that you can jump over. Simply drive into the obstacle to fly high. While airborne, your movement is slowed considerably, but you fly over all enemies’ shots and so you can’t be hurt during this time. Just make sure to steer to a safe landing spot.

Look ma, no hands!

While you don’t have too many lives to spare in Thundercade, there’s only a few ways you can be killed. You can touch most solid objects freely without being damaged. You will die however if you get squished against the bottom of the screen due to scrolling. Enemy bullets and the enemies themselves will beat you when you touch them. You are able to defeat basic enemy soldiers by driving into them. Given your advantage over them it makes sense, but not too many games implement a feature like that.

You start the game with three lives. You don’t earn lives from points in this game, only from 1up items. There are several of them in the game if you know where to look. Dying gives you a new motorcycle as play continues, as well as a fresh set of three bombs. Lose all of your motorcycles and it is Game Over. You then see a screen showing a map of your overall progress, the total number of shots fired, number of enemy hits, and your hit rate as a percentage. It’s curious to see your hit rate in a game that encourages you to shoot everything, thereby decreasing your rate. You get the same screen after completing each stage too. You can continue your game twice and the game will place you at a nearby checkpoint within the current stage. If you can clear the third stage, you earn a third continue.

This was my first time playing Thundercade. This is a game I know I’ve seen before in old gaming magazines that I never got a chance to play until now. It looked interesting but not interesting enough to rent or find cheaply. It turns out it is a cheap, common game that can be had for about $5.

Of course you go up against a gigantic tank.

Playing this game can be a bit slow going at first, but most of the game isn’t really that difficult. Bombs and side cars are plentiful and they helped me make rapid progress. After a few tries, I reached the final stage. I found that the last half of the final stage was a steep upturn in difficulty. There’s a big section with these huge turrets that emerge from the ground. Not long after they pop up they fire a string of missiles in your direction. Having good side cars is crucial here, otherwise your normal shot can’t really keep up and there’s not a lot of wiggle room to get around. The final showdown at the nuclear plant is also really difficult. There are ten snipers that briefly appear at each of ten windows. All of them aim at you but at different intervals, so you have to weave around all the bullets carefully over just the lower part of the screen. Worst of all is that your bombs here don’t remove enemy bullets. It can be a long, grueling fight. Each sniper takes several hits to defeat, but eventually you’ll defeat a few making the fight easier the longer it goes on. My run for my longplay video was just okay. I used a continue in Level 2 and another in the last stage. I’ve made it to the last part on the first credit before.

Now it’s time for the big reveal of this game’s deep, dark secret. This isn’t exactly a spoiler since it’s easy to miss. Thundercade has a special ending. If you beat the game, you might notice that this game doesn’t loop again like many shooters do. You have to let the game sit on the ending screen for roughly one hour of real time before the special ending appears. There will be a procession of tanks and soldiers, followed by a developer message written in Japanese. I suppose the localizers missed this entirely, but can you blame them? Thanks to The Cutting Room Floor, you can read the translation of the special message. After all that wait, it doesn’t stay on the screen very long before going back to the title screen. I left my recording running so I captured the special ending. I left the room with the game running but managed to walk back in the room in time to watch most of this ending live.

Even though Micronics has a poor reputation as far as their game output on NES, Thundercade is a pretty decent shooter that I enjoyed. The whole package is not incredibly special. The graphics are okay. They did a good job with all the destructible buildings and things. The music is repetitive – there’s only one main song throughout most of the game – but I found it catchy enough and didn’t get tired of it. The controls were responsive. The game mechanics have mostly been found elsewhere, which is a little disappointing. Overall, I consider it an average, run-of-the-mill type game. There are plenty of better NES shooters, but Thundercade isn’t all that bad and it is worth trying out if you like shoot-em-ups.

#118 – Thundercade

 
MAR
31
2016
2
Operation Wolf Box Cover

#20 – Operation Wolf

Gun down the enemy forces in this Zapper-compatible version of the arcade classic.

Calm yourself before heading into terrorist territory!

To Beat: Beat all six missions to reach the ending
To Complete: Beat four loops
My Goal: Beat the game with the best ending
What I Did: Beat the game with the best ending and reached Loop 3 Mission 6
Played: 3/18/16 – 3/25/16
Difficulty: 5/10
My Difficulty: 5/10

It’s a landmark day for Take On The NES Library as I have come to the first Zapper game on my list. Operation Wolf is not one of the first Zapper games that comes to mind, but it’s a pretty good one and it looks to be a mostly faithful port of the arcade title.

Most people with knowledge of the NES from its heyday will certainly remember the Zapper peripheral. It was first released on the Famicom in 1984 as a pack-in with Wild Gunman. The Zapper later launched along with the NES in 1985 for use in launch titles Duck Hunt, Hogan’s Alley, and Wild Gunman. Perhaps it is most remembered for being part of the NES Action Set which included the Zapper and the ubiquitous Super Mario Bros./Duck Hunt combo cart. The light gun has a gray color scheme that was changed to orange in 1989. This was done in compliance with changes in US gun regulations requiring toy guns to look like toy guns. The two Zappers are identical aside from the color differences.

The Zapper works by detecting the presence of light through a photodiode within the device. When the gun is fired, the NES draws a black screen on one frame followed by other frames of a black screen with white boxes indicating the location of the hittable objects. The zapper can detect the white light from the box drawn on-screen to determine if a target is hit. In the case of multiple targets, the game will show more frames like this with only a portion of the objects highlighted. This process is repeated until it can narrow down which target was hit.

Honest to goodness this is what the NES screen looks like when you pull the trigger

Honest to goodness this is what the NES screen looks like when you pull the trigger.

That explanation might be a little hard to follow but a possible example may help. Say there are four enemies on the screen and the trigger is pressed. The first frame will be an all black screen and the second frame is a black screen with white boxes placed on top of only two of the four targets. If the Zapper detects light this time, then it knows you shot one of the first two targets but it doesn’t know which one. The third frame draws the black screen and only one white box for one of those two targets. If the Zapper sees light on this frame then you shot the first target, otherwise if it doesn’t pick up light then you shot the second target. Going back to the second frame, if the Zapper doesn’t detect a hit, then it will draw white boxes on the next frame for the other two targets to see if you hit one of them. If so, then it will draw a fourth frame to determine which of those two was shot. If it does not detect a hit here, then it means none of the targets were hit because by this point all four were checked. If that is all still a bit murky, don’t worry! The basic idea is that the game will test half of the targets at a time for a hit and it keeps whittling it down until it can find the one you actually shot.

It’s worth mentioning that the first all black screen is really important. The Zapper can detect light from the television as well as light from other sources such as a light bulb. If the Zapper game doesn’t check for a non-hit at first, then there is nothing to stop you from aiming the gun at a light bulb tricking the game into thinking you are always making contact with a live target. TVs in the US run at 60 frames per second so it would be more or less impossible to shoot at a light bulb while rapidly turning it on and off to fake out an NES Zapper game.

The Zapper technology only works on older tube TVs called CRT TVs; the games are not playable on modern TVs such as LCD, Plasma, or LED televisions. The reasoning is that the Zapper is very dependent on the timing of the individual frames of video displayed on the screen as illustrated above. Newer TVs have additional processing time that results in lag where the actual picture on the TV appears one or more frames later than the NES recognizes. For most other games this slight delay is not noticeable, but since the Zapper is tuned to the timing of older TVs it causes the game to not register any hits at all when played on a modern television. Therefore, I had to use my CRT to play this game.

Now to get down to brass tacks.

Now that the Zapper talk is out of the way it’s time to talk Operation Wolf. Developed and published by Taito, Operation Wolf is an arcade game released in 1987. The arcade cabinet is fashioned with a mock submachine gun used to aim at the enemies and it contains a motor inside of the gun housing to simulate recoil. It was ported to many home consoles and computers, including the NES in 1989. This is the first Taito game covered for the blog. Taito published 26 NES games in total so they are one of the largest publishers for the console.

Operation Wolf is also a game series spanning four games. The second game, Operation Thunderbolt, was released in 1988 in arcades. It would see an SNES release several years later. There were also arcade titles Operation Wolf 3 in 1994 and Operation Tiger in 1998. Operation Wolf was also released in 2005 as part of Taito Legends as well as an NES Virtual Console release in 2008. Sadly, the Virtual Console version does not support the Wii remote as a Zapper.

The object of Operation Wolf is to survive six missions of infiltrating terrorist strongholds in order to save prisoners and take them back home to safety. Each mission has a number of enemy soldiers, tanks, helicopters, and boats that you must defeat before advancing to the next area. Enemies will run across the screen and you shoot them before they shoot you. If you hold B on the controller while shooting with the Zapper then you will fire a grenade that does a lot of damage within a wide range. The game also features controller support by way of a targeting crosshair on screen. Before the start of play you can choose either controller or Zapper, and if you choose controller you can also set the speed of the crosshair from one of five options. Use the D-Pad to aim the cursor, press A to fire your standard weapon, and press B to launch a grenade.

You’ll be under attack from all over.

On screen you will see a bunch of statistics. It shows the score, number of magazines as well as the number of rounds left in the current magazine, number of grenades, number of prisoners saved in later missions, and the number of enemy soldiers, helicopters or boats, and tanks remaining in the level. There is also a damage meter that nearly spans the entire bottom of the screen. The enemy counters represent your progress through the level. The stages keep going until either you destroy the number of enemies remaining or you take too much damage. They also end if you are completely out of ammo.

There are several powerups to help you out. Ammo is limited but you pick up extra magazines and grenades by shooting the icons for them on screen. A power drink with a letter P on it will reduce your damage meter. A bullet with the word “FREE” written on it will give you unlimited rapid fire for 10 seconds. Barrels explode just like grenades when they are shot. There are also crows, pigs, and chickens that travel across the screen in some of the levels. You can’t kill them but you can shoot them and they will occasionally drop extra ammo to help you out. There are also civilians and prisoners that run across the screen trying to head for safety. Don’t shoot them because if you do it will increase your damage meter.

There are six missions: Communication Center, Jungle, Village, Ammo Dump, Prison Camp, and Airport. In the arcade version you can play the first four levels in any order you like. Clearing all four will unlock the Prison Camp followed by the Airport. The NES version is linear so you must beat all six missions in order. There is also a sort of a seventh mission that appears randomly in between stages. If you see the message “Warning! The enemy has located you!” then that means you have to survive another round of enemy forces before reaching the next stage.

The levels are clearly laid out so you know what to expect.

Each level has something slightly unique about it. The Communication Center is the exception as it acts a little bit like a tutorial level. The Jungle has a boss fight at the end. An enemy is holding a civilian hostage and uses her as a body shield so you must be careful to aim for just the enemy. Completing the Village level heals you up quite a bit, and completing the Ammo Dump rewards you with a full complement of 9 magazines and 9 grenades. The Prison Camp features prisoners that run across the screen calling for help. Your task is to lead them across the screen to safety. There are five prisoners in total and each one will be chased by a knife soldier. He should be your primary target since he kills the prisoner if he reaches him. You can kill the prisoner with your weapons as well so be mindful of that. The game keeps track of each one you save. In the Airport mission, you must lead each prisoner to safety again that you helped in the prior mission. The ending you get depends on how many prisoners you save and you will lose the game if you survive all the missions without saving a single prisoner. The Airport ends with a final boss battle where you must destroy the enemy Hind helicopter. These things would all be spoilers if they weren’t spelled out clearly in the manual.

The game ends if you suffer too much damage, but you are allowed to continue once if you are defeated in any of the first four missions. There are no continues given for the last two stages. It’s frustrating to die at the end of the game but it is pretty short so it doesn’t set you back as much as it first seems. The manual indicates that Operation Wolf has four levels of six missions each. It means that the game loops right after you beat it and there are four total playthroughs of increasing difficulty. There is no difference in the ending when the game is beaten for the fourth time and it restarts the game at Loop 4 difficulty when finished, so it’s not really essential to beat the game four times in a row. One thing I noticed is that if you get Game Over and have to restart the game, then it will start you at the same difficulty loop you were on before. That acts like a continue in its own way.

This was my first time playing through Operation Wolf. I set up my CRT from out of storage whenever I started the blog so I haven’t played any Zapper games in a very long time. I have several Zappers but the one I was using has a loose trigger which didn’t feel great while playing. I recently purchased a R.O.B. set on eBay with all the parts for Gyromite for an excellent price, and that set included a Zapper that felt like it had never been used. I switched to that while playing and it will be my go-to Zapper from now on.

Do the right thing and help that man out!

It took me awhile to warm up to playing Operation Wolf with the Zapper. I simply was not all that good with it to start and it was wearing me out physically after a couple of attempts in a row. Firing grenades in particular was difficult to get comfortable with. I would aim and shoot with both hands which caused me to stumble around with my free hand looking for the controller’s B button whenever I needed to let off a grenade. I could get away with it because I played while sitting, but it would have taken me a lot longer to beat the game if I had to stand up and shoot the gun with just one hand. With two hands I could shoot both faster and more accurately.

Overall it took me around ten tries before considering Operation Wolf finished. I think I advanced farther and farther with each attempt. The game is pretty short and the health bar is generous enough to absorb some mistakes made with shooting, so I figured average difficulty is appropriate for completing one loop of the game to get the ending. The first time I beat it I managed to save three prisoners which rewarded me with the second best ending. My accuracy wasn’t quite up to snuff with just the zapper and I would shoot too many prisoners. I decided to play through again using the controller and the slowest cursor setting in hopes that I would be more accurate overall. I beat the first loop and saved four prisoners which was good enough for the best ending, and during my second loop I saved all five. That was the picture proof I kept. During the third loop I made it most of the way through the airport stage before running out of grenades. That left me too vulnerable to attack when I focused on the helicopters with just the standard weapon. I really had no chance and that leads me to believe that doing all four loops is best accomplished with the Zapper. And really, a Zapper compatible game should be played with it if possible.

Ugh did you really mean to shoot him!?

My intention from the beginning was to beat one loop of the game with the best ending since I knew there was no other reward for playing four times. It can be argued pretty easily that it should take all four runs to beat Operation Wolf considering it is called out that way in the manual, and I’m fine with that criticism if you happen to take that stance. In my opinion the game is long enough to justify a single loop.

Operation Wolf on NES looks to me like a well done port of the arcade game. Using the Zapper makes this one of the better ports by default and this game is quite playable and fun using it. The controller is okay in a pinch but not the best way to play the game. The graphics are alright. The brief story images between levels are well detailed and everything is clear during gameplay when it matters. There is not much sound to speak of which may be a turn off. There are only sound effects during game play, and the brief songs on the title screen and between levels are not that notable. For me, gameplay rules the day, and Operation Wolf is a fun game where that is concerned.

Operation Wolf Ending Screen

#20 – Operation Wolf